The Shack's AeroGrow

The AeroGarden is a;

  • A Viable Growing Option

    Votes: 119 66.1%
  • A Fun Toy

    Votes: 48 26.7%
  • A Waste of Seeds

    Votes: 13 7.2%

  • Total voters
    180

Shackleford.R

Well-Known Member
Hello RIU Community!! The Shack is at it again!
This grow around, I've taken the Ghetto AG Rig used for early seedling development from my current, ongoing grow, and have put it to good use.

The Grow Guidelines:

1-Grow in a7-pod AeroGarden
2-Using the AeroGardenMaster Gardener Kit
2-The seeds will either be from a trusted bag, or possibly from my currently grow I've allowed to go for breeding purposes
3-Strictly CFL from seed -> flower
4-Aerogarden stock nutes for short veg period
5-GH FloraGro Series for flower + FloraLicious Bloom + FloraNectar (Pineapple Fushion)

A bit about the AeroGarden

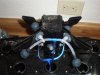
The AG unit will be undergoing a few modifications for the purposes of picking up where the manufacturers left off. The first modification already completed is the addition of CFL lighting in the form of one 23W 6500k spiral CFL . The attached fixture will house the 6500k bulb from sprout and through short vegetative period. After this short period, it will be replaced with a 23W 2700k spiral CFL to enhance the light spectrum for a more robust flowering period. Modified AG light hood pictured below.

Here you can see where I removed the AeroGarden badge to allow the new lamp cord access to the light hood.

shackleford-r-131310-albums-grow-cabinet-picture834463-p5190010.jpg


You can see I have passed zip-ties through the opening for stability.
Next, is a look "under the hood"

shackleford-r-131310-albums-grow-cabinet-picture834465-p5190013.jpg


Here you have a perfect view of how just how the additional fixture has been attached. Utilizing slots for venting and more zip-ties I created a mounting strap of sorts for the fixture. This configuration allows for nice distribution of light, as well as a slight gap between the additional bulb and the hood itself.
The following is an up close look at the "mounting strap".

shackleford-r-131310-albums-grow-cabinet-picture834464-p5190011.jpg


Also not pictured is the aftermarket "Figure 8" lamp cord used for plugging AeroGarden lamp hood to an independent timer.
Future modifications include:

-The addition of air stones and an air pump for oxygenating the nutrient solution. (Pump and stone size recommendations welcome!)
-Covering the AeroGarden"plant bed" with mylar to reflect light under the leaves
-Tensioned (somehow) mylar curtains to drape around the unit

That is all for now, the grow will be getting underway soon, please leave your comments, subscribe and check back soon for an update!!

shackleford-r-131310-albums-grow-cabinet-picture834466-p5190015.jpg
 
I LOVE the pics of the adapted light hood! I knew people did that, but I never saw it pictured! Thanks!! I use 2 6" stones. Good luck!!
 
How exactly did you mod the hood? Is there a piece that comes off, or did you have to cut/drill into it or something?

As for the Air pump, I found that a 10" was too big for my 7-pod AG, and have had MUCH better luck with a trio of small 1" airstones
2795.jpg


just plug em to the end of the air hose, and they're real easy to arrange/move/replace, much more so than a huge clunky 10" airstone
 
lookin great man, im doing the same thing with my AG Hood, tho im using a 7 gallon tub now, i will always love and recommend the AG or begging hydro

keep us posted
 
How exactly did you mod the hood? Is there a piece that comes off, or did you have to cut/drill into it or something?

As for the Air pump, I found that a 10" was too big for my 7-pod AG, and have had MUCH better luck with a trio of small 1" airstones
2795.jpg


just plug em to the end of the air hose, and they're real easy to arrange/move/replace, much more so than a huge clunky 10" airstone

thanks for the comment leova! the hood is VERY simple to modify. the AeroGarden badge in the hood pops out VERY easily, it just snaps out. The badge is then attached to a seperate ring that also snaps out very easily if you want to have a slightly cleaner look than I achieved.

Thanks for the tip on the airstones, i had the thought that several of the small stones would be not only an easier fit but more efficient with less power. I first picked up a 5" and pump brought it home, and HATED its performance. I then made the quick decision to purchase parts and construct my own airflow system to be detailed as follows.

I'm FAR too lazy to type out the parts used, but I will share in photo form each piece. Along with a few reference photos to give you an idea how i went about setting up what i feel to be VERY efficient.

shackleford-r-131310-albums-grow-cabinet-picture834502-p5190016.jpg


Nothing too special..
Tubing (probably more than I'll need for this grow
Set of airstones (1 inch)
T-fittings / Control valvles / Suction cup clips
Pair of air pumps (more on that later)
Aquarium check valve (to prevent backflow)

So let's start at the pump! I used one of the t-fittings to unite the air pumps in pumping harmony. The reason for the two air pumps, is as I mentioned above i started off with a 5" airstone and pump, when I wasn't happy with that, i thought might just add a pump and the small airstones.. got home didn't like it either so decided to "daisy chain" the pumps and go with JUST the 1" airstones powered by the linked pumps.
shackleford-r-131310-albums-grow-cabinet-picture834503-p5190026.jpg


From here we go up some tubing to the main flow control valve, which allows me to dial in the proper amount of aeration. Not seen in the picture is the back flow vale i plan to add AFTER the flow control valve. From here the tubing goes into the tank sacrificing one of my 7-pods.
shackleford-r-131310-albums-grow-cabinet-picture834504-p5190028.jpg


Using the various T-Fittings and suction cups, i arranged 4 of the airstones as deep as the main AG pump assembly would allow. Here is a snap of their layout.
shackleford-r-131310-albums-grow-cabinet-picture834505-p5190029.jpg


Now here is the AERATION IN ACTION!!
shackleford-r-131310-albums-grow-cabinet-picture834506-p5190030.jpg


I went ahead and attached all the parts I used in this construction.. feel free to click through them and ask any questions!


shackleford-r-131310-albums-grow-cabinet-picture834507-p5190015.jpg


Attachments

  • P5190017.jpg
    P5190017.jpg
    63.3 KB · Views: 33
  • P5190018.jpg
    P5190018.jpg
    82.4 KB · Views: 20
  • P5190019.jpg
    P5190019.jpg
    95.4 KB · Views: 20
  • P5190022.jpg
    P5190022.jpg
    75.2 KB · Views: 18
  • P5190021.jpg
    P5190021.jpg
    86.4 KB · Views: 18
  • P5190020.jpg
    P5190020.jpg
    86.2 KB · Views: 24
Thanks SICC, i'm actually taking a step backwards so to speak, scaling because i realized my CURRENT grow is a bit more than i need for just personal use. The link is also in my signature if you want to check i out. By the way i saw your thread the other day, i think may have stole your light idea, haha. more than likely i did. thanks for the comment, keep checking back.
 
Congrats dude. This is a very impressive set up you got here. I love the modifications because every thing is neat and sleek. Good Shit. Very good pictures as well. Keep that up through this grow and it will be very enjoyable to watch. Are you adding more CFL's? I don't think you mentioned you were adding anymore... just curios?
 
Congrats dude. This is a very impressive set up you got here. I love the modifications because every thing is neat and sleek. Good Shit. Very good pictures as well. Keep that up through this grow and it will be very enjoyable to watch. Are you adding more CFL's? I don't think you mentioned you were adding anymore... just curios?

appreciate the love MrAlex, expect a real response once these happy hour margaritas have worn off. i plan to add a pair of 23-26W CFL on either side of the unit. no plans yet as to what size or style...

like i said once i'm sober... real update... haha i'm barely holding it together right now
 
appreciate the love MrAlex, expect a real response once these happy hour margaritas have worn off. i plan to add a pair of 23-26W CFL on either side of the unit. no plans yet as to what size or style...

like i said once i'm sober... real update... haha i'm barely holding it together right now

So after being an ass... time for a real update.
First let me start by saying just about EVERYTHING you saw in the previous update about the air stone mod is out the window. haha. I looked at the setup and just wasn't happy with the functionality of everything, the pump stand kept moving the air stones out of place or pushing them up out of the water, there was too much tubing going everywhere, and there was one too many pumps as well!

So i simplified the setup, overhauled if you will. returned the XP-20 pump and replaced it with the XP-60? XP-125? not sure off the top of my head, i'll check later if anyone is curious. At any rate, after upgrading the pump, i figured the other part of my problem were the air stones themselves. I "upgraded" (in my opinion) to the Elite Aqua Fizz and couldn't be happier!!

One each attached to the front legs of the pump stand in the AG tank produce as much if not more, than the 4 standard air stones, with TWO pumps!! (better quality bubbles too! fine fizzy instead of the large bubble produced by their predecessors) Since i do have an extra pump lying around and other air stones, i'm considering doing something with them, attaching to the back of the pump stand, for more even bubble-age throughout the tank. However since the water is now MORE than sufficiently aerated for this system i'll probably hold off till i'm bored one day!
(pics of the new rig and stones in action to come later)

Now as far as lighting is concerned, as i mentioned in my drunken stupor, YES! More lighting is on the way, in the form of 2-23W CFL desk lamps.

The idea is to have on either end of the tank (facing the unit heads on, one at the left and right) the arm is very well adjustable, and the hood/housing can be swiveled 90 degrees to shine directly in from the side. Also later on during flower will come in handy as auxiliary or side lighting. (Though i plan to go 12/12 at the second node as well as LST at this time, so there won't be much concern about light saturation to the bottom leaves!)

That is all for now, as mods continue and my excitement builds, seeding day soon approaches!!! Leave comments, thoughts, and questions after the beep.....

:peace: and happy growing :hump:

BEEP!!
 

Attachments

  • pPETS-3762552dt.jpg
    pPETS-3762552dt.jpg
    19.3 KB · Views: 80
  • 268980002_44c8e72390.jpg
    268980002_44c8e72390.jpg
    67.9 KB · Views: 409
sounds good man, keep us posted, what lighting do you plan on using for flowering? how many plants are going into the system?


i would suggest some "Y" socket's for the CFL fixture thru the AG hood, so you can have 2 lights on one fixture. Peep my journal for some pics of what im using, those desk lamps are good, but it would be better to get fixtures that you can hang over the plants. i raised my AG hood higher then my actual CFL's, so what ever light going up, will also get reflected back down with the actual AG grow lights in the hood if that makes sense haha.
 
I had a spur of genius this morning... I have a GenHydro WaterFarm in addition to the AeroGarden. My idea now is to start some seed in the AG, allow them to grow to the second node, take clones one from each seed (6 hopefully will sprout) place them in the WaterFarm under 12/12 lighting. Find a female from those flowered clones, choose it as a mother. Transplant mother plant from AG to WaterFarm, and use the AG as a flowering system, and clone, transplant under 12/12 from the start, and have perpetual "lollipop" style harvests.

Now... AG growers and all other RIU users alike... correct the flaws in this system!
 
sounds good man, keep us posted, what lighting do you plan on using for flowering? how many plants are going into the system?


i would suggest some "Y" socket's for the CFL fixture thru the AG hood, so you can have 2 lights on one fixture. Peep my journal for some pics of what im using, those desk lamps are good, but it would be better to get fixtures that you can hang over the plants. i raised my AG hood higher then my actual CFL's, so what ever light going up, will also get reflected back down with the actual AG grow lights in the hood if that makes sense haha.

All mods are complete! When it comes time to grow I'll cut to fit a mylar sheet for the grow platform, to bounce as much light as possible around the young sprouts, and later at the lower leaves. For now it goes tucked away into a cabinet for a week or so.

Check my other grow journal..Waterfarm Closet Grow The hood used there, a bubble print silverwing with a 175 W CFL.

I plan to plant the maximum possible. Utilizing all 6 available pods. Then taking serious consideration into my plan to transplant a mother to my WaterFarm unit. Once that happens, I plant to start a perpetual putting clones into the AG and then flowering around the second or third node.

As for the Y-sockets, i'm using several in my other grow. I probably will end up using those later on, just haven't screwed one into the new hood socket.

Thanks for the reply SICC! Haha, this forum reminds me that I need to plan and strategize ahead of time, fellow growers comments and questions are ALWAYS welcome.

:peace: and happy growing :hump:
 

Attachments

  • P5220041.jpg
    P5220041.jpg
    39.9 KB · Views: 134
  • P5220042.jpg
    P5220042.jpg
    83.2 KB · Views: 134
  • P5220059.jpg
    P5220059.jpg
    61 KB · Views: 132
  • P5220060.jpg
    P5220060.jpg
    60.7 KB · Views: 122
wow man..... you have put ALOT of thought into this grow... Good Job Dude! It looks amazing.. very creative on your new airstone set up..... im interested to see how crazy its going to get in your base with the roots.... they are going to hug those airstones and probably make transplanting a bitch.... we will see..

Amazing Set Up!!!!!


Now lets get some fuckin bitches in there... LMAO!
 
Yea man, i like how you got it all planned out, I'll stop by the other thread, cant wait to see this go down, +REP
 
I am suprisded you didnt use 1 6in airstione so eays to get around and keep free of roots and it fit well in the front i think SICC has a illustration on his thread. Works great in mine. remember the old saying KISS. but hell it looks cool. Check out my grow and see what you think. Simple cheep huge.
 
Hellooooooo RIU!! Just got in from a weekend long camping trip, expect a decent update later this evening, possibly tomorrow.
:peace:
 
Finally made up my mind on seeds/seedbank/online store... etc.

I ordered from Attitude Seed store, Greenhouse Seed Co. for seed bank, and opted to get two of their Colored Seed "souvenir" disks, for added stealth hopefully?

Indica Mixes "G" and "H"

The G
indicaG_smalll.jpg


The H
indicaH_small.jpg


The seeds I'm after are the Lemon Skunk, White Widow, and White Rhino... All 3 strains caught my attention. Anyone have any words of wisdom about those, or the others?? Now to wait for the delivery... what's the worst that could happen ordering seeds this way to a non-medicinal state??
 

Attachments

  • ChartVariety_sativaindicaG.jpg
    ChartVariety_sativaindicaG.jpg
    360.7 KB · Views: 206
  • ChartVariety_indicaH.jpg
    ChartVariety_indicaH.jpg
    153.1 KB · Views: 195
Back
Top