Harvest a Pound Every Three Weeks!

StinkBud

Well-Known Member
I can't see any screen in that pic? To keep roots from exiting the post? Also.. I thought I read earlier that you didn't have problems with roots clogging sprayers?
The roots will start to grow out the post and into the res.

I just cut them off when they get too long.

No problems with sprayers so far.
 

Skinflute

Well-Known Member
I have built my flowering unit also, was easy as I already had the pipe and fittings on my truck :mrgreen:. I only had to go to the store for Roughneck tubs and the fencepost + caps.
Clones just started to show roots, so I still have a few weeks till I can use it.

Hey Stinkbud, it is not necessary to use primer on pipes less than 2" in size. In the past 12 years I have only used primer on 2" or larger and only if they were going under a driveway, House, foundation or roadway.
(just trying to save you a step)

Originally Posted by DaveTheNewbie
im in australia
i doubt they send there
plus we use 240 volt wiring, you guys use 120 volt
i would blow it up in half a second if i plugged that in
Dave,
I run into this problem all the time. I will need to power a timer (120 volts) and a sprinkler pump (240volts) but I only have a single line which is 240.
It's called splitting the line, and only using 1 hot and a neutral.


A 220 outlet will have one neutral (white) and two hots (black and red normally) just use the neutral and just one of the two hot wires. Careful where you do this because normal 110 breakers are 15 or 20 amp and normally 220 breakers tend to be either 30 amp for a dryer or 50 amp for a stove.

Also, make sure your water pump is rated for 110 and not 240 :bigjoint:
 

R1b4z01d

Well-Known Member
i would work my fucking ass off for a pound a week are you serious?!

thanks for this stink bud, i have a few questions if thats cool.

How do you combat blackouts and loss of power? do you have any personal experiences with that issue, i ask because i am thinking of going aero but ca is a vulnerable place.

thanks


I use a UPS battery backup for my pumps. I have not had any issues with this yet but I figures I would be prepared.
 

DragonPhoenix

Well-Known Member
Wow! That was quick. I haven't even finished the build tutorial on the veg system yet and you already built the flower unit. You get to go to the front of the class.

It looks like my photos where able to help you visualize the build without plans. Not an easy thing to do! Great job!

One thing that you can't see in the photos very well is a small little lip that I make out of left over neoprene. I glue it to the bottom of the fence post about 1/2" from the end.

This will keep the water from running back up the the fence post. I know it sounds weird but it's true! The lip makes the water drop back down into the res cleanly.
Hey Stink - when I build the flower units I made a "front" which will face the res and a "back". The height of the "back" where the fence post rests is a couple inches taller than the front and I was planning on having gravity do the work of putting the water back in the res.
 

StinkBud

Well-Known Member
not[/U] necessary to use primer on pipes less than 2" in size. In the past 12 years I have only used primer on 2" or larger and only if they were going under a driveway, House, foundation or roadway. (just trying to save you a step)
Not only did you save me a step but I will no longer get strange looks from people because of my bright purple fingers!

Thanks!
 

StinkBud

Well-Known Member
Hey Stink - when I build the flower units I made a "front" which will face the res and a "back". The height of the "back" where the fence post rests is a couple inches taller than the front and I was planning on having gravity do the work of putting the water back in the res.
I have a 1" rise on the back of my large system although 2" would work fine also. Maybe even better!

I'll be doing the plans and tutorial for the veg unit this weekend and the flower system the weeks after.

I figured 3 weeks overall for the tutorials would time out well but some of you are way ahead:-o Great job guys!
 

Saladsmokin

Well-Known Member
Alright I made your aero cloner.. Im going to be using your system. it was leaking at first but then i lowered the pvc legs and it doesnt leak anymore. Im just going to have the mothers..incase the clones dont root. but heres a pic.


Heres the mother plants im going to take clones off of. How much water should i use with the superthrive?


StinkBud

Well-Known Member
Alright I made your aero cloner.. Im going to be using your system. it was leaking at first but then i lowered the pvc legs and it doesnt leak anymore. Im just going to have the mothers..incase the clones dont root. but heres a pic.

It looks great bro!

Ok, so here is the technique I use to stop leaks...

You have to push down on the middle of the lid and bend the edges up at the same time. You want the top to curve down, not make a bubble if that makes any sense.

Sometimes the lids get bent and warped during storage and shipping. It may take a little while to get the lid straight and seated correctly. I find it helps to cuss a lot.
 

Saladsmokin

Well-Known Member
lol.. thanks for the help. How much water do you use and how long should it take to root? Does it work really well? i dont want to waste any cuttings, would it hurt to leave it running 24/7.?
 

StinkBud

Well-Known Member
Thought some of you may be curious at to what the roots start to look like after a week in the Aero/NFT system.

I also threw in a couple of photos I took this morning (Shhhh, the girls are sleeping).

I found a couple of Thripes a few days ago so I released some Predatory Nematodes into the reservoirs and hung some Green Lacewing Eggs throughout the garden.

Beneficial insects are really the only safe way to control pests in a organic manner. I avoid pesticides if at all possible to keep my smoke safe from any toxic residue.

Always check your plants every few days with a magnifying glass. The most important thing is to catch pests early. One thing you need to understand early is...you will eventually have to deal with pests!

If you can catch the pests early you can add good bugs to eat all the bad bugs and their eggs.

Predatory Nematodes are the shit! They are microscopic animals that invade the bad insects bodies and then reproduce themselves until only a shell remains. They eat anything that has growth stage in the roots and soil. Many bad insects spend their egg and larvae stage in the soil. Nematodes will kill all of these pests without the use of pesticides.

The Green Lacewings are also called aphid lions. In the larvae stage they eat up to 200 incests or eggs and then change into a fly that will lay another 200 eggs.

The cool thing about beneficial insects is that after they eat everything they die off themselves.

Remember, organic is not just about nutrients. It's a concept. It's allowing nature to do the work for us.
 

DIRTHAWKER

Well-Known Member
Hey guys, im building my flower room, I posted on the grow room section but didnt get any help. I know you guys will help out. Im ready to cut holes in my prefabbed 4ft wall sections, but unsure of the dimensions I am gonna have 600watters hps, aircooled.
are they standard 4''or 6" hole for duct?
will i be able to cool 2 lights with one fan in a straight line?
last question;
Im planning on an exhaust fan up into the attic, ducting to the attic vent and a passive intake on the lower wall inside the room.
The problem is i will be running the lights at night and light will shine through the intake vent during the dark cycle.
anyone have a solution? lighttrap?

the room is 8x8x8 sealed. im starting with 2 600w hps and adding 2 more later.

thanks .
 

savant

Active Member
i use a drip to d.w.c. its a real beast to clean and set up. i ve been thinking of something similar to ur sys. i m waiting with bated breath 4 ur next post.
 

DragonPhoenix

Well-Known Member
Hey guys, im building my flower room, I posted on the grow room section but didnt get any help. I know you guys will help out. Im ready to cut holes in my prefabbed 4ft wall sections, but unsure of the dimensions I am gonna have 600watters hps, aircooled.
are they standard 4''or 6" hole for duct?
standard is 4"

will i be able to cool 2 lights with one fan in a straight line?
Yes you can do this. There is also a squirrel cage fan that has two 4" outputs on it so you can use it for two lights. Although you can sure use a fan to cool both in series.

last question;
Im planning on an exhaust fan up into the attic, ducting to the attic vent and a passive intake on the lower wall inside the room.
The problem is i will be running the lights at night and light will shine through the intake vent during the dark cycle.
anyone have a solution? lighttrap?
Yep - you have the right idea. I think a lighttrap is in order.
 

StinkBud

Well-Known Member
Step 1 – Cutting the ½” PVC Pipe
1)Cut seven 7” lengths.
2)Cut 1 10” length.
3)Cut two 1½” lengths.
4)Cut one 17¼” length.

Step 2 – Preassemble Your Sprayer Frame
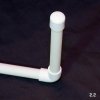
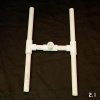
1)Start with the top “H”. It’s made from the 3 – Tees & two 1½” pipes.
2)Add the elbows to the tips of the “H”.
3)Add the 7” legs and end caps.
4)Add the 10” drain pipe to the “H”. Do not attach the ball valve yet.
5)Attach the 17¼” pump connecting pipe to bottom of the “H”.

Step 3 – Drilling the Sprayer Holes
1)Measure and mark the sprayer holes (according to the plans).
2)Use the 11/64” drill bit for the ten holes.

Step 4 – Drilling the Lids & Containers
1)Measure out 18 holes as shown in the plans.
2)Use the 2” hole saw to cut the holes.
3)Mark the exact center inside the plant container. Cut a 2” drain hole.
4)Cut a 2” drain hole in the exact center of the reservoir lid.
5)Cut a 2” access hole in the corner of the reservoir lid so you can see and maintain water level.
6)Cut a 13/16” hole in the side of the plant container for the drain valve (according to the plans).
7)Use the Exacto Knife to clean up the holes.

Step 5 – Final Assembly
1)Place the sprayer unit into the container and check to make sure everything fits well.
2)Take apart the sprayer unit.
3)Start the final assembly on the sprayer unit. Start applying glue to each piece. Be careful because the glue dries fast! Do only one part at a time until the unit is completely assembled.
4)Screw in the sprayers. You may need to use a pair of pliers to get them in.
5)Put the pump in the reservoir and attach the down pipe.
6)Put the reservoir lid on and place the plant unit on top.
7)Connect the sprayer unit to the down pipe (pump).

Step 6 – Mixing the Nutrient Formula

Botanicare Nutrients:
1)126ML Cal-Mag Plus
2)180ML Liquid Karma
3)540ML Pure Bend Pro Vegetative Formula

Mix all the nutrients together in a gallon jug and top off with water. Shake well!

Step 7 – Setup and Conclusion
1)Add 15 Gal. of water. (approx.) to the reservoir
2)Add nutrient mix until the meter reaches 2000 PPM
3)Adjust the PH to 5.8
4)Put the lid on the plant unit.
5)Fill the veg unit with your favorite strains from the clone unit.
6)Set your cycle timer to one minute on and five minutes off.
7) Enjoy your new Veg unit!!!! You should see amazing growth rates.
8)Don’t forget to pass the love on…
 

Attachments

Top