I am planning to switch up systems. Does anyone have some plans or guides for DIY undercurrent DWC? Since I need a few I figure it would be much cheaper to build it myself and also that way I can make it custom to my site. Otherwise I was thinking I could order one to use it as a template. I have searched and found various threads and write ups but not really a complete guide. Or if someone here has experience and wouldn't mind being a mentor maybe we could work something out. Thanks.
Get some 5 gallon buckets and a tote. Get some 3/4 inch poly hose from the hydroponic or hardware store. Get two 3/4 inch straight nipples from the hardware store, the gray ones, per 5 gallon bucket and three for the tote. Get one 3/4 inch T nipple. Get one 3/4 inch grommet for each straight nipple. You will also need an air pump and a water pump.


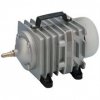
Get this type of air pump (on the left) the other kind suck.
Make an approximation of the room on a sheet of paper, then draw the pattern you will have your buckets laid out in. Then go into the room with the buckets and lay them all out where you want them. Once they are laid out, mark on the buckets where your nipples will go. The nipples should be put where they easliy connect to the nipple on the next bucket. \
The buckets will be daisy chained in a circle from the tote all the way around the room and back to the tote. It is best if the tote is outside the grow area, this will keep everything a lot cooler.
Once you have everything marked, cut the holes for the grommets. Put the grommets in. To get the nipples into the grommets, I use the slightest bit of vegetable oil on the tip of the nipple, some use Vasoline, then push it about 1/3 of the way through.
Put them back into the room and connect everything together with the poly hose, they should be daisy chained all the way around.. There are three nipples coming out the front of the tote, the buckets connect to the tote on the end nipples. The water pump inside the tote is connected to the center nipple by a short piece of the 3/4 inch poly hose. The outside end of the center nipple is connected to another section of the poly hose that runs to the two furthest away buckets. Cut the hose between these buckets, connect the ends to the 3/4 inch T nipple, and connect the other nipple on the T to the hose running from the tote. This is how the undercurrent circulates. you do not need a very powerful water pump, too powerful of a pump might just overflow the buckets either side of where the water line feeds in.
You need holes in your lids to run the 1/4 inch airline in, and a small cylindrical air stone for each bucket.

You can either use the lids that come with your buckets and put netpots in them, or you can buy netpot lids made for that purpose.

Once everything is put together, fill it with water and turn everything on to make sure it does not leak.
When you buy your tote, make sure it is about the same height as the buckets.
This is a very cheap, very effective system.
Here is estimate for a five bucket system.
1 tote 15$
1 water pump 12$
1 commercial type air pump $40 (dont go cheap-o here)
1 3/4 inch pvc T nipple $1
13 3/4 inch pvc straight nipples $10
Poly hose tubing 25 feet .75 per foot = $18.75
Air tubing 25 feet - $5
5 airstones $5
5 -5 gallon buckets $4 each = $20
5 netpot lids - $4 x 5 = $20
Total: $146.75 CHEAP!
If you want to add more sites it costs about $14 per additional site (bucket) once the reservoir is set up.

Various nipples

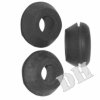
Use this kind of grommet
I have built lots of these systems for people. Very simple effective undercurrent system.


