Balls to the Wall grow, Riddleme Gets Serious

riddleme

Well-Known Member
Well it has been since Jan that I had my last harvest and some of you know that I have been waiting to start another because I was buying a new house, which meant a new garden. We have the house now and the new garden is built we are ready to kick this thing into gear.

I will be doing a bunch of explaining as to why things are the way they are so new growers can get a handle on things, so as always look for some learnin going on.

[video=youtube;B_3TlrZLpQ0]http://www.youtube.com/watch?v=B_3TlrZLpQ0[/video]

Let's do this!

All Comments are Welcome
 

riddleme

Well-Known Member
It has taken a few weeks to put this garden together. It will be no surprise to those that read my threads that I will be using a 400 watt CMH (Ceramic Metal Halide) light for this grow.

I will be growing 4 plants, one strain (no surprise there as I advise it is best to only grow one strain at a time) it will be Sensi Seeds Northern Lights #1, from seed.

I will be using FF Happy Frogs to nuture the seedlings in 6" pots and then transplanting to the 5 gallon pots you will see in the pic's using SunShine Mix #4 amended with Calcine Clay (30%) and 1 cup of DynaRock.

For nutes I will be using DynaGro FoilagePro 9-3-6 and DynaGro ProtK (a silica additive) 0-0-3. For Flower I will be using Jack's Professional K-Trait 14-5-38. If you have read any of my Nuggets, you know that I want a 3-1-2 NPK ratio for veg and a 2-1-3 NPK ratio for flower.

Let me explain what you will see in the pic's

Garden is setup in the basement of my new house, right next to both our water heater and furnace (yes both pilot lights are on) this adds CO2 to the garden using things that are already happening whether we are growing or not as the burning pilot lights give off CO2.

You will notice two fans (4" 12 volt computer fans) mounted on the raised bed platform that are aimed straight up towards the light. this is because CO2 is heavier than O2 and tends to stay concentrated down on the floor. These fans will ensure that it is constantly circulating in the garden and at the same time will cool the light. Though I gotta tell ya CMH bulbs do not have near as much heat issues as other HID's. the temp in my basement was 74 when I fired it up and after over 2 hours on it raised to a whopping 75.

The raised bed serves two purposes (ok 3, as my old tired ass does not have to bend over as far) Most importantly allows the temp of the soil to be the temp of the garden via ambient convection. This is important as soil temp plays a part in plant vigor. If I were to set the pots on the concrete floor of my basement, the soil temp could be as much as 10 to 15 degrees colder than my actual garden temps. The second reason is to allow proper run off of the water into buckets when I make it rain, hence making dealing with the run off water more easy. (as there is no drain in this part of my basement)

The reflective panels are 1/4" pasteboard that have been painted flat white, they are hinged together so that they can be moved and adjusted as needed, this allows that my garden will never be "cramped" as the plants get bigger.

The white drip tray that you see is a water tank from an old camper that I cut in half, the raised bed is exactly high enough to place 5 gallon buckets under the trays to catch the run off.

Also note the nice white light comming from that CMH bulb, this is gonna give you bud porn like no other light can as pic's taken under this light are vibrant true color photos.

Here are the pic's of my new garden,,,,,,​
Attached Thumbnails
 

riddleme

Well-Known Member
There will be a few experiments during this grow, most importantly there will be a "secret" experiment. One that I will detail in depth and report on towards the end of the grow. Once it is setup I will give you a peak photo to see if you can guess what I'm doing?

Other experiments will be about topping as I will be treating each of the 4 plants differently (gotta a few ideas I want to try out) and we will be sexing with socks (should be fun) also gonna collect some pollen and pollinate a few buds for seeds, this will be the first of many grows with the intent to create a new strain, and I have chosen the genetics very carefully for what I plan on breeding.

Mostly this grow will be demonstrating a combination of all of the info nuggets I have posted and the things my research has uncovered so we can actually "see" the results of all my many hours of research.

Will be posting a lesson in a bit and then gonna put seeds in dirt (well peat pellets to start) so more comming soon.​
 

riddleme

Well-Known Member
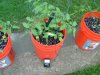
Welcome to Riddleme's Tomato Garden, yes that is right I have some tomato's growing out in my back yard (had to do something with that bag of FFOF I had).

If you have read my threads then you know I am constantly telling folks to learn to better understand thier lights and that lights are simply one part of all the required elements of our gardens. Lights seem to be one of the most misunderstood parts and most folks pay more attention to the lights then the other elements (which is a big mistake). Also most folks believe that more light is better and that cramming light up the plants ass will result in better yields??? None of which is true

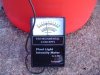
I have also said many times that a light meter is a must in this understanding process, the one I have only cost $29.95 and can be purchased here,,,,,
http://www.amazon.com/Plant-Light-In.../dp/B002JP8B82

No it is not the best but it works and only has a 2% error margin, best part it is affordable for most everyone as $29 is not that much, but since most of you do not have one I thought I would share some perspective readings so you can see why you want one.

In order to better understand a few things it is best to take some readings outdoors of the good old sun so that we can get an actual idea of what is going on with mother nature. We all know that the sun is the #1 best light there is and that MJ grown outdoors is the bomb because of it.

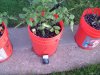
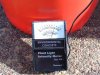
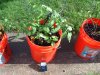
for each set of pic's I will include a pic of the sky, the meter, and the canopy so you can see where thesensor is (actually is in the same place each time)

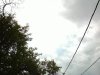
Here we go first set is under complete overcast, cloudy with no sun


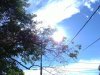
Next same day as the sun breaks thru the clouds


Next a nice bright sunshinny day


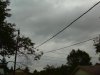
and finally a sunset


Now I know that the forum retoric is to say that the sun puts out 10,000 lumens but as I have also repeated several times that is only at noon at the equator, as you can clearly see from my pics the best I got here in Colorado was 7200 lumens.

Anybody seeing the light yet???
 

Attachments

riddleme

Well-Known Member
I put the seeds in a shotglass this morning at 11 they have been in there now for 7 hours ( I normally go 10 to 12) and 3 of the 4 have sunk, I can tell #4 is gettin ready to so we are all good.

At the same time I readied my little greenhouse that I got at lowes for $35 if you follow the link I think the price is a bit high but at least you can see what I'm talking about.

If you have read my links you know I will go straight from the cup to the peatpots, I have 100% germination using this method. The why is that there are enzymes on the seed shell that are activated by water that tell it to go, grow and multiply. if the seeds are a bit old or not viable they will float if they sink they are good, it's that simple.

I expect to be plantin em in another hour or so. in the mean time gonna add some more pic's of my tomatoes,,,,why? Because in a few post I have made I have explained how the ideal conditions allow the plant to relax, even though it is doing things and I have posted pic's of MJ plants to show this as well. But I want to tell you the pic's were taken at 12:30 so high sun, temp was 89F and plants were getting total access to the sun (no shade). Please take note that the leaves and stems are simply hangin out, relaxed and doing thar thang. This is what great conditions look like, some folks think that if the leaves are errect and standin up to the light it is a good thing, they would be very wrong as if this is the case the plant is stressin and one of the conditions (or more) is not properly dialed in. In most cases it is the light being too close but it can be temp & humidity as well.

On yet another note, light has been on 10 hours and temps in basement are holding steady at 76 (a very good sign) and humidity has dropped from 65% to 54% (as the light is burning it off (heat does that)

So till later, here are the pic's​
Attached Thumbnails


riddleme

Well-Known Member
and seeds are now in thier new bed, waiting to wake up

will post again once we have sproutage :mrgreen:
Attached Thumbnails
 

Danielsgb

Well-Known Member
Well, you know I'm in. One thing I noticed. Your ballast is on the floor, and I always keep them higher. You do "Make it Rain" so it would be safer in event of a spill.
Daniels
 

riddleme

Well-Known Member
Well, you know I'm in. One thing I noticed. Your ballast is on the floor, and I always keep them higher. You do "Make it Rain" so it would be safer in event of a spill.
Daniels
good thing to point out, that is not its final resting place, I was in a hurry to get those pics taken, it will be on a raised platform behind that back panel

I added another 20 amp service to my basement yesterday, now ready for sproutage to occur and I believe it will be today as I see one of them starting to poke it's head out
 

Danielsgb

Well-Known Member
good thing to point out, that is not its final resting place, I was in a hurry to get those pics taken, it will be on a raised platform behind that back panel
Yea I figured it wasn't in it's final home, but thought I'd check. My 400W CMH is on the way. I can't wait. They look like the shit.
Daniels
 

riddleme

Well-Known Member
Yea I figured it wasn't in it's final home, but thought I'd check. My 400W CMH is on the way. I can't wait. They look like the shit.
Daniels
the really cool part is as they fire/warm up they change colors and you can see all the spectrums fire, mine starts out reddish then goes greenish then blueish then gets that high white, takes about 2 to 3 minutes
 

chainseeker

Well-Known Member
Hey Riddle I know something that would help the growth rates of your plants.
HAha it feels stupid offering you advice but here ya go.
The local hydro shop had these smart pots next to a flood and drain same variety and the smart pots just ran all over the hydro as far as growth rate.
I can show you a 10 day after transplant comparison it's a pretty dramatic difference. I just wanted to ask before posting a pic.
 

riddleme

Well-Known Member
Hey Riddle I know something that would help the growth rates of your plants.
HAha it feels stupid offering you advice but here ya go.
The local hydro shop had these smart pots next to a flood and drain same variety and the smart pots just ran all over the hydro as far as growth rate.
I can show you a 10 day after transplant comparison it's a pretty dramatic difference. I just wanted to ask before posting a pic.
yeah have read about the smart pots, nothing I would do at the moment, not saying thay are bad, just not on my wishlist
 

Rocky Mountain High

Well-Known Member
I tried the smart pots and I was too dumb for em I guess. Hated them, just didn't work for me, I'm sure in the right garden they are great.

One thing I have been thinking about though is the airpots.

RM3, how do you think the airpots would work with the 'make it rain' technique?

I know they've broke the surface, where's our pics???
 

Illumination

New Member
the really cool part is as they fire/warm up they change colors and you can see all the spectrums fire, mine starts out reddish then goes greenish then blueish then gets that high white, takes about 2 to 3 minutes
Am so jealous:evil::joint:

Cant wait til all my construction is done so I can get my cmh's.

Looking forward to this as I already know I will learn so much.

Show 'em teach!!:twisted:

S'cribed 4 sure

Namste' my friend:eyesmoke:

" A state licensed personal medical grow...Thank you"
 
Top