1st Grow (about time!) All CFL (maybe) 2 femmed WW

DankBudds

Well-Known Member
OK,
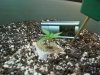
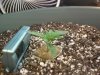
Ive been asking alot of questions whether it be through PM or posting others threads. Thank you all for the help. I got the seeds from Nirvana in December and procrastinated this long on my enclosure till now. The 2 WW have been growing for about a week and a half now. Germinated in the rockwool in the soil. Will being LSTing the two plants. Hopefully they will not turn into hermies. Ill be taking clones off the best female.

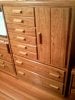
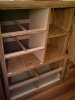
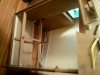
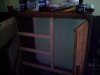
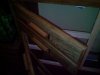
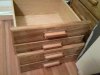
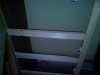
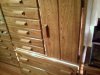
Enclosure: Dresser that matches the rest of my furnature. 1.5Dx3Wx4.5H. Ill post all the picures of this also. Intake and exhaust fan. Lined with mylar. Temp inside the box is ranging between 75 and 81 depending how cool it is outside and if the A/C is on in the room.

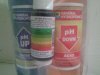
Soil: FFOF, 20-30% more perlite added. 3 gallon pots.

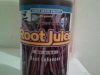
Nutes: Later on either Age Old Organis or FF GB and BB. Right now im only using a tiny bit if Root Juice. I know that the FF is a little hot but no signs of burn.

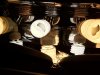
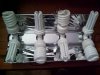
Lights: DYI light fixture (will post pics later). Made from a chrome painted 4 bulb bathroom light fixure. Added wings wrapped in Mylar. Added Y splitters to add 1 more light to each socket. 8 lights total in this fixture. 4 42 watt 2700k and 4 27 watt 6500k CFLs. I also have 2 65 watt Flourex Flood lights 6500k that I will be adding later.

Ill be adding pictures later of everything. I might buy a MH/HPS later on down the road and leave this enclosure with the CFL's for just clones.
 
This is how the cab originally started. Removed all the drawers and the removed everything from the cab.
 

Attachments

  • starting point.jpg
    starting point.jpg
    54.3 KB · Views: 55
  • cabnodrawers.jpg
    cabnodrawers.jpg
    46.9 KB · Views: 57
  • cabempty.jpg
    cabempty.jpg
    40.4 KB · Views: 66
After removing everything. I removed everything from the drawers themselves and just used the outside parts of the drawers. I added hinges to every one.

I also Had to reframe the inside of the cabinet so it would look somewhat normal when closing the cabinet doors. Also to keep most of the light in.
 

Attachments

  • doorshinges2.jpg
    doorshinges2.jpg
    35 KB · Views: 24
  • doorshinges.jpg
    doorshinges.jpg
    35.3 KB · Views: 25
  • drawersfull.jpg
    drawersfull.jpg
    47.3 KB · Views: 27
  • frameonlyopen.jpg
    frameonlyopen.jpg
    31.3 KB · Views: 21
  • frameonlyopen3.jpg
    frameonlyopen3.jpg
    32.1 KB · Views: 20
The only drawer that I left in tact was the bottom one. It there to hold the pots. If im watering and there is runoff, i can lift the pots out and clean it out. The drawer is lined with plastic bags for waterproofing.

I did add about a 4 inch extention to the back of the cab because I wanted more depth and some passive ventilation. I will be sealing this off and set the fans up for intake and exhaust. The cab was wrapped in mylar. 2 hooks were installed to the inside to hang my light.

The second pic is the end result. Still have to work on the light coming out of the second drawer up from the bottom. Going to get some rubber molding for that
 

Attachments

  • insidecabfinished.jpg
    insidecabfinished.jpg
    95.2 KB · Views: 92
  • finished cab.jpg
    finished cab.jpg
    51.8 KB · Views: 50
This is my light fixture for now. Its was originally a 4 bulb bathroom light fixture that was $15. I added the the Y splitters to each. I bought a piece of aluminum cut it in half, screwed it to the fixture and angled the wings about 45 degrees. I wrapped each with mylar. It has 4 42W bulbs 27k (11,200 lumens) and 4 27W 65k bulbs(7200 lumens). The Flourex bulbs you see in the pics are no longer in there because they didnt work. I also have 2 65w flourex flood lights that I will be using (not pictured) later on in the grow. I might even switch to a 150 HPS.
 

Attachments

  • light2.jpg
    light2.jpg
    54.7 KB · Views: 60
  • light1.jpg
    light1.jpg
    51.4 KB · Views: 103
Now..here are my 2 babies....

They both germinalted in rockwool that was already planted in the soil. Im going to try to do an all organic grow. Trying to get my hands on Age Old Organics but if not Im going to use the the three Fox Farms nutes. The Soil is FFOF. It is a little hot so Im not doing anything for about a month or more.

Both plants were germinated at the same time about 11 days ago.
The first plant seemed to be the strong one at first. I showed its first leaves first and then just slowed down.
The second plant is actually much bigger than the first plant but started slow. The shell from the seed was actually holding it first leaves when it was about 1 inch above the soil. (I helped it a little bit) I removed the shell as careful as I could and then it just took off. Ive been following the "Buds for Less" book for watering. It seems to be working ok. Only Phed water and root juice right now.

So what do you guys think? Feel free to write whatever you want. Say it sucks, good, bad, ok, ur an asshole...lol...tell me what you guys feel....haha

Thanks
N&M
 

Attachments

  • smallplant1.5.jpg
    smallplant1.5.jpg
    70.7 KB · Views: 76
  • bigplant1.5.jpg
    bigplant1.5.jpg
    75.9 KB · Views: 86
Now..here are my 2 babies....

They both germinalted in rockwool that was already planted in the soil. Im going to try to do an all organic grow. Trying to get my hands on Age Old Organics but if not Im going to use the the three Fox Farms nutes. The Soil is FFOF. It is a little hot so Im not doing anything for about a month or more.

Both plants were germinated at the same time about 11 days ago.
The first plant seemed to be the strong one at first. I showed its first leaves first and then just slowed down.
The second plant is actually much bigger than the first plant but started slow. The shell from the seed was actually holding it first leaves when it was about 1 inch above the soil. (I helped it a little bit) I removed the shell as careful as I could and then it just took off. Ive been following the "Buds for Less" book for watering. It seems to be working ok. Only Phed water and root juice right now.

So what do you guys think? Feel free to write whatever you want. Say it sucks, good, bad, ok, ur an asshole...lol...tell me what you guys feel....haha

Thanks
N&M


Those babies looks healthy. They're not stretching, very tight internode structure. Keep up the good work. :joint:
 
After removing everything. I removed everything from the drawers themselves and just used the outside parts of the drawers. I added hinges to every one.

I also Had to reframe the inside of the cabinet so it would look somewhat normal when closing the cabinet doors. Also to keep most of the light in.
sweet man im building a dresser very similar to yours , subscribed aswell keep it up:peace:
 
Thanks guys,
Im going to be taking pictures every day.
Write now that are running 24/7. This might change. Im going to give them a bath later.

The temps between the plants and lights are like between 85-95. Temps inside box are 75-80. Going to set fans up differently tonight.
 
They just got their first real water with some "root chew". Watered both with 2 quarts of PH adjusted water. I watered them about 3 hours ago around the rock wool. They have seemed to perk up nicely.
Box Temp: 80
Temp between "Small fry" and lights: 84F
Humidity at the top of soil of "Small fry": 55%

Temp between "Slow Poke" and lights: 96F
Humidity at the top of soil of "Slow Poke": 45%

The lighting not directly from the top. If you draw a square, each light is positioned on a corner, about 4-6 inches away on a 45 degree angle.
 

Attachments

  • smallfry1.jpg
    smallfry1.jpg
    87.9 KB · Views: 13
  • smallfry2.jpg
    smallfry2.jpg
    72.2 KB · Views: 11
  • slowpoke1.jpg
    slowpoke1.jpg
    74.5 KB · Views: 18
  • slowpoke2.jpg
    slowpoke2.jpg
    96.6 KB · Views: 15
  • rootjuice.jpg
    rootjuice.jpg
    35.8 KB · Views: 14
  • phupdown.jpg
    phupdown.jpg
    34.9 KB · Views: 16
still doing 24/7 light? seems everyone that does this is WAYYY ahead of me in their grows im on day 10 and yours at 11 has 2 more sets then mine ><
 
I raised the lights a little last night. Now they are about 6-7 inches away from the top of the plant

"Small Fry": 81 degrees
"Slow Poke" : 90 degress
Humidity is the same respectvely
Inside cab temp: 80


still doing 24/7 light? seems everyone that does this is WAYYY ahead of me in their grows im on day 10 and yours at 11 has 2 more sets then mine ><

I germinated mine right in the rockwool already in the soil. It is a slow process. I wouldnt worry about it. Its a learning experience. Ill check your journal later. Time to put my 10 hours in with "the man"
Thanks for stopping by
 
Looking nice man :)

when i seen your rockwool cubes my hair raised on end and i just wanted to cry lol.

I just had to throw away 5x of the big 3ft or whatever blocks. Somehow somewhere they had gotten contaminated and reacked chaos upon all the lil clones i put in the cut cubes :p (I haven't boughten actual 1" cubes forever, ive just been cutting my own from the big blocks :p )

Anyways the tear has been fought back. :)

+rep for a torn nerve when i seen the cubes
&
Subscribed. lol..
 
HA! You dont like cubes? They took awile to germinate in the cube. I put soil over the top and nothing was happening for like 4 days. I took the dirt off and from out of the little hole and the were up in hours. I keep over thinking this whole grow..lol
 
HA! You dont like cubes? They took awile to germinate in the cube. I put soil over the top and nothing was happening for like 4 days. I took the dirt off and from out of the little hole and the were up in hours. I keep over thinking this whole grow..lol

lol, nah i like the cubes, just somehow lost all my blocks when who knows what contaminated them.

Did you take the lil layer of film off from around your cubes or you leave it on to force them to root low to start?

:) lookin good though, can't wait to see them in a week or so :)
 
Thanks "Bub's"

Nah, I left it on. Shit!, Was I supposed to take it off?

Nah you can leave it on, it just forces your roots to start at the base of the cube, removing it would just allow them to start pushing out from the top of the cube to the bottom.

:)
 
Back
Top