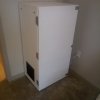
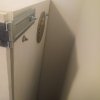
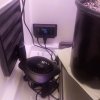
This is my first grow and decided to build a custom cabinet. I wanted this cabinet to be durable, easy to clean, stealthy and visually appealing. The cabinet is 24" wide x 48" tall x 18" deep and is made out of 2x2s and 1/2 pine board. I painted it with 4 coats of flat white paint on the inside for the reflective properties and 4 coats of white semi gloss on the exterior so it is easy to wipe clean. Stainless steel hardware was used for the sleek modern look. There are 4 locking casters on the bottom so the cabinet can be moved with ease. There is weather stripping all along the door and there are 3 latches (top, middle and bottom) to ensure a tight seal when closed.
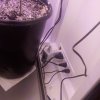
There is a recessed power strip with regular and USB connections mounted inside so only 1 cord is coming out of the cabinet. Caulk was used around the intake/exhaust holes as well as the power strip to ensure that there were no light or odor leaks.
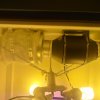
For ventilation there is a 8" x 8" dark room louver for a passive intake. This vent is designed in a way to let air through but no visible light. There is 1 small fan on the cabinet floor to move air around the bottom and another 2 small fans moving air around the canopy. For the exhaust I have an AC Infinity Cloudline T4 programmable fan pulling air through a carbon filter. The air is exhausted out of the side of the cabinet. The Cloudline T4 is simply amazing as you can program not only the temperature but humidity as well.
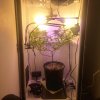
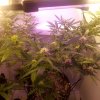
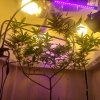
The lighting consists of 3 - 42w (actual wattage) cfl bulbs and a 30w LED triple gooseneck light. I used 6500k during seedling/veg and 2700k now during flower. The total wattage is 156w for 1 plant. The best part is everything is easily adjustable. The lights are on a timer (currently 12/12 for flower).
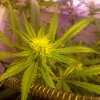
As for the current grow I'm on week 4 of flower. I had a slight spider mite scare but after using 2 applications of Azamax I don't see any more. I will be applying it again in 3 days just to be sure. It never got to the point where there was webbing so maybe I caught the issue early enough. The soil is organic but I added 30% perlite for drainage purposed in a 3gal pot. Nutes have been used during veg and modified for flower accordingly. Water/feeding solution is PHd to 6.5 and the run off is 6.3. The clay colored stuff located along the soil you see in the pictures is diatomaceous earth after it gets wet. I watered her right before this picture and hadn't applied more yet. For those that don't know, diatomaceous earth is a great preventative maintenance step for unwanted pests.
I'm not sure what strain I have (bag seed). I thought it was Bruce Banner but it doesn't seem tall enough even though LST was used. After this grow I have White Widow Feminised Auto seeds that I can't wait to try.
Take a look at the photos and let me know what you think or any tips that you may have.
There is a recessed power strip with regular and USB connections mounted inside so only 1 cord is coming out of the cabinet. Caulk was used around the intake/exhaust holes as well as the power strip to ensure that there were no light or odor leaks.
For ventilation there is a 8" x 8" dark room louver for a passive intake. This vent is designed in a way to let air through but no visible light. There is 1 small fan on the cabinet floor to move air around the bottom and another 2 small fans moving air around the canopy. For the exhaust I have an AC Infinity Cloudline T4 programmable fan pulling air through a carbon filter. The air is exhausted out of the side of the cabinet. The Cloudline T4 is simply amazing as you can program not only the temperature but humidity as well.
The lighting consists of 3 - 42w (actual wattage) cfl bulbs and a 30w LED triple gooseneck light. I used 6500k during seedling/veg and 2700k now during flower. The total wattage is 156w for 1 plant. The best part is everything is easily adjustable. The lights are on a timer (currently 12/12 for flower).
As for the current grow I'm on week 4 of flower. I had a slight spider mite scare but after using 2 applications of Azamax I don't see any more. I will be applying it again in 3 days just to be sure. It never got to the point where there was webbing so maybe I caught the issue early enough. The soil is organic but I added 30% perlite for drainage purposed in a 3gal pot. Nutes have been used during veg and modified for flower accordingly. Water/feeding solution is PHd to 6.5 and the run off is 6.3. The clay colored stuff located along the soil you see in the pictures is diatomaceous earth after it gets wet. I watered her right before this picture and hadn't applied more yet. For those that don't know, diatomaceous earth is a great preventative maintenance step for unwanted pests.
I'm not sure what strain I have (bag seed). I thought it was Bruce Banner but it doesn't seem tall enough even though LST was used. After this grow I have White Widow Feminised Auto seeds that I can't wait to try.
Take a look at the photos and let me know what you think or any tips that you may have.
Attachments
-
 1.2 MB Views: 59
 -
 1.1 MB Views: 57
 -
 2.3 MB Views: 57
 -
 988.5 KB Views: 54
 -
 1 MB Views: 59
 -
 1.1 MB Views: 61
 -
 1.6 MB Views: 63
 -
 3.2 MB Views: 59
 -
 1.3 MB Views: 49