hey guys i made this home made cloner and i thought that i would share it with y'all, if you have any questions about anything please let me know and i will answer them.
DIY Lowes Cloner:
Items Needed To Complete Mission-
Cycle Timer- Way To Grow- 38.99 (Will edit late with brand and image)
Pond Pump (155-300 GPH)- Lowes- 29.99
2” Neoprene (35)- Way To Grow- 17.50
Fish Air Pump 10-30 gal- Petsmart- 14.99
Aquatic Thermometer- Petsmart- 11.99
Command XXL Tote- Lowes- 8.98
Easy Clone Misters (12)-Way To Grow- 6.00
1/2” PVC Slip x Slip Elbows (4)- Lowes- 6.00
Valspar Black Spray Paint- Lowes- 4.98
½” PVC Nipple Cap (4)-Lowes- 3.20
¼” Air Tube-Lowes- 2.99
5” Air Stones (2)-Wal-mart- 2.48
½” PVC Nipple 4” Long (4)-Lowes-2.32
½” PVC Pipe-Lowes-1.95
PVC T-Joint (2)-Lowes- .92
Electric Tape-Lowes-.68
PVC T-Joint, One Side Threaded-Lowes-.66
#10 Screws-Lowes-.50
TOTAL BEFORE TAX: 155.62
Other Addition Items you may have in the Toolbox-
11/64” bit- Lowes- 3.68
1 7/8” Hole Saw-Lowes- 13-30 (yea it’s fucking ridiculous)
Instructions:
First take your ½” PVC pipe and cut it into these sizes:
2- 19 ½”
2- 8 7/8”
4- 4 ½”
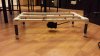
After you have cut your pieces to size, use the (4) ½” 90 degree Slip x Slip Elbows and the (3) ½” T-Joint pieces to make the frame of the mister (As seen below). After the frame is put together take the ½” PVC Nipples which should be 4” long and thread them into the threaded part of the ½” 90 degree Slip x Slip Elbows of the mister frame. Then take the (4) ½” PVC Nipple caps and screw them into the (4) 4” Nipple legs. Take the 11/64” drill bit and drill 12 holes spaced as seen below, these holes will be the places where the mister heads will be placed (if you feel that you need more you may do so now). Using the #10 screw, screw it into the holes that you made for the mister heads, what this will do is create the thread needed for the mister head to screw into. This is your mister.
NOTE* the mister heads will be able to reach 12-14 inches above themselves, so you don’t need to put the misters closer than 8” IMO
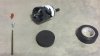
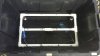
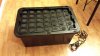
Take the pond pump and screw it into the threaded T-Joint in the middle of your mister frame, its ok if it does not touch the ground. If you wish for it to touch the ground or your pump is too big, you can get a connector and adjust it now. Take the 1 7/8” Hole saw and cut out the 35 holes in in the lid of the tote (you will see where), this will be the place where the neoprene will go. After your holes are cut now is the time to spray paint your top black, we are doing this because we do not want any light penetrating the lid and getting into the rez.
*OPTIONAL-If you are having some trouble with high temps I would recommend to then spray paint the lid white, now the surface will reflect heat rather than absorb it. Because you first painted the lid black then white, the light will not be able to penetrate the lid.
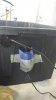
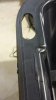
If you want you can have the cable from the pump and the tube for the air pump, which will connect to your air stones, to come through one of the sites in the lid, or, as I did, you can cut out a hole in the back of the tote so you will not lose a site in your lid. If you do decide to do this, use an extra neoprene to fill in the hole and then use silicon calk to cover the whole site so it will not leak. Don’t worry about using too much of the silicon calk it will have no effect with the water. Also I chose not to glue any of the joints together because I did not want any of those chemicals in my rez and the pump will not be able to generate enough pressure to bust it apart.
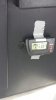
Using Duck Tape or whatever methods of your choice to mount the air pump to the back of the tote. On the front of the tote (or the top) drill a hole that is the size of the thermometer probe, and stick your probe through and have it place in the water however you wish. Then using silicon fill in the hole, and mount the display where you can read it easily.
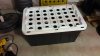
FINALLY! Take your electrical tape and tape along the outside and the inside edge of the top part of the tote, at this moment you can add more or less to adjust for leaks. Put your lid on and place your 2” neoprene inserts into the 1 7/8” holes into your lid, place and adjust everything into your tote and RUN A TEST RUN TO CHECK TO SEE HOW HOT YOUR REZ WILL GET! No need to mess up a batch of important clones!
With everything that I have done to this machine it is equivalent to a $400+ that you could buy on-line or in store, and those don’t come with a short cycle timer.


 stoner brain .