DIY led grow

Positivity

Well-Known Member
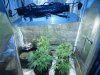
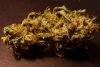
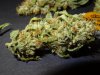
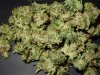
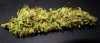
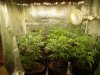
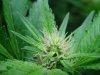
Alright pulled everything. Will post some nug shots when dried

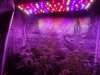
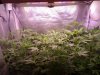
changed out the leds also. Took out all far red and inserted cool blue, royal blue, and 430nm violet. This should be interesting...lol. Might have to take out my neutral xmls now and just make them all warm white. Maybe next run..

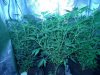
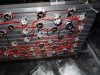
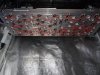
also just put just a few reflectors on. Couple on the ends and couple in the middle. Just for a little added penetration without giving up color blend and spread
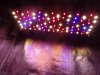
image.jpgimage.jpgimage.jpg
 
Your panel looks like it did a great job mate! :). Can't wait till I can afford to buy some LED's to try. Got some plans laid out but I did discount far reds... though reading recently I am seeing the science in pr/pfr and how adding them at the end of a light cycle could allow for longer flowering hours and faster maturation.

Where'd you get the heatsink? I think that should be my first purchase!

Also need to consider a smaller setup for a little veg/breeding box I want :D.
 

churchhaze

Well-Known Member
Where did you get the 430nm violet LEDs? I haven't been able to find these. Are they a lot less efficient than the common 450-460nm leds? It seems like 430nm would work a lot better than the leds commonly being used since it lines up closer to the peak of chlorophyll A.
 

Positivity

Well-Known Member
Got them from ledgroupbuy..http://www.ledgroupbuy.com/exotic-hyper-violet-led-430nm/

not sure of the efficiency measured in mW. They are quite a bit brighter than the 405nm. The light fixture picture kinda sucks but if you look closely on the left side. The small purple light is the 405 and the purplish blue is the 430. Probably less visible spectrum in the 405? The light is turned down to a minimum in the shot, they get much brighter

not sure it's better than a royal blue or I'm sure more peeps would use it. Just used them to fill in the gaps of spectrum where some peaks were, must of been chlorophyll A.
 

Positivity

Well-Known Member
image.jpgimage.jpg

Round 2

going to veg the shorter plants a few days under big light to even them out with the taller ones. Smaller pots this time around. About a 50/50 mix of coco and few year old recycled soil.

the light runs at about 370w total now, up from 355w. My driver had a few watts to spare and adding the blues consumes more watts than the red. Drivers are pretty much maxed out right now, still about 15% leeway for driver inefficiencies. just running 170w right now..120w red and blues...50w whites
 

Positivity

Well-Known Member
Nycd x st3

Cross I made years ago, finally grew it out. This is a sativa leaning nycd pheno. Piney,citrusy, heady....not bad. Will be good for daytime smoke..coco kush is more stony baloney.


image.jpg
 

AdmiralSurf

Member
Probably just continue here with an occasional update

some blumat root porn for now..

View attachment 2935345View attachment 2935344
The roots coming up out of the soil line are unreal. It does make me wonder though if they aren't getting enough water elsewhere in the pot. I see a lot of circling there. Might improve your yield to go with a Rootmaker pot to avoid that wrapping, and the 'mushroom' you ended up with.
 

Positivity

Well-Known Member
The blumats are simple once you get used to them. They just work..

I use it in coco and soil. In coco I use veg + bloom one part, hasn't clogged up yet. Plants can stay in 1/2 g pots for months and stay green and healthy. Like a hydro system that doesn't need electricity. In soil I just use plain water with amended soil. It works beautifully, makes feeding easy. Gets the water drip until it looks hungry....then top feed whatever nutrients...blumats sense the wet pot and shutoff until it gets dry again.

the wrapping is just from extended veg, they go into fabric pots in flower. The mushroom is from nutrients dripping in one spot for months, I kinda like seeing the mushroom, especially when they are white and healthy.

one note on the water distribution in one spot. If you scratch an inch down its consistently wet. Getting a drip at a time keeps the pots evenly saturated.

for anyone thinking of getting them..
Deck and patio kit is good to start with, includes lots of fittings.
get extra quick disconnect shutoff valves for res and end of line flushing
get an extra roll of the small line that runs into blumat. Much more flexible and easier to work with than the rigid main line.
 

Positivity

Well-Known Member
Almost ready for round 2

blumats setup. You can see the small blumat line around the pots. Normally they come with just a short length, like 12" or so. Getting an extra roll of the smaller line makes setup much easier.

image.jpg
 

Positivity

Well-Known Member
Week 1 in flower

much nicer node spacing and branching. The 740nm caused apical dominance and would send only a few shoots up during stretch. Branches are stouter from luxeon blue additions also. Going to run uv all 12hrs also, want to see how that works out. Think I knocked a few days off of flower with flower trigger vs 740nm always on. About 10 days to pistils down to 7.

uv only...bubbak in middle

image.jpg

200w xml white only

200w xml white, 120w red and blue mix, 24w uv
 

Attachments

PSUAGRO.

Well-Known Member
Nice pics^^^ positivity .................and healthy girls.

Interesting about you running the V&B fert through the blumat systems without issues?? usually I heard to just top feed by hand and ALWAYS run 100% plain water in the lines
 

Positivity

Well-Known Member
Yah..zero issues if you take the time to set them up right in the first place. Straight coco makes better contact with the blumat, firm up the soil around the blumat for solid contact. Properly hydrate them. Make a dimple in dirt for water to catch in rather than roll off somewhere.

Veg + bloom been running right through the lines. Haven't done any maintenance in a year
 
Top