You are using an out of date browser. It may not display this or other websites correctly.
You should upgrade or use an alternative browser.
You should upgrade or use an alternative browser.
Top44 Indoor Grow With 250watt CFL
- Thread starter neverstoned
- Start date


neverstoned
Well-Known Member


neverstoned
Well-Known Member
Thank you for the compliments dude.
i am very proud of my plants so far as this is my first every indoor grow and my 3rd ever grown all together, so im still on a learning curve with many years to go..
i owe everything to roolitup as this is where ive got all my information on indoor growing.")
my next project is going to be 12 plants under 6x 250watt CFL lights im in the middles of purchasing all the needed things now
i am very proud of my plants so far as this is my first every indoor grow and my 3rd ever grown all together, so im still on a learning curve with many years to go..
i owe everything to roolitup as this is where ive got all my information on indoor growing.
my next project is going to be 12 plants under 6x 250watt CFL lights im in the middles of purchasing all the needed things now
neverstoned
Well-Known Member

neverstoned
Well-Known Member
ok.. i took 2 clones from my plants a day before i switched to flowering and the are now rooting like a treat. Please note these clones were only taken as part of a test for a cloning solution i purchased as i wasnt sure how well it was going to work i only took 2 clones instead of a bunch incase they didnt root. but this is by far the best cloning soultion i have ever used (babybio Roota). So after seeing the 2 clones doing so well i decided to take 4 more today from the very bootom of my plants as they were just not getting much lights anyway so they will not be missed at all.
Attachments
neverstoned
Well-Known Member
this is my step by step guide for taking clones..
first you will needs..
a pair of very sharp scissors or a fresh razor blade.
a cup of water filled right to the top.
soil.
pots.
humidity dome or clear plastic pot.
rooting solution.
Ok first things first fill your pot/s with soild and get the soild nice and moist (not to wet), then make a hole in the middle of the soil (i use a cocktail stick for this).
Now take a good look around your plants and choose where you are got to take a clone from??. (try and clone from the lower part of plant if you can) the part of the plant you are going to clone should have about 4 / 6 leaves already on it and be about 4 inches long..
now get your cup of water next to the plant that you are going to take the clone from, and get your scissors in hand now hold the part you are cloning in one hand and make a 45 degree angled cut on the branch making sure you are left with out 4 inches of clone, now put the cut end straight into the water (BE QUICK).
Now your cutting is in the water it is safe for a few minutes whilst we do some more work on it.
Ok if your cutting has any leaves bellow the main grow tips remove them, and if there are any big leaves at the top just cut them leaves in half.
now get your rooting solution ready and dip 1 inch of the clone stem into the solution making sure you get a nice layer all round it and then place straight into the hole in your soild, once in the soil press the soil around the stem using your thumbs to make sure the clone is nice and firm (dont press to hard).
Once you have taken all the clones you need place them into your humidity dome (make sure you mist the lid of your humidity dome with a water sprayer every 2 / 3 hours.
if you dont have a humidity dome you can use plastic tupper wear pots ans place them over the pots doing the same misting.
TIP----- it is a good idea the plant your clones into a clear cup so that you can see the roots once they start growing. but make sure you place the clear plastic cups inside a dark cup or your roots might burn.
PLEASE REMEBER... this is just the way i take clones other people might say im doing it all wrong, you just do what you feel comftable with..
HOPE THIS HELPED
neverstoned
Well-Known Member
OMG lol i just read my post back to myself and noticed all the spelling mistakes,, lol well all i can say is im high as a giraffes ass right now
neverstoned
Well-Known Member

neverstoned
Well-Known Member
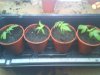
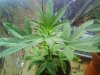
Hi guys i woke up this morning to find the tops of my plants touching the bulbs once again. i am now having to rais my lights 2 inces a day my plants are now 28 inches high and i put them into flower at 11 inches, 14 days ago. So they have grown 17 inches in just 2 weeks im amazed lets hope they dont get too BIG.
ive added another pic taken today you can really see the buds on top now
ive added another pic taken today you can really see the buds on top now
Attachments

neverstoned
Well-Known Member


neverstoned
Well-Known Member
i didnt use any fert for the first week of flowering. i then started to use bloom fert for 2 waterings then flush every 3rd watering. im using quarter strength at the minute
neverstoned
Well-Known Member
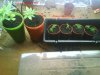
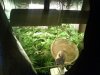
Hi people, i woke up this morning and checked on my plants and noticed that some of the plants were not getting enough light so i decided to change my lights around ive added pics of my new light setup hope you all like.
PLANTS ARE NOW 16 DAYS INTO FLOWERING.
PLANTS ARE NOW 16 DAYS INTO FLOWERING.
Attachments


neverstoned
Well-Known Member
how long have they been in flower for 12/12 ???? my plants took about 3 days to show pre-flowers but i had to use a magnify glass to see them so i would say about 7 days to be able to see signs of sex with the naked eye. hope this helps
neverstoned
Well-Known Member
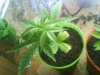
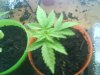
Just fort i would show you how my clones are getting along.. the 2 clones that i took 3 weeks ago are now doing really well, i am using these clones to do some homebrew experiments with and if they turn out ok i am going to keep them as mother plants just for 12 clones of each then i will cut them down and keep 2 of the new clones and do the same & keep the cycle going. one of the plants you will see is in a homemade wick system using a 2litre drinks bottle cut in half. it seems to be working very well so i am pleased and the other plant is in a 16oz drink cup. as you can see the plant in the wick system is growing alot fast than the plant in the pot.
Attachments


neverstoned
Well-Known Member


bizzarebud
Well-Known Member
lOOKS LIKE EVERY THING IS GOING WELL... GOOD LUCK
Similar threads
- Replies
- 4
- Views
- 411
- Replies
- 0
- Views
- 816