Yeh... McMaster really is great... Nice catalog... And cad files for lots of stuff too. I'll let you know if the fittings stay solid...
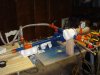
I've personally tried the 2 nozzles I posted about one full cone, one hollow cone... No really appreciable difference as far as I'm concerned... I ended up going with the full cone just figuring on root mass blocking parts of the spray pattern so I figured it was better to have the full pattern. I also tried 2 of the brass nozzles, the fogger that sprays onto a pin point seemed to dribble a much as it misted and the volume was lower... And the fancy $20 nozzle with the helix cut -- have not put any water through this one yet... But I'll post up when I do.
The room is roughly 14x14, mostly subterranean ... Concrete walls and floor, stays nice and cool. And I have another one thats about double that size that I can expand into when I need it.
The solenoids are 120V AC... Probably should have gone with the 24V DC variant, but it made them simple to test this way... And I have an opticly isolated triac output board that I'll run them through so it shouldn't be to bad... But that company I posted about for the DIN sockets in your thread has some slick parts that really got me thinking. They have cords with a bridge rectifier in them that are suppose to drive AC solenoids and eliminate the buzz while prolonging coil life... And they have a clear gasket sort of thing for the low voltage solenoids that has blue (I think Ga LED's are blue...) LED's in it that lights up when the solenoids on... Honestly I thought the ones I ordered were suppose to have an indicator light, but they did not...
I'm not to concerned about it all working out in one shot -- most things don't -- and like you said, as long as you have fun doing it things will work out in the end... One of the things I learned working at a high end body shop was that a lot of the time -- well 2 things really... Things that look like they are simple usually involve a lot of technique this is not readily apparent to a layperson... Simple things like running a file over so metal, or making a nice bead with a welder... And rarely do the people doing them consciously think about this... A lot of them couldn't even tell you what they are doing on that level... It's just automatic... You find a stroke that works and it becomes part of muscle memory... And the second is that a true craftsman is never intimidated when he has to do something a few times to get it right... Things take time, and as long as you can see it through most of the time you can make it work out... Everyone screws up... The difference is knowing how to fix it
")
I'm guessing most people see the topic and just think "Oh gee... A new pump... Good for you... Now will someone please tell me what nutrient mix to use so I can grow a pound every 2 days? Does anyone know why my plants are turning spotted and the leaves are curling under? I don't have a camera and I'm not sure what Ph I'm running... But the spotts!"

Hehehe that's kind of cold... Had more then my share of nute problems and they can be damn hard to figure out... One looks like the other and when you get more then one going it becomes damn near impossible.... Best damn thing I EVER learned was to just dump the solution, feed them something week for a day, and then start off fresh... The stuff is just too cheep to spend a bunch of time second guessing whats swirling around in your buckets.
I also noticed that one one of the pages McMaster has one of those air fed siphon nozzles like you and treath have been talking about... Probably not an atomix or anything... But it seemed pretty similar with the adjustment knob and all... That is one of the lame things about McMaster... You never know who actually makes the stuff until you get it in the mail... Sometimes it's obvious... And you do have to love the nice illustrations... But it can make judging fit and finish a bit of a problem.
T.M.H.


 thats a challenge .