You are using an out of date browser. It may not display this or other websites correctly.
You should upgrade or use an alternative browser.
You should upgrade or use an alternative browser.
The Membrane Meniscus System
- Thread starter Dreddd
- Start date
-
- Tags
- experiment membrane meniscus test
amedeo
New Member
I am using bulkhead fittings with rubber washers so it should not be a bad choice. But I noticed that some bulkheads has a too small body to fit correctly the rubber, so I bought some different types. I am also worried about them to be in plastic material: Andrew recommend them in the book (because the PH interference that other materials could cause maybe?), but at the same time at my point I am more worried about leaks than weird PH behaviour since I don't even have a chance to test it. So if it does not work I'll try with metallic fittings, maybe chromed or galvanized that I think could be better than brass.What are you using to make the holes and what type of seal are you using? Also, what type of container are you using?
I dont do my stuff the same way most people do it. For smaller holes - 1/2" or under, I just drill a hole slightly smaller than the pipe and then forse it through the hole. Im using plastic storage totes from my local hardware supply and that works great for me.
For larger holes, I use male and female threaded plumbing fittings and metal and rubber washers. Drill the hole the correct size, then push the male fitting through the container wall, adding washers as needed. Then thread the female on from the inside - again with washers as needed.
Most people use bulkhead fittings, but you need to be able to drill nice clean holes of the exact size.
If you tried everything and it still leaks, then you're going to have to use some sort of sealant. Silicone for aquariums or a marine grade sealant like 3M 5200 will stop any leak. You have to drain and clean all surfaces though.
You also made me notice that while I drilled perfectly both the holes (I have to screw vigorously the bulkheads in the tray), I still have some imperfections around the hole because of the structure of the tray, so I will also smooth the surface as soon as I change the bulkheads.
amedeo
New Member
Ok I realized why I could not figure it out: I've never seen something like that in Italy! I know, it is quite weird, but I can assure you that we miss a lot of useful things that could be found in a common hardware store abroad! So I am (sadly) bounded to drill myself the holes.
See the tray underneath the hotwater geyser (that is what we call those in these parts), here is another one

I am using bulkhead fittings with rubber washers so it should not be a bad choice. But I noticed that some bulkheads has a too small body to fit correctly the rubber, so I bought some different types. I am also worried about them to be in plastic material: Andrew recommend them in the book (because the PH interference that other materials could cause maybe?), but at the same time at my point I am more worried about leaks than weird PH behaviour since I don't even have a chance to test it. So if it does not work I'll try with metallic fittings, maybe chromed or galvanized that I think could be better than brass.
You also made me notice that while I drilled perfectly both the holes (I have to screw vigorously the bulkheads in the tray), I still have some imperfections around the hole because of the structure of the tray, so I will also smooth the surface as soon as I change the bulkheads.
If you have to use any metal parts, then they must be stainless steel. Galvanized, brass, or chrome metals will corrode and poison your plants. The salts in the nutes are bad for any metal except stainless steel.
ANC
Well-Known Member
Then I would drill it into the bottom on one side, as the ones I showed, have a little recess that guides the water... the water falls back into the reservoir so you don't need pipes and stuff.Ok I realized why I could not figure it out: I've never seen something like that in Italy! I know, it is quite weird, but I can assure you that we miss a lot of useful things that could be found in a common hardware store abroad! So I am (sadly) bounded to drill myself the holes.
The reason I use these trays are that they are cheap, not even $15.
amedeo
New Member
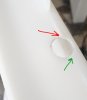
This is my tray and as you said, Larry, it had an imperfection (red imperfection, green smooth):

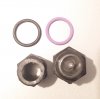
Then I changed the bulkhead: from the "black" one to the "violet" one. The main difference is that the violet has a larger edge that helps the gasket.


So this was my old arrangement

And this is my new one

I also added the leftmost part to add another gasket in a safer way. The line between the components is where the tray lays. It seems it works now, but only time can tell!
Then I changed the bulkhead: from the "black" one to the "violet" one. The main difference is that the violet has a larger edge that helps the gasket.
So this was my old arrangement
And this is my new one
I also added the leftmost part to add another gasket in a safer way. The line between the components is where the tray lays. It seems it works now, but only time can tell!
Attachments


Dreddd
Well-Known Member
Boy am i late with this update, the grow ended a while ago i just couldnt find the time to write this up, anyways my fabric selection ended up failing me again, which is why i started seeing ph/ec shifts some time after changing out the previous fabric, looks like in the future ripstop nylon will be a must.
The plants ended up looking terrible because the russet mite infestation came back and to add insult to injury i began to see ants placing mealybugs on my plants, apparently ants farm mealybugs... wasn't aware of this..
This was the total harvest, they weren't very sweet but then again im not sure if the strain is suppose to be.. and the grow didnt really go that well to begin with.

Here are the poor plants right after picking all the ripe tomatoes, lots of leaf damage.


pulled the fabric to discover this..

penetrated both the fabric membrane and the plastic sublayer, damn near clogged up the inlet.

I still think this system can grow some good crop without ph/ec shifts but the fabric selection has to be spot on.
next system i plan on testing will have a simpler design, no plastic sublayer, just a tray, a buffer mat, and a ripstop membrane, i'll probably use a regular size tomato variety for the more aggressive root formation, the micro dwarf tomatoes roots slow down a lot when they reached max height.
The plants ended up looking terrible because the russet mite infestation came back and to add insult to injury i began to see ants placing mealybugs on my plants, apparently ants farm mealybugs... wasn't aware of this..
This was the total harvest, they weren't very sweet but then again im not sure if the strain is suppose to be.. and the grow didnt really go that well to begin with.
Here are the poor plants right after picking all the ripe tomatoes, lots of leaf damage.
pulled the fabric to discover this..
penetrated both the fabric membrane and the plastic sublayer, damn near clogged up the inlet.
I still think this system can grow some good crop without ph/ec shifts but the fabric selection has to be spot on.
next system i plan on testing will have a simpler design, no plastic sublayer, just a tray, a buffer mat, and a ripstop membrane, i'll probably use a regular size tomato variety for the more aggressive root formation, the micro dwarf tomatoes roots slow down a lot when they reached max height.
any recent update sir?Hey everyone, after reading about the membrane meniscus hydroponic system on Larry3215's thread:
https://www.rollitup.org/t/three-types-of-hydro-in-a-small-tent-on-one-airpump.960095/
I did a little digging, got in touch with the inventor Andrew Parker and also read his book on the system.
On paper it seemed like the next step in hydroponic systems as it claimed to be a recirculating system where the PH and EC dont change throughout the grow, the roots get the maximum amount of dissolved oxygen and it doesn't even require any electricity.
In a nutshell, this system works as a sort of hybrid NFT & wick system, the nutrient solution flows very slowly from one end of a flood tray and drains on the other, while on top of the flowing solution sits a second thin plastic tray with a bunch of holes in the bottom that are protruding slightly upwards to discourage water from flowing back down, this second tray is just touching the solution, not submerged in it, on top of this tray comes the membrane which is a tightly woven thin nylon fabric, this fabric is there to keep roots from growing down into the solution while still allow them to wick water up from the bottom, thus creating a constant upward movement of solution, never down, essentially keeping the solution flowing beneath in pristine condition.
since the roots are always in contact with the wet fabric, due to capillary action they are coated with a thin meniscus film of nutrient solution and in that thin film is where the dissolved oxygen is highest.
So i decided to go ahead and test it out, i built one according to the instructions in Andrews book and since i only have room to test this outdoors i decided to grow micro dwarf tomatoes, they stay very small and compact while still producing flowers and tomatoes and therefore have a higher nutrient demand then say lettuce..
This is what the system looks like:
View attachment 4165227
on the left is a 30L barrel that contains the solution, its connected with some black tubing and a valve to the bottom left side of the tray, the solution flows on the bottom of the tray and drains out the other end into a 20L collection bucket at a very slow rate, around 1 drop every 3-4 seconds, the bucket is manually dumped back into the barrel every week or so when it fills up.
View attachment 4165236
this is what the root zone looks like, what you see here is first the nylon fabric which sits on top of the plastic diy tray, you can see where the holes in the tray are thanks to the fabric that is being pushed up a bit.
Since i started this a few weeks ago you get to see the progress without waiting
This is 9 days ago:
View attachment 4165249
View attachment 4165250
This is 5 days ago:
View attachment 4165254
View attachment 4165252
since starting this grow the EC of my solution has not moved, PH been holding steady at 6.7, im using tap water and masterblend 4-18-38 + calcium nitrate + epsom salt as fertilizer.
So far so good, i'll take more pictures tomorrow.
Airwalker16
Well-Known Member
I can tell you he didn't. ANYTHING that WATER can pass through, ROOTS can pass through. End of story.
billybarns
New Member
Did you have any success with your new method?Actually i am working on a little something, ditched fabric entirly, cant say more because if this works i might try to market it as it would be endlessly reusable.
Similar threads
- Replies
- 118
- Views
- 7K
- Replies
- 2
- Views
- 1K
- Replies
- 183
- Views
- 17K
- Replies
- 0
- Views
- 547
- Replies
- 4
- Views
- 522