The Hippie Gardener's New Yard Centerpiece

Danielsgb

Well-Known Member
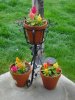
So the Hippie Gardener from my journal [FONT=&quot]https://www.rollitup.org/grow-journals/313042-well-here-goes.htm
decided she wanted another one of these but huge.
[/FONT]Mom's pots done 1.jpg
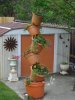
So we got a base and a Huge black plastic pot then painted it clay color. I drilled a 2" hole in the center, and smaller drain holes.H.G pots Wide.jpg
We filled the bottom with some landscape fabric and some crappy rocks. Then extra dirt, then some soil i mixed up to plant into. The big pot is 26" wide and 19" tall.
The next pot is 22" then the next is 22" also but a tighter base to look smaller. H.G pots 3 side.jpgH.G pots 3 filled.jpgH.G pots 3 other side.jpg
[FONT=&quot]
[/FONT]

We'll go 18" 16" 14" then a weird shaped pot to end it. I'll have her list the plants when we do it.
What do you guys think?
Daniels
 

Danielsgb

Well-Known Member
I got the last 3 pots on and filled tonight. They're dampened and hopefully a light rain tonight so we can plant tomorrow.6 pots filled best.jpg6 pots filled best 2.jpgmore plants.jpg
Daniels and the Hippie Gardener
 

akgrown

Well-Known Member
Excellent. This is a perfect example of originality and independent thinking. +rep to you for creativity and being a hippie.
 

Danielsgb

Well-Known Member
I mentioned an Indica would be cool, but it's a little too open for family, co-workers, and non-cool friends. Thanks for all the compliments and rep. Her plan. I just made the comment a "really big one" would be cool. Next thing I know I'm getting meds to help. I'll throw some more updated pics. They are settling in, and in a month it will be silly. I'll add some pics of her yard as we go into the summer. Here's the Hippie Gardener in Green. I added 3 pics for her hint.
Daniels

Hi Guys--Thank you so much for your comments on our sculpture. What is most special to me is that we recycled most of it. It truly is a "green" sculpture. The 26" plastic base came from a tree and the soil from the hole we dug for a Canadian Red Cherry. The vertical sculpture would also hold a tower of herbs.

**Helpful Hint from the Hippie Gardener: When planting in a pot with holes, you can use old nylons to hold the soil. The toes and heels can be cut off and cut along "tube" to flatten it. Rocks can then be placed to hold the nylon and soil. You'll find that it will be more efficient than the soil leaking away. We used landscape fabric for the larger pots in the sculpture. Works great! Good Growing!


5-28 All full.jpg5-28 All full 2.jpg5-28 All full 3.jpg5-28 All full 4.jpg5-28 Hens & chicks.jpg5-28 fiber optic grass mini hen & chicks.jpgHippie Gardener 001.jpgHippie Gardener 003.jpgHippie Gardener 005.jpg
 

Danielsgb

Well-Known Member
Here's some pics of the Hippie Gardener's Flower Beds. I'll throw pics of some plants next.
Daniels and the Hippie GardenerH.G. Main Garden.jpgH.G. Moonlight garden.jpgH.G. Moonlight side.jpgH.G. side Moonlight closer.jpgH.G. Future herbs.jpgH.G. Korean Maple.jpgH.G. Canadian Red.jpg
 

Danielsgb

Well-Known Member
The H.G and her Mom found one of these https://flipflopflowerpot.com/
So they got me one for a Succulent Piece for my office. The H.G. and I talked about one, but too many other projects kept me busy. With the kit it was easier to throw together. On the 2nd and 3rd pot I put 2/3 Styrofoam peanuts with a piece of landscape fabric for less weight. The clay pots were heavy, and succulents and cacti need little soil anyway. I also mixed vermiculite and more perlite in topsoil for some then topped with the M.G. Cactus Soil (and more perlite). I transplanted one cactus I had then a few things from the Main Garden. I have 3 different Hens n' Chicks in a few spots. I broke a green pot to place in spots to break it up. I also put a quartz fossil in a spot on the front to get light in the morning. I left some places to add to it as I find unique stuff. I'll probably use a spray bottle to water it.:eyesmoke:
DanielsSuppies to Start.jpgAssembled 4 pots.jpg1st planting 005.jpgPre-planting.jpg1st planting All four pots.jpg1st planting btm.jpg1st planting 2nd pot.jpg1st planting 3rd pot.jpg1st planting 4th pot.jpg
 
Top