SuperSkunk Manifold

H.A.F.

Well-Known Member
Here's the basics:
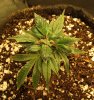
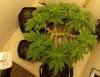
Superskunk from ILGM seed in 3 gallon fabric.
Fox Farms full line of nutes, about 50% strength every other watering.
I use an RO and cal-mag every watering to compensate for that.
Fox Farms Happy Frog soil.
HLG 260 V2 and a AC Infinity CLOUDLINE T6 350cfm exhaust.
IMG_6418.JPG
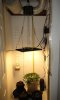
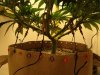
Seeded and veged under a HLG 135 in a small tent. Just moved to flower room, but not flipped yet. Monster cropped 3 clones from my last harvest, and they are going back into the tent when I flip the skunk.
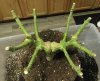
Tried the 'manifold" technique last grow, and it worked, so doing it again.
IMG_6417.JPG
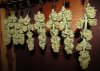
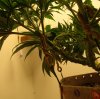
Here was my last skunk grow
IMG_5704.JPG
And the big top on the left looked like this
IMG_6098.JPG
Questions and comments welcome!
 

H.A.F.

Well-Known Member
Last grow was 2 GDP in smaller pots. Had heat/low humidity issues and they weren't pretty, but they produced so here's the one plant example of a manifold. 100 days seed to harvest in a 3 gallon pot. The manifold looked like this:
IMG_6366.JPG
And the octuplets that came from them were all within 10 grams of each other in wet weight. This was 80g cured from one plant Dried to from 9-11g per limb.
IMG_6390.JPG
Edited: And that 9-11g was without those fat stems.
 
Last edited:

H.A.F.

Well-Known Member
Since I'm new here, I don't know if this method is widely used. Here's the gist from the guy that took the time to post it, but stole the idea from someone else. This seems to actually shorten the veg- and recovery time, because after it recovers from the first topping, the prunings after that take no time.
manifold.JPG
 

H.A.F.

Well-Known Member
Here's some other tricks I've learned. Put eyelets in your pot before you start. great tie-down places for LST. Also pictured, the 'expensive' (comparatively) rubber coated plant ties can be turned into hooks, then the $1.99/roll garden ties can be made as long as you need.
IMG_6426.JPG
And the "quick cure" with a vacuum sealer. Supposedly the flowers being in a vacuum sucks the inner moisture out quicker, or allows it to escape or whatever. You can see the buds fluff a little as it vacuums, at first. Did a trial run with an ounce regular and an ounce vacuumed (both with 62%rH packs) and it took roughly 2 weeks to get to the right 'feel' vacuumed, and the usual month jarred regularly.
IMG_6424.JPG
Burped and re-vacuumed once a day minimum, more often at first, and I empty the jar each time and let it air out for a few minutes, and make sure nothing is stuck together. Once it all rolls out loose, it doesn't need to be dumped, just burped and re-vacuumed.
 
Last edited:

H.A.F.

Well-Known Member
I can't post a link yet, but look up "Nebula's Manifold" and it's on the growweedeasy forum.

Basically think about an un-pruned plant. The first node or two is larf no matter what you do. From there, they are randomly 'medium to large' then a big fat top.

"When the plant is split this way, it completely destroys the “apical dominance” or the tendency of the plant to focus mostly on its one main stem. With your plant’s apical dominance broken, it tends to make many long and thick buds sites (colas), instead of just one main one."
 

diggs99

Well-Known Member
def following along with this one.

good info in this journal already, its apparent you obviously know what your doing.

nice job on last crop, good luck with this one.
 

H.A.F.

Well-Known Member
def following along with this one.

good info in this journal already, its apparent you obviously know what your doing.

nice job on last crop, good luck with this one.
Thanks! I'm just growing for me, and I'm retired so this is one of my hobbies.

I like trying new things, but if I find something that works (like the manifold or quantum boards) I stick with it.

Last time I pruned every shoot until I flipped, then let it go. this time I'm training it more and letting it veg for a few weeks longer to get some height, and I'm not pruning any more shoots for now. You can see all the pruning done up to now, from the stubs.
IMG_6430.JPG
I either snip or pinch shoots off, but I leave the fan leaves until they get in the way. I basically trim it like a scrog, naked underneath, and keep it level on top like a scrog, but not having a net in the way gives you lots more options. When I feed them I untie everything, then retie it after. All it takes is ripping one limb off because your stoned butt didn't notice the watercan hung up on the twist tie... "new rule!" :)
IMG_6431.JPG
You can see 3-5 tops on each limb. Last grow there was just one per limb until the flip. So we'll learn together LOL
 
Last edited:

H.A.F.

Well-Known Member
And since I'm on here anyway, I use the FoxFarms feeding schedule but I found a trick to keep the plants happy.

First, I go easy on the nutes (50% strength) the easy way. Use their exact measurements for a gallon, but mix it into 2 gallons of water - NO MATH!
If they are in flower I'll push it up to 75% (mix in 1.5 gal)

Second, 7 day weeks don't work well. If you feed once a week, and water once in between feedings, there's a weird 3day-4day thing going on. Use a 6-day week. Feed-nothin-nothin-water-nothin-nothin. If your plants aren't drying out good enough in between, switch to 8-days. And I never poke my finger in the soil. Lift the pot. Feel if it is heavy or light. When you first transplant lift it dry, then feel how heavy it is after you soak it. A gallon of water weighs 8 pounds, so it is pretty noticeable if they need water.
 

H.A.F.

Well-Known Member
First attempt at cloning and I decided too 'monster crop' taking them at 3 and 4 weeks into flower. the 1 gallon pots are a week older and from one plant, the 2 gallon is from the V8. Took 2 but only one made it, so 75% success on the first try. This is my veg-tent with the HLG 135. I flipped the skunk today, so I had to separate them again. I'm hoping the few days under the 260 'hardened' them a little. Took them about a week before Christmas.
IMG_6432.JPG
I used smaller pots just to see what happens, since it's basically free weed. The round leaves I read about have showed up on all three, but one is starting to take off.
IMG_6437.JPG IMG_6440.JPG
If this works, they should be ready for flower about the same time as I harvest the skunk
 

H.A.F.

Well-Known Member
I decided to flip, regardless of height, just because I have a lot of cola for a small pot. I don't want to have rootbound issues later. 2 branches on one end were growing noticeably faster than the other 6, so I topped them. Here is one of those. the 5th cola on the top right is from 2 nodes down, then 2 and 2 from the topping.
IMG_6442.JPG
So here's the last pre-flip pic. the 2 on the far left are the topped ones.
IMG_6441.JPG
 

H.A.F.

Well-Known Member
I'm not going to post every time I water, but when or think of another trick or I see something 'noteworthy' it'll be here.

Another basic for me is doing the light cycle at night. Really helps with temperature fluctuation in summer and winter.

Did some LST today, and pruned a few leaves that were shading shoots.
IMG_6445.JPG
Wanted to post it now, and if my stoner butt doesn't forget I'll post another in a few hours after everything points north again.
From the underside, My technique with the pot having all the eyelets is to create a scrog-type top, without all the tucking and breaking and nets in the way.

I water about every 3rd day, and I usually use that time to LST and re-position stuff. On each limb, As soon as there is room between nodes I move the hook up, then carefully bend it and re-tie. At first it was to create room for light in the middle, now that I'm leaving shoots I try to guide them as well.
IMG_6446.JPG
 

H.A.F.

Well-Known Member
I remembered!
IMG_6449.JPG
I guess my rule of thumb is that I want to see the light green new growth. Today was LST and snipped one shoot and about 5 fan leaves. Nothing but leaf tucking until the next watering.

As soon as I see pistils, it's pretty much hands off for major LST. That is why I'm being pretty drastic now. After that I'll prune the occasional leaf or two, but that's about it until I see a brown pistil, then it's just guiding and supporting flowers. So far with this technique I haven't had to use the plant yo-yo's I bought. The 8 main branches get pretty stout by the time the buds get dense. The trunk on the last one was bigger around than a roll of quarters, and the plant was only about 20" high in a 3 gallon pot.
 

H.A.F.

Well-Known Member
Thanks @H.A.F. I will follow too. I think Nebula is a gal though and she gave credit to Nugbuckets whose original thread is here on RIU: https://www.rollitup.org/t/the-main-lining-thread.542308/
I have both links saved, nug-buckets and nebulas LOL

I slow-veged these for a while waiting for my previous harvest. I am trying leaving more cola this time and see how the weight compares. Last manifold was just the 8 tops, but I left one shoot on each branch about 2 nodes down from the top on the inside. Each of those produced a decent top and 2 dense nugs. I also kept pruning shoots right up to the flip. This time I topped a few, and left the top 3 nodes alone to 'shoot out'. I may prune a few of those if it gets crowded, but I have plenty of room to just stretch them out.

The thing I learned about the Superskunk seeds I have is that they are hearty, they can take a beating and flourish. That is why I'm trying several different things on the same plant.
 

H.A.F.

Well-Known Member
Pro-tip!

I forgot to mention. Root-riot or similar peat sponges! I have a fool-proof (so far) germination and seedling system so far. I'm gonna burn one and get some pics together.
 

H.A.F.

Well-Known Member
First, I use 1ml of 3% h2o2 in a shot-glass (30ml) of water. (distilled, filtered, RO)
soak the seed in the mix for 24hrs on a heat source (germination mat, cable box, etc.) . cover with a solo cup.
IMG_5282.JPG
After 24hrs, you should see a tail - but as long as you are positive which direction to place the seed (point down) it doesn't matter.
If you need to see a tail put a folded paper towel on a plate, dump the whole shot glass onto it, fold the paper towel over, then drain the excess water off. wait another day and you should be good.

Here's the trick.

Widen the hole on the rooting plug (Root Riot, Rapid Rooter, etc. NOT JIFFY PELLETS!!!) if needed to get the seed about 1/4" down, really is easier if you don't wait for a long tail.

Put the plug (still fairly moist, but not soaking) immediately into your dry-ish starter soil. They can stay in here until they are ready for their big pot, so I use about 50/50 peat and FF Happy Frog.
IMG_5335.JPG IMG_5340.JPG
Trick 2 - Use a clear solo cup for the soil, Use scissors and slice both sides all the way to the bottom so you can open the cup in half. Cut some notches in the bottom for drainage, but then tape the top of the cup back together. The clear cup allows you to check on root development see how dry the soil is, etc.
IMG_5711.JPG IMG_5833.JPG
But since light and roots is bad, I set it in an opaque solo cup. I cut the entire bottom out of that cup for drainage and aeration as they get bigger, but at first I set it in another cup and dome it to keep the humidity up.

Any watering I do in the cup is minimal, just around the outside, or sprayed into the crack on the side of the cup. When it's time for transplant, you can see it, and you can just open the clear cup in half to remove the plant instead of having to pull on them or dump them upside down. So far the only transplant issues I have seen has been a pause in growth for a few days as the roots get established. But if you get it at the right time it's hardly noticeable.

I soak the cup with prepared water and let it drain about 3-4 hours before transplant. helps the soul stick together, and gives the seedling a good watering to help with transplant shock. I'll usually add rooting stuff to the water, microbes and whatnot.

So there it is. Hope this helps, if you can use some or all of it.
 
Last edited:
Top