Stealth grow dresser, 12 23w CFLs, LST + scrog screen, white widdow + sour desiel

BongHolyeo

Active Member
Hi everyone,
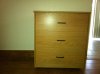
I have been a
smoker for a few years, but after getting arrested i decided i am done dealing with shady people, and will be growing my own personal stash now. Well this was about 2 months ago and after lots of reading on "rollitup", and a few weeks of build time between school and work, this dresser is what i came up with.

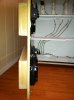
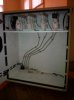
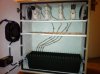
interior dimensions- 30" tall 26.5" wide and 14" deep

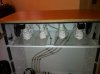
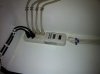
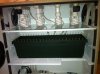
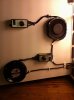
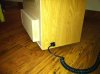
electrical is all wired up to a 8 socket light timer inside the box which is wired to a removable cord on the exterior of the box. 4 of the plug ins are programmed on the timer for the lights and 4 of them are programmed to be on always and that is what i have the fan speed controllers plugged into.

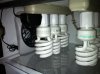
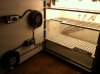
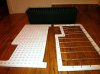
lighting- 12 23w CFL bulbs ( 6-65k, 4-5k, 2-27k ) for flower i will be doing 8 27k and 4 65k, shelf under with 2 glass panes to prevent plants from ever touching the lights directly. the bulbs are 3 per power strip and 4 power strips for the top.

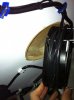
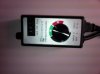
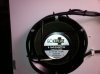
fans- 2 70 cfm fans to blow hot air from lights down to main chamber to be exhausted ( these are plugged in to the lights power strips at the top so they turn off when the timer turns the lights off ), 1 235 cfm ecoplus fan on intake and another 235cfm ecoplus exhaust fan. both intake and exhaust fans are on growbright fan speed controllers to quiet them down.

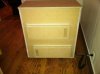
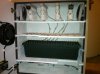
grow pot- 4.13 gallon grow pot 24" long 8" wide at base 10" wide at top and 6" tall with hooks every 1" around the top for LST strings to be attached

Scrog screen 2" by 2" netting made from speaker wire

movable shelf with 1/2" holes every 1" to still get air circulation

light traps on the back guide airflow for intake and exhaust while making light leaking a non issue

I ordered 1 white widow seed and 1 sour deisel seed and they are germinating as i type this so i will be updating when they are planted and as they grow. Get excited i know i am!

I probably forgot to list some stuff so any questions just ask.
Hope yall like the box as much as i do

IMG_0023.jpgIMG_0033.jpgIMG_0024.jpgIMG_0031.jpgIMG_0030.jpgIMG_0034.jpgIMG_0027.jpgIMG_0032.jpgIMG_0036.jpgIMG_0035.jpgIMG_0020.jpgIMG_0026.jpgIMG_0028.jpgIMG_0025.jpgIMG_0037.jpgIMG_0029.jpgView attachment 1827468View attachment 1827469View attachment 1827470View attachment 1827471
 

sicks stuff

Active Member
it looks like a well thought out (electrically, and structurally), grow box, but for the life of me, i can't figure out where your intake vent (inside the box) and extraction fan are.

not a criticism, just a word to the wise that you probably already know, but in natural convection, heat rises, intake should be at the bottom, heated air extraction should be across the box at the top...

i'm sure they must be there, but i'm too stoned to figure it out...

g' luck...
 

BongHolyeo

Active Member
Thanks for the comment. Both of the fans are on the back door that opens and shuts on hinges. The one on the bottom is the intake, and the one at the top the exhaust. You can see the fans in the photos of it open next to the fan speed controllers, and on the one of the back of the box those things that stick out are the light traps and the fans are behind them.
 

sicks stuff

Active Member
Thanks for the comment. Both of the fans are on the back door that opens and shuts on hinges. The one on the bottom is the intake, and the one at the top the exhaust. You can see the fans in the photos of it open next to the fan speed controllers, and on the one of the back of the box those things that stick out are the light traps and the fans are behind them.
yeah, i understand that part.. hahaaha i'm not "that" stoned.. but how does the intake fan 'pull' air into the box?? there doesn't appear to be an internal vent from the rear light trap. and how does the exhaust 'pull' the heated air from inside the box??

i just cannot for the life of me visualize where the vents from the light traps are to and from inside the cabinet??? like i said before, this appears pretty well thought out, but from the fotos provided i just can't make out how the air gets from inside the dresser into the light traps...

air exchange is better accomplished with fans pulling air, rather than pushing it, efficiency wise.. plus fighting natural convection seems problematic...
 

BongHolyeo

Active Member
OH i see what you are saying they are 6" fans so directly behind them i used my jigsaw and cut 5.75" circles, just enough room to mount them with 4 3" long screws but still allow for almost full airflow. Then on the exterior it was just two holes exposing the fans inside and i then used liquid nails and some MDF and built light traps that have slits cut on the face on the opposite side of the hole exposing the fan for a little box that lets air flow but blocks almost all of the light. At night there is a very dim glow emitted from the two slits where the air goes in and out, holding paper up to the slits you can see it sucking or blowing.
 

BongHolyeo

Active Member
Thanks alot man i spent a lot of time making sure it was well built so that i had no excuses for any problems i might have with my plants. The seeds have now germinated and got planted this morning, i will update with more photos as soon as the plants break the surface of the soil.
 

mastiffkush

Well-Known Member
Looks good, but where is your light timer? I notice the powerstrip, those are GARBAGE...i used one for about 2 days before i took it back to the store. You cannot program it for 12/12 cycle, it is not to be trusted, please do yourself a favor and buy a timer!!!!!
 

BongHolyeo

Active Member
Looks good, but where is your light timer? I notice the powerstrip, those are GARBAGE...i used one for about 2 days before i took it back to the store. You cannot program it for 12/12 cycle, it is not to be trusted, please do yourself a favor and buy a timer!!!!!
The light timer is the power strip at the bottom of the box with 8 outlets. 4 of the outlets are set on the built in timer ( have the 4 power strips the lights are on plugged in there) and 4 of the outlets are always on (for the intake and exhaust). What didnt you like about the timer power strip exactly? i am open to replacing it as i do not want any issues with my plants i am just confused as to what is wrong with it i have yet to try the 12/12 cycle like you said on the timer but the 18/6 cycle tests worked just fine. I do not know a lot about timers i mostly just built this box from online reviews and taking parts i liked from others builds on RUI and just smashing it all into a small craigslist dresser.
 

mastiffkush

Well-Known Member
The light timer is the power strip at the bottom of the box with 8 outlets. 4 of the outlets are set on the built in timer ( have the 4 power strips the lights are on plugged in there) and 4 of the outlets are always on (for the intake and exhaust). What didnt you like about the timer power strip exactly? i am open to replacing it as i do not want any issues with my plants i am just confused as to what is wrong with it i have yet to try the 12/12 cycle like you said on the timer but the 18/6 cycle tests worked just fine. I do not know a lot about timers i mostly just built this box from online reviews and taking parts i liked from others builds on RUI and just smashing it all into a small craigslist dresser.
I wasn't able to get the timer to work, then 1 day into figuring it out the clock kept on resetting back to 1200 and flashed..it did this about 3 times and you know how long it takes to get that thing programmed..its just not worth the effort... Get yourself a heavy duty mechanical or digtal timer and plug your extension cord into it with all of your lights, JMO i think that you would be better off and not have any worries!
 

BongHolyeo

Active Member
I wasn't able to get the timer to work, then 1 day into figuring it out the clock kept on resetting back to 1200 and flashed..it did this about 3 times and you know how long it takes to get that thing programmed..its just not worth the effort... Get yourself a heavy duty mechanical or digtal timer and plug your extension cord into it with all of your lights, JMO i think that you would be better off and not have any worries!
The timer was a bitch to program, i will give you that, and every time that i unplug the box to move it to a different room i am stuck reprogramming the time of day on the timer. If i do have any problems with the actual functioning of this timer i will be replacing it but until then i am going to leave it. Do you have any suggestions on timers that are of nicer quality? brands or specific functions to look for would be helpful because i am designing a similar flowering dresser that will need a timer also.
 

mastiffkush

Well-Known Member
You dont have to spend a ton on a timer for a single light, just a basic $10-20 dual 3 pronged outlet will work for you needs, brands..none specifically.
 

BongHolyeo

Active Member
i like your design very smart and looks awesome!! i want to make one just like it haha
If you want a grow dresser i really would recommend building your own like i did, it saves you tons of money over buying a pre-fab one and they are fun to make. I could walk you through it if you were serious about it.
 

dank smoker420

Well-Known Member
yeah i like building shit my own so i can make it exactly like i want it to be
i would be serious if i could find a dresser or something that is cheap and would make a good box. i went to salvation army the other day and every good cabinet/dresser was part of a damn set
 

BongHolyeo

Active Member
yeah i like building shit my own so i can make it exactly like i want it to be
i would be serious if i could find a dresser or something that is cheap and would make a good box. i went to salvation army the other day and every good cabinet/dresser was part of a damn set
I bought mine on craigslist for 10$. i would recommend getting one a little larger than the one that i did so you have more grow height, the only reason i built such a small one is i plan to use this one as a veg box and build a 6 drawer tall dresser into a flowering. Good luck picking out a dresser make sure you get one you like because there is no turning back once you start!
 

mastiffkush

Well-Known Member
I bought mine on craigslist for 10$. i would recommend getting one a little larger than the one that i did so you have more grow height, the only reason i built such a small one is i plan to use this one as a veg box and build a 6 drawer tall dresser into a flowering. Good luck picking out a dresser make sure you get one you like because there is no turning back once you start!
I recommend trying to find an armoire, they are wider and taller!
 

jdillinger

Active Member
Wow It looks really really good.

Was wondering where your intake and outtake points are? Other than that it looks great. Smart work on some points, and its your first grow, I had to redesign mine at least a few times before getting to somewhere like yours. Also with your constraints I would have suggested the lowryder strains, but its just as fine to let it veg until its 1inch then flowering.
 

BongHolyeo

Active Member
IMG_0052.jpgIMG_0050.jpgIMG_0051.jpgIMG_0049.jpg
Wow It looks really really good.

Was wondering where your intake and outtake points are? Other than that it looks great. Smart work on some points, and its your first grow, I had to redesign mine at least a few times before getting to somewhere like yours. Also with your constraints I would have suggested the lowryder strains, but its just as fine to let it veg until its 1inch then flowering.
As far as you having to redesign yours a few times, i had to totally tear this apart and start over twice perfecting things and the back door on the box with the intake and exhaust i had to rebuild 3 times to get it just the way that i wanted. And you are not the first person to be confused by my intake and exhaust so i took so more detailed photos to clear things up hope this helps. If you look at the photo behind the 6" fan there are 5.75" holes into the light traps so that air can flow freely but the bends in the light trap stops the light from escaping. before those boxes on the outside of the back door there were just 2 5.75" holes exposing the fans to the outside. I also took a side shot of the back door so you can see how the light traps line up with the fans. ( ill add these photos to my original post as well )
 
Top