Pelt's First Grow Box and Indoor Grow Journal
- Thread starter pelt1
- Start date
pelt1
Well-Known Member
I really doubt it Giblet. Right now, as it sits its consistently warmer than the ambient temp. Right now inside the box its been a consistent 79 degrees since I started running it. Which is a few degrees warmer than ambient temp. I think in winter I will easily be able to control this temp as it sits in a room where if it gets too warm I can simply crack a window.Would a box like that stay cool if the ambient temp outside the box was say 100 degrees?
I'm sure adding better cooling would help, I knew I would be doing this in during cool weather, I'm sure if it where 100 degrees the box would be really warm.
Giblet
Well-Known Member
The reason I ask is because I'm trying to decide whether to just grow in my closet or grow in a cabinet. My closet has no air vent but I should be OK too due to the weather cooling down. So I guess a cabinet would not really make a difference in temp as long as I have fan blowing then right? Kind of a dumb question I guess lol. So is the only advantage to growing in a cabinet stealth? If so, I think I'll just use my closet as a really big cabinet. Thanks.
Plus I'm too dumb to build anything as nice and clean as your cab. Very nice work sir.
Plus I'm too dumb to build anything as nice and clean as your cab. Very nice work sir.
pelt1
Well-Known Member
Stealth and portability possibly. Also with your cabinet, you could get a $10 thermometer, sit it in there now and see what type of steady state values you get. This will change with lights and all but at least you'd get a baseline to see if its even feasible in that particular cabinet.The reason I ask is because I'm trying to decide whether to just grow in my closet or grow in a cabinet. My closet has no air vent but I should be OK too due to the weather cooling down. So I guess a cabinet would not really make a difference in temp as long as I have fan blowing then right? Kind of a dumb question I guess lol. So is the only advantage to growing in a cabinet stealth? If so, I think I'll just use my closet as a really big cabinet. Thanks.
Plus I'm too dumb to build anything as nice and clean as your cab. Very nice work sir.
I'm not sure exactly how much of a difference it would make, but there is also something to actually EXCHANGING the air in your grow space as opposed to just recirculating the same air. There's a rule, either 3 or 5 times per minute you want to be able to exchange the air in your grow space I think? Just something to think about.
----EDIT------
Just checked and my box is about 7 degrees warmer on the inside than the ambient air around it. So in the room it is 73 degrees but up to 80 inside the box. So I'm right on the edge, my goal is to stay somewhere between 65-80.
pelt1
Well-Known Member
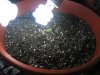
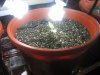
3 days after planting seeds
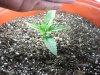
Woot!! Both of my seeds have sprouted!
A bit less than 72 hours after planting, I now have some green in both pots. The first one that sprouted was a bit above the surface this morning, and had the cracked seed still attached to the top of it. I was able to break this off. So now its just a matter of the leaves folding down.
I gave them about 8ozs of tap with a pH of 7.0 today.
pelt1
Well-Known Member
No serious updates save for the leaves folding down on that second sprout.
Two orders of business.
1.) I will be exactly doubling my lighting inside my case. This will bring the total wattage to 23 x 12 = 276 watts inside my case. So still less than a 3 bulb fixture using standard 120w light bulbs. In total I will have 12 lights inside the cab. For now the plan is to mount the new lights in the same fashion as the other lights. This may change in the future to get lighting to various bud sites.
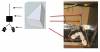
2.) I am thinking about building a hood to cover and reflect light downwards toward the plants. The plan is to do this for each fixture I have hanging using cardboard covered in mylar. If I dont do one individual for each fixture, I will do one big one that just blankets all 6 of my fixtures.
Attached is a general idea of what I mean.
Two orders of business.
1.) I will be exactly doubling my lighting inside my case. This will bring the total wattage to 23 x 12 = 276 watts inside my case. So still less than a 3 bulb fixture using standard 120w light bulbs. In total I will have 12 lights inside the cab. For now the plan is to mount the new lights in the same fashion as the other lights. This may change in the future to get lighting to various bud sites.
2.) I am thinking about building a hood to cover and reflect light downwards toward the plants. The plan is to do this for each fixture I have hanging using cardboard covered in mylar. If I dont do one individual for each fixture, I will do one big one that just blankets all 6 of my fixtures.
Attached is a general idea of what I mean.
pelt1
Well-Known Member
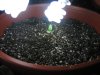
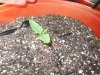
4 Days after Planting seeds, 4 days overall
Here are some shots of the little girls now. They're doing ok. For now I have most of the lighting removed as I figure since they're just to tiny little seedlings, I can cover it all as I literally have the light a half inch right off the top of each one.
Here are some shots of the little girls now. They're doing ok. For now I have most of the lighting removed as I figure since they're just to tiny little seedlings, I can cover it all as I literally have the light a half inch right off the top of each one.
pelt1
Well-Known Member
For sure, thx!Nice build bro +rep!!
pelt1
Well-Known Member
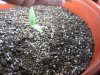
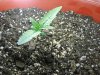
Day 6 Overall, Day 3 after sprouting
Not much progress so far. I am still only using 4 of the 6 lights I have in my cab, as I can completely cover the small plant with one light each.
I haven't watered since the seeds first sprouted above the soil, which was 3 days ago. The soil is still plenty moist though.
Not much progress so far. I am still only using 4 of the 6 lights I have in my cab, as I can completely cover the small plant with one light each.
I haven't watered since the seeds first sprouted above the soil, which was 3 days ago. The soil is still plenty moist though.
pelt1
Well-Known Member
Make sure you keep watching!hey man ur off to good start ill be followin ur progress make sure to keep us updated
Day 8 since planting, Day 5 after sprouting
Not a whole lot of change as of now. But I can't complain. The leaves so far have just gotten longer. Still have yet to give this plant any water, which has me a bit worried. Soil is still moist two inches down though. I have moved the lights up a click each day as the plant approached the light though so it must be growing.

pelt1
Well-Known Member
That's an awesome journal you have there with the explanation!! I have gone through many ideas with my grow.
I plan on updating it with a full plan with pictures. But initially it was going to be a 6 light CFL grow. Then after reading a lot of journals I decided to go for an LST grow. Then I thought about not having a lot and purchased all my materials to double my light output and add another 6 lights. Well then I thought I would just add a 150HPS light to get things really going.
So i have settled on at least my grow setup. I am going to leave my box just like it is and add the 150watt hps. So in my main box there will be 6 CFLs for side lighting, plus the 150HPS.
I am going to also build a really quick and dirty pre-vegging/cloning box. I am literally going to make it from a few pieces of wood and cardboard, add 2 PC fans to it, and 6 CFLs.
At that point, I'll be taking clones from the main box, and letting them veg out in the crappy box for a few weeks before transferring them, and on and on.
As for the plant, i.e. topping or LST, I can't make up my mind. This is just too much fun with so many options so I'm kinda all over the place.
pelt1
Well-Known Member
So I have my pre-vegging/cloning chamber started. The dimensions as it sits now are 14x14x25.
I used all of the mdf board left over from the shelves I never build into my main grow box. But I still need a top,bottom and front door.
I also have to wire up the PC fans and the lights, and line the inside and install a lock. I should be finished with it some time today or tomorrow.
This box will house 6 23 watt cfls.
pelt1
Well-Known Member
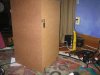
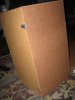
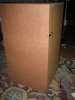
More grow box prono. Just about finished with what will soon be my pre-vegg/cloning chamber.
I'm rather happy with this box, although it is not something you would put a television on top of")
It's not all that stealthy as it kinda looks like there is something going on with it. If I saw it I'd want to look inside.
But I'm pretty much finished. I just need to install the floor, create my light traps for the fan, wire up the fans and line the inside.
I'm rather happy with this box, although it is not something you would put a television on top of
It's not all that stealthy as it kinda looks like there is something going on with it. If I saw it I'd want to look inside.
But I'm pretty much finished. I just need to install the floor, create my light traps for the fan, wire up the fans and line the inside.
pelt1
Well-Known Member
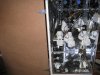
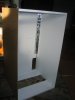
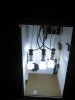
It's Alive!!!!!
Here are some pics of the light trap I made. I'm not sure if I am going to use them though, I don't like the amount of space they take up. I might try to see if I can come up with some louver type design that I can just tape to the outside of the box. It won't stop all the light but its not much of a concern to me at the moment.
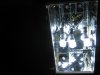
And here is a pic of what it looks like now with the lighting installed. It's hella bright in there.
I still need to pick up another fan and a converter for them. Wire that up, and do some tidying of the box and I should be good to go for whenever I get the chance to take some clones.
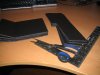

Here are some pics of the light trap I made. I'm not sure if I am going to use them though, I don't like the amount of space they take up. I might try to see if I can come up with some louver type design that I can just tape to the outside of the box. It won't stop all the light but its not much of a concern to me at the moment.
And here is a pic of what it looks like now with the lighting installed. It's hella bright in there.
I still need to pick up another fan and a converter for them. Wire that up, and do some tidying of the box and I should be good to go for whenever I get the chance to take some clones.
pelt1
Well-Known Member
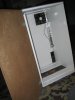
Ok. I think I am done. At least it is now sitting in the location where it will reside, and I'm letting it run while I monitor temp/humidity. But I don't expect a problem, I went with 2 exhaust fans and one intake, similar to my main box. And this one doesn't have any light baffling right now. I'll deal with that later. And if I do add it, I will put it on the outside.It's Alive!!!!!
But here are the pics, maybe not quite as clean as my other box, but it will get the job done. I would say the cost of this box was less than $50.00. Most of that cost being the actual lights, the power strip and the AC/DC converter.