ONE MORE TIME Around FOR THE OLD MAN in The Wardrobe Grow
- Thread starter Tim Fox
- Start date
Tim Fox
Well-Known Member
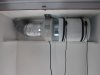
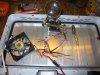
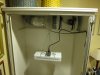
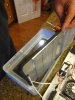
I also was able to get the passive 4" intake hose on easily once the adaptor was tightly screwed to the cab, you can see the speed controller on the floor, the controller will get a mount on the wall next to the outlets, probably just a small shelf that I will use some scrap wood to make, so its off the floor out of harms way if there is a flood, and you can see how the electrical outlets are hopefully well out of the way, I used the shallow electric boxes to keep them shallow as I could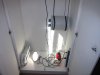
fishdeth
Well-Known Member
Dang !fan and filter mated , duct tape on all joints, caulked the elbow where it exits the roofView attachment 3335773
Looking good, you got skilz !
MAJOR-RED-EYE
Active Member
If your unsure where to put your sockets think where's coolest and least humid that's where it's safest mine are in front of my carbon filter on the side
Tim Fox
Well-Known Member
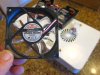
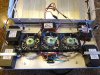
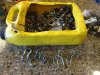
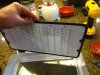
The light for the first run is a Mars Hydro 300 watt first gen, with an actual draw watts of 180, supposed to be good for 3 foot x 2 foot, which is the size of my box, the fans were kinda loud, so these pictures show me replacing the stock fans with a very quiet pc fan, the results were amazing, you cannot hear this light now, especially when its inside the box, stealth work continues to rock, cut and soldered all the wires and used heat shrink to ensure the connections stay permanent and tight/sealed, 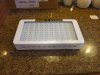
FranJan
Well-Known Member
Cutting the fan covers off the case and replacing them with wire covers and also redoing the thermal paste on the heatsinks will do wonders for cooling. Moving the drivers out of the case will too. Strange drivers. Never saw constant current drivers that don't run at a constant current LOL. Maybe they're selectable, I don't read Chinese. And aren't those "5 watt" diodes? Maybe new drivers would be better too. Whatever though, thank you for the pix and good luck.
P.S. Removing the glass will also help with heat and up your radiometric output from probably somewhere between 7 and 12% I would think. That and cutting slices into the corners of the faceplate and carefully bending the metal into contact with the mounting plate will help with the light that gets trapped around the edges of those stock Chinese case. Terrible cases btw. Crap when it comes to cooling. Oh well.
P.S. Removing the glass will also help with heat and up your radiometric output from probably somewhere between 7 and 12% I would think. That and cutting slices into the corners of the faceplate and carefully bending the metal into contact with the mounting plate will help with the light that gets trapped around the edges of those stock Chinese case. Terrible cases btw. Crap when it comes to cooling. Oh well.
Tim Fox
Well-Known Member
I have tried to make sure I am having fun as I go along with this project and grow, today I was super frustrated as I light sealed the wardrobe, and I had to remind myself that this is supposed to be a good time, after much trail and error, the cab is light tight, thank goodness I have ways of making small adjustments on the doors, YOU GUYS GROWING IN REFRIDGERATORS!!! you lucky sons a guns, all that door closing and light sealing and white inside, already kinda done!,, I am off to the hydro store, I want to exchange the grow bags from the 5 gallon I have now to the 3 gallon, they will fit better in the floor space and make it much easier to find trays to fit underneath
TripleMindedGee5150
Well-Known Member
Nice dude. Great share. I've got myself a little micro cabinet going and have had some major time getting circulation and temps under control. Finally I think I got it.
But I've already been mental planning of a bigger cabinet next go around. Cool cabinet
But I've already been mental planning of a bigger cabinet next go around. Cool cabinet
Tim Fox
Well-Known Member
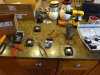
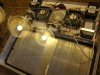
exchanged the 5 gallon grow bags for some 3 gallon bags at the hydro store, guy didnt want to take the other ones back because I opened the bag, I showed him his own store reciept , , , 30 percent restock fee on opened items, come on man, just push me back to the internet stores??? so any ways,, here are the plastic saucers I got at the nursery , 13 inch round and the 3 gallon grow backs are 11 inches , good fit, keep the water contained, 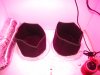
Tim Fox
Well-Known Member
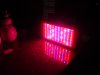
Great Advice, I took the led housing apart and removed the glass, even though it was real glass and not pexi, I held it up to the light and there sure was a slight tint , or so it seemed, well now the leds have direct path to the plants,Cutting the fan covers off the case and replacing them with wire covers and also redoing the thermal paste on the heatsinks will do wonders for cooling. Moving the drivers out of the case will too. Strange drivers. Never saw constant current drivers that don't run at a constant current LOL. Maybe they're selectable, I don't read Chinese. And aren't those "5 watt" diodes? Maybe new drivers would be better too. Whatever though, thank you for the pix and good luck.
P.S. Removing the glass will also help with heat and up your radiometric output from probably somewhere between 7 and 12% I would think. That and cutting slices into the corners of the faceplate and carefully bending the metal into contact with the mounting plate will help with the light that gets trapped around the edges of those stock Chinese case. Terrible cases btw. Crap when it comes to cooling. Oh well.
Tim Fox
Well-Known Member
Ready to Roll,,Dang !
Looking good, you got skilz !
Tim Fox
Well-Known Member
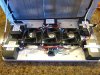
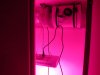
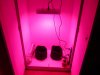
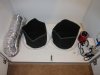
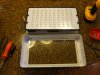
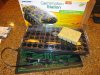
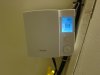
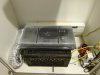
Ok, the wife likes to keep the bedroom at 60 degrees, and i am finding it very easy to work with that number. The Germination station has a heating mat, and with the germ dome and heat mat in the Cab doors closed, the dome temp got up to 73, it rose the temp 10 degrees, everyone seems to agree that 80 degrees is great for germinating seeds??? So early on I wired up a short baseboard heater, back when I thought I was going to have to grow out in my barn in the middle of winter!! So I went and grabbed this thing, which I had made a special stand for, and it has a super trick one week programable digital thermostat , I took the heating mat out and left the dome in the cab and plugged in the heater and set the thermostate for 80, I will check back in 1 hour and see what the temp and humidity is in the germination dome then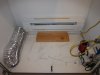
GrowUrOwnDank
Well-Known Member
The cabinet is a beauty and you did really well. The only thing I see I don't like are those outlets near the floor. I actually built a cabinet very similar except, I had a shelf at the top and all the electrical started Up top and ran down to the appliances. The top of the cabinet would lift up for easy access and I use a timer/surge surpressor strip with 4 always on and 4 times strips. It sat in the top so no worries about water splash hitting the outlets. Or if you flood using a hydro. 1 source was plenty since I also used CFLs and an LED, small fans etc. Well under the 1500 rated watts probably 300 or something tops for 1 plant.Ok, the wife likes to keep the bedroom at 60 degrees, and i am finding it very easy to work with that number. The Germination station has a heating mat, and with the germ dome and heat mat in the Cab doors closed, the dome temp got up to 73, it rose the temp 10 degrees, everyone seems to agree that 80 degrees is great for germinating seeds??? So early on I wired up a short baseboard heater, back when I thought I was going to have to grow out in my barn in the middle of winter!! So I went and grabbed this thing, which I had made a special stand for, and it has a super trick one week programable digital thermostat , I took the heating mat out and left the dome in the cab and plugged in the heater and set the thermostate for 80, I will check back in 1 hour and see what the temp and humidity is in the germination dome thenView attachment 3337018View attachment 3337019 View attachment 3337020
Like you, I exhausted from the top, but had holes in the very bottom for passive intake. I didn't light seal as much as you tho, I was doing autos at the time and it was unnecessary.
Also, I had wires running from the top down for my fans and used those same little screw-in hooks like you showed in the pic. I ran them down from the corners of the cab then over to make the wires stay put and elevated, to where the appliance was. Straight down through a hole for the light, and kept the excess coiled in the top. Anyway, other than the outlets down low, that's a nice build. I don't use the cab anymore, but it was a fun build. Wish I had a pic. You would be amazed at the similarity in our ideas. Simple yet effective.
Anyway. Kudos. Some of the best DIY I've seen around here and certainly more attention to detail than my own.
Edit: this is my timer/surge surpressor. Except mine is white. Basically exactly the same otherwise.

Last edited: