MightyBuddha
Well-Known Member
I can't take credit for this it has been ripped from another site but it is worthy of posting. I built one about double the length of the one below and found it to be very effective. I also attached it directly to a bathroom fan unit so it is inside of the grow room not hooked to the exhaust.
**
Security is important to marijuana growers, and odors can lead the police straight to your grow room. There are a number of 'odor solutions' out there, but they can be quite costly. Here is a simple method you can use to build your own carbon filter. It will take you about half an hour to construct it, and it will cost $20 to $30 dollars.
Aside from its main advantage of being ultra cheap, this method is also very versatile. It utilizes the exact same activated carbon filters that are used in professional air cleaners, without paying the huge prices. It can be adapted to practically any ventilation system. You do not need any crazy tools to build this - anyone can do it.
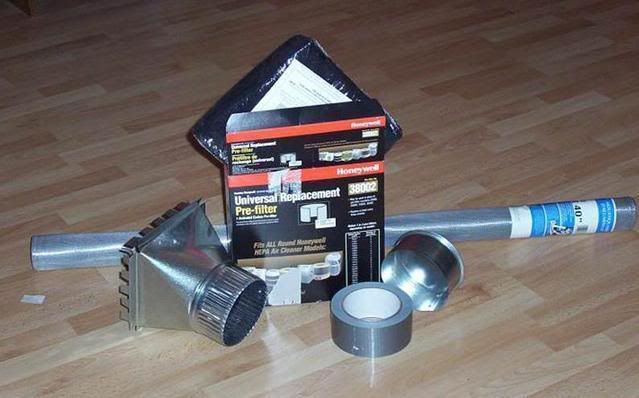
For supplies, everything is easily available at a store like Home Depot. You will need the following:
1 activated carbon filter - ( found near humidifiers, air, and hepa filters )
1 small roll of aluminum screen
1 four inch ventilation end-cap
1 four inch duct connector piece
1 roll of duct tape
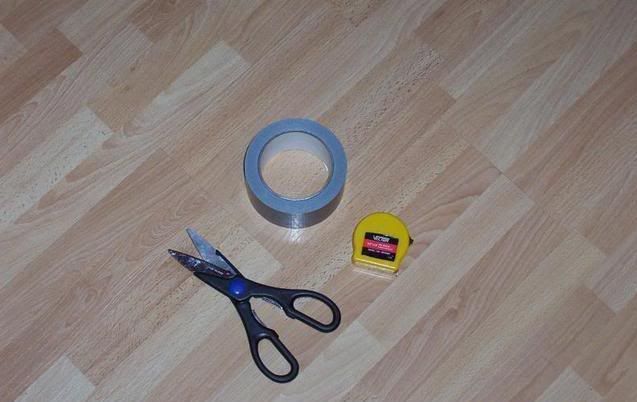
No tools are required. A pair of scissors and a measuring tape are all you need.
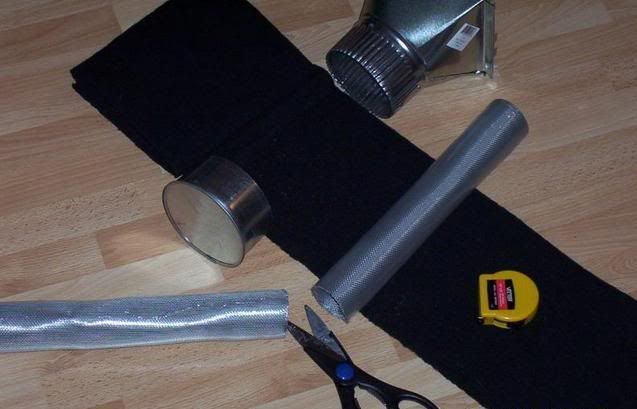
The carbon filter I purchased is a 'universal' replacement filter for HoneyWell air purifiers. Since I didn't pay the hefty price for a professional unit, I will cut this to size. It was originally 16" high and about 48" long, so I cut it right down the middle. When the first filter is expired, I will have a replacement ready to go.

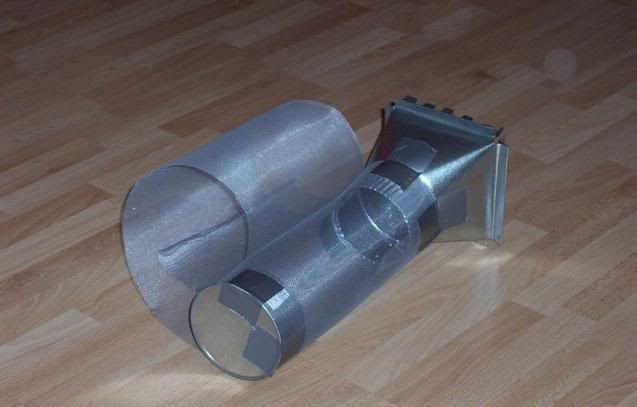
The next step is to cut your aluminum screen to size. I chose aluminum because it will be strong, and will still allow good air-flow. You could substitute chicken mesh or something similar. Since my (cut) carbon filter is 8" high, the aluminum will be cut to 12". The carbon filter will go in the middle 8" of this screen, with 2" coming out of each end to connect to the duct pieces.
Now we will attach the aluminum screen to the duct pieces, with duct tape. (This might be the first time you have actually used duct tape on ducts!) Do your best to keep it straight as possible.
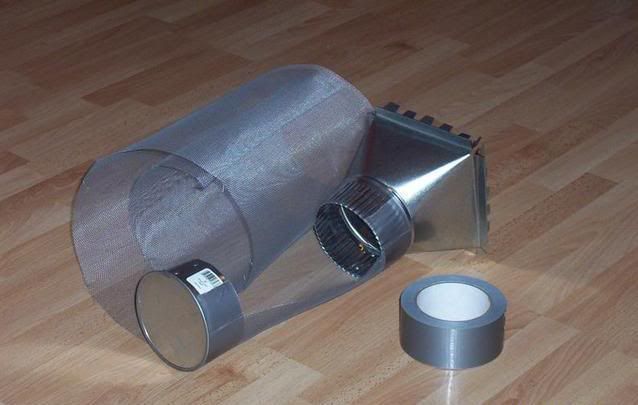
It will seem a bit flimsy at the beginning. Continue to wrap the aluminum screen around and around, taping it every few inches. You want it to hold firm.
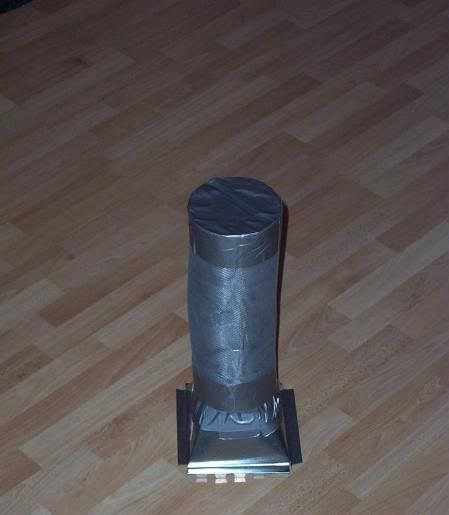
After a few wraps it will be fairly sturdy, and able to hold its own weight. However, don't drive your truck over it! Treat her nice and gentle like a Christian schoolgirl.

The ends of your screen may have little strands of metal poking out, threatening to impale you. Add some more duct tape to cover this up and to finalize the DIY carbon filter. Soon it will be done.
Now it is time to wrap the activated carbon filter onto our device. Conveniently, the filter I bought came with a couple of velcro straps, so I used them to hold it on. This will be convenient to replace when the activated carbon is expired.
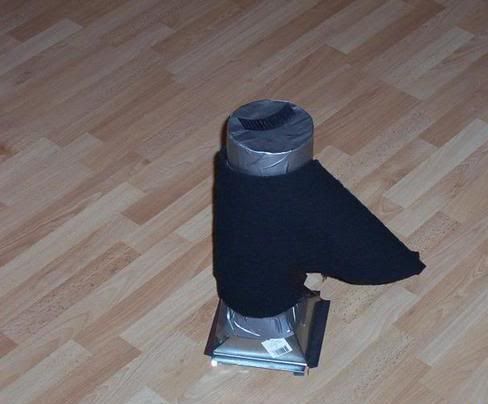
After she's all sealed up, throw on a bit more duct tape around the edges of the carbon filter, to seal up any gaps. Only tape over the edges, because you want the air to flow as easily as possible. Air does not flow through duct tape. Here is the finished product.
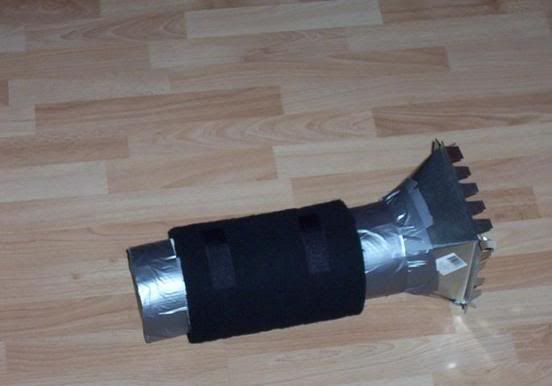
Time to hook her up to the grow room exhaust! In this case, it is being hooked to a 4" square duct. (That is why I used a 4" round to 4" square connector piece. You may need a different piece to suit your ventilation setup, but a million sizes are available.) Just slide her onto the vent, and tape it down nice and sturdy. Duct tape is your reliable grey friend.
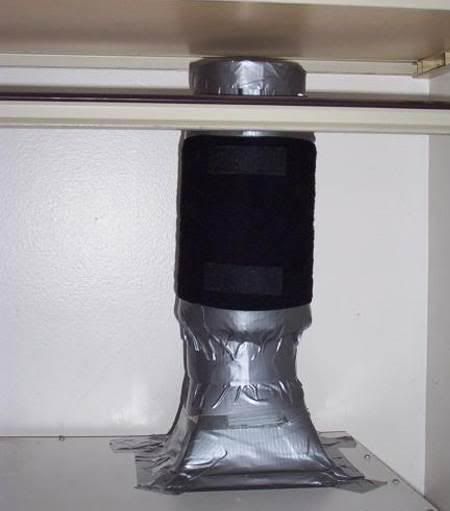
After she is attached and fire up, things are looking good. It is working nice, hooked to a 60 CFM fan, and you can feel the air flowing out of it lightly. The fan was not slowed down too much, but obviously a carbon filter will add some back-pressure to your vents. I haven't tried this with a slower blower (under 60 CFM), but 60 CFM is not a lot.
I just hooked this up today, so I don't know how often I will have to replace the carbon filter. The box the filter came in says to replace every two or three months. It does seem to make a difference though. Outside the grow room does not stink like a skunk anymore. There is almost no smell at all, except the faint odor of duct tape adhesive. I'm sure that will go away after a few hours.
Using this method, everyone can now build their own activated carbon filter. Its quite easy, and you can build it any size you need, to fit any grow room and any type of duct. Could it get any better than that?
**
Security is important to marijuana growers, and odors can lead the police straight to your grow room. There are a number of 'odor solutions' out there, but they can be quite costly. Here is a simple method you can use to build your own carbon filter. It will take you about half an hour to construct it, and it will cost $20 to $30 dollars.
Aside from its main advantage of being ultra cheap, this method is also very versatile. It utilizes the exact same activated carbon filters that are used in professional air cleaners, without paying the huge prices. It can be adapted to practically any ventilation system. You do not need any crazy tools to build this - anyone can do it.
For supplies, everything is easily available at a store like Home Depot. You will need the following:
1 activated carbon filter - ( found near humidifiers, air, and hepa filters )
1 small roll of aluminum screen
1 four inch ventilation end-cap
1 four inch duct connector piece
1 roll of duct tape
No tools are required. A pair of scissors and a measuring tape are all you need.
The carbon filter I purchased is a 'universal' replacement filter for HoneyWell air purifiers. Since I didn't pay the hefty price for a professional unit, I will cut this to size. It was originally 16" high and about 48" long, so I cut it right down the middle. When the first filter is expired, I will have a replacement ready to go.
The next step is to cut your aluminum screen to size. I chose aluminum because it will be strong, and will still allow good air-flow. You could substitute chicken mesh or something similar. Since my (cut) carbon filter is 8" high, the aluminum will be cut to 12". The carbon filter will go in the middle 8" of this screen, with 2" coming out of each end to connect to the duct pieces.
Now we will attach the aluminum screen to the duct pieces, with duct tape. (This might be the first time you have actually used duct tape on ducts!) Do your best to keep it straight as possible.
It will seem a bit flimsy at the beginning. Continue to wrap the aluminum screen around and around, taping it every few inches. You want it to hold firm.
After a few wraps it will be fairly sturdy, and able to hold its own weight. However, don't drive your truck over it! Treat her nice and gentle like a Christian schoolgirl.
The ends of your screen may have little strands of metal poking out, threatening to impale you. Add some more duct tape to cover this up and to finalize the DIY carbon filter. Soon it will be done.
Now it is time to wrap the activated carbon filter onto our device. Conveniently, the filter I bought came with a couple of velcro straps, so I used them to hold it on. This will be convenient to replace when the activated carbon is expired.
After she's all sealed up, throw on a bit more duct tape around the edges of the carbon filter, to seal up any gaps. Only tape over the edges, because you want the air to flow as easily as possible. Air does not flow through duct tape. Here is the finished product.
Time to hook her up to the grow room exhaust! In this case, it is being hooked to a 4" square duct. (That is why I used a 4" round to 4" square connector piece. You may need a different piece to suit your ventilation setup, but a million sizes are available.) Just slide her onto the vent, and tape it down nice and sturdy. Duct tape is your reliable grey friend.
After she is attached and fire up, things are looking good. It is working nice, hooked to a 60 CFM fan, and you can feel the air flowing out of it lightly. The fan was not slowed down too much, but obviously a carbon filter will add some back-pressure to your vents. I haven't tried this with a slower blower (under 60 CFM), but 60 CFM is not a lot.
I just hooked this up today, so I don't know how often I will have to replace the carbon filter. The box the filter came in says to replace every two or three months. It does seem to make a difference though. Outside the grow room does not stink like a skunk anymore. There is almost no smell at all, except the faint odor of duct tape adhesive. I'm sure that will go away after a few hours.
Using this method, everyone can now build their own activated carbon filter. Its quite easy, and you can build it any size you need, to fit any grow room and any type of duct. Could it get any better than that?
