malbulja
Well-Known Member
Here's a super simple light fixture that anyone can make for about $40. It can be expanded to mimic Where The Hell Am I's great fixture once you get established. This is a pretty standard CFL fixture so there may already be DIY tutorials for this so I apologize in advance if this is the case.
-
What you Need
Instructions
1. The supplies needed

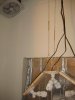
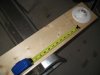
2. The fixture consists of a center lamp and 2 wing lamps. The center piece is cut from the 1X6 lumber to 6" and the wings are cut to 12". The wings allow for an additional lampholder to be added to each wing at a later date if needed.

3. The pieces are sanded and smoothed out. You should paint the pieces white at this step (I have not done so).

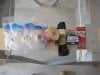
4. The female receptacle of an extension cord is cut and the 2 wires are stripped and hooked one by one to each lamp to ensure they work prior to mounting.

5. The metal brackets are screwed down onto each appendage and each part sits just under an inch apart. The metal brackets were found in Home Depot in the lumber section. They're rigid enough to hold the parts in place but flexible enough to be moved up and down.

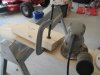
6. The assembly is placed in its upright position and bended to test for rigidity and flexibility.

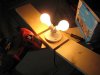
7. Testing the Y-Splitter (optional) with some spare incandescent bulbs. Of course this fixture will use CFLs; the incandescents are for testing.

8. Holes are drilled out on each appendage and the stripped extension cords are run to each lamp. Each lamp gets it's own 12' cord and the lamps are secured to the assembly.

9. The eyehooks are attached to the center piece.

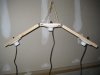
10/11. The fixture is secured with wire strand and bowline knots and tested for levelness and mobility.


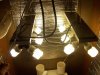
You can hang this from the top down as demonstrated or you can hang several of them in a side ways configuration to create a (wrap around) plant halo. You can also expand the wings to hold 2 lamp posts each. If you use a Y-Splitter in each lamp with the extra 2 posts then you're looking at 10 CFLs! You can also create extra appendages depending on your requirements.


-
What you Need
- Leviton Keyless Plastic LampHolder x3
- 50 ft Rope, Wire, or Strand
- 12 ft Extension Cords x3
- Wood Screws (1 in deep)
- Eye Hooks x4
- Flexible Metal Plates x2 (cut correction plates in lumber section of Home Depot)
- 5 ft 1X6 lumber
Instructions
1. The supplies needed
2. The fixture consists of a center lamp and 2 wing lamps. The center piece is cut from the 1X6 lumber to 6" and the wings are cut to 12". The wings allow for an additional lampholder to be added to each wing at a later date if needed.
3. The pieces are sanded and smoothed out. You should paint the pieces white at this step (I have not done so).
4. The female receptacle of an extension cord is cut and the 2 wires are stripped and hooked one by one to each lamp to ensure they work prior to mounting.
5. The metal brackets are screwed down onto each appendage and each part sits just under an inch apart. The metal brackets were found in Home Depot in the lumber section. They're rigid enough to hold the parts in place but flexible enough to be moved up and down.
6. The assembly is placed in its upright position and bended to test for rigidity and flexibility.
7. Testing the Y-Splitter (optional) with some spare incandescent bulbs. Of course this fixture will use CFLs; the incandescents are for testing.
8. Holes are drilled out on each appendage and the stripped extension cords are run to each lamp. Each lamp gets it's own 12' cord and the lamps are secured to the assembly.
9. The eyehooks are attached to the center piece.
10/11. The fixture is secured with wire strand and bowline knots and tested for levelness and mobility.
You can hang this from the top down as demonstrated or you can hang several of them in a side ways configuration to create a (wrap around) plant halo. You can also expand the wings to hold 2 lamp posts each. If you use a Y-Splitter in each lamp with the extra 2 posts then you're looking at 10 CFLs! You can also create extra appendages depending on your requirements.
Attachments
-
 indoor_garden 002.JPG38.6 KB · Views: 3,175
 -
 indoor_garden 003.JPG33.7 KB · Views: 3,025
 -
 indoor_garden 004.JPG34.2 KB · Views: 2,971
 -
 indoor_garden 005.JPG36.6 KB · Views: 3,012
 -
 indoor_garden 009.JPG41.5 KB · Views: 2,962
 -
 indoor_garden 008.JPG32.8 KB · Views: 2,995
 -
 indoor_garden 007.JPG40.7 KB · Views: 2,985
 -
 indoor_garden 006.JPG38.1 KB · Views: 2,977
 -
 indoor_garden 010.JPG31 KB · Views: 2,957
 -
 indoor_garden 011.JPG24.1 KB · Views: 6,039
 -
 indoor_garden 012.JPG28.2 KB · Views: 3,118