Diy 5 gallon bucket cloner - simple

HighLowGrow

Well-Known Member
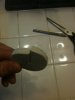
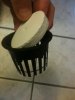
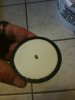
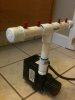
Over the last month or so I have been looking for a simple and straight forward way to root clones. Kind of a set and forget if you will. I was looking for a 5 gallon bucket cloner, but instead found many DIY rectangle rubbermade units from 4 cloning sites to 120 sites. I gathered bits and pieces of info from my research.

I wanted this as simple as possible. Without further ado here it is:


photo.JPG photo19.JPG


Please do not post until you see END.
 

HighLowGrow

Well-Known Member
Items needed:

5 gallon bucket with lid
Pump - I used a 300 gph I already had
5 x red sprayers - free from the local hydro store
5 x 2" net pots - free from hydro store
5 x neoprene inserts - free DIY
12" 1/2" PVC
1 x 1/2" "T" non threaded
2 x 1/2" end caps non threaded

The "out" on my pump is 1/4" with threads on the outside. I brought my pump with me to the hardware store and had to buy a few fittings to convert 1/4" to 1/2". All pumps will be different.
 

HighLowGrow

Well-Known Member
Let's start with the lid. I plucked a number out of the sky. 5 it is.


I started by taking my "drug free" ruler and drew a line across the lid. Then I flipped the ruler verticle and drew another line. Then I split these two more times. I ended up with what looked like an 8 piece pizza.


photo4.JPG


Across the top of my net pots measure 2 1/4". The hole bit I used was a little smaller maybe 2" or 2 1/8". So I didn't F up my lid, I drilled into a garbage piece of plastic and set the pot in there. Fist time perfect fit. Yehaaa

I measured (well eyeballed) the placements for the pots. It's very simple. It's already separated into 8 pcs of pizza. I attached the hole bit and drilled the four holes plus one in the center.


photo15.JPG


Next I took some sand paper and sanded off all the burs. If these were to get into the water, you could have problems with plugged sprayers.


photo6.JPG
 

HighLowGrow

Well-Known Member
Let's get to the net pots.


This is only a cloner for me. When clones root they will get transplanted to soil. I cut the bottom of the pots off so the rooted clones will be easy to remove without being tangled up in the pots.


photo7.JPG
 

HighLowGrow

Well-Known Member
Pucks or neoprene inserts.

These inserts will be used to hold the clones in the net pots. I happened to find a bundle of pretty pretty princess mats. With my wifes permission, I was ready to cut away. One side of the mat was a Disney print. The other side is white.

You can skip this step and purchase these at your local grow shop cheap. They are typically black.


photo11.JPG photo8.JPG


With the same hole bit used to drill the holes for the pots, drill out 5 "pucks".


photo9.JPG


This is what they will look like. The bit will drill a hole directly in the center. This is where the clone will live until you see roots. Once these are drilled out they need to be cleaned up. I found sand paper does not work, but scissors do!


photo10.JPG


Now that these 5 are drilled out, it's time to make a cut from the outer edge of the puck to the center hole. Scissors or a razor will work just fine.


photo23.JPG photo22.JPG


Here is the final puck.


photo24.JPG


They go in the net pots like this.


photo12.JPG photo13.JPG
 

HighLowGrow

Well-Known Member
Mister and PVC assembly.

I have seen these assemblies with 2 sprayers and I have seen some with 17. It all depends on what size container you are using. For the 5 gallon bucket, 5 misters work perfect with excellent coverage. Yes, it's very simple.


photo17.JPG


I have already glued this together but here is what you will need:

3 pieces of 1/2" PVC 4" long
2 end caps
1 "T"

Put the assembly together and make sure it all fits BEFORE you glue.

You will need to end up with 1/2" PVC coming off the pump (non threaded). I brought my pump with me to the hardware store and bought a couple adapters. The pumps come in all different configs so I can't tell you exactly what to buy here. The "out" on my pump happens to be 1/4" threaded.


photo2.JPG .


Here are the misters I used. Went to the local grow shop to buy these and the guy just gave them to me. Sweet. He said there're yours just buy your nutes here. So while I was there, I picked up Beastie Bloomz. It's a blossom builder used in week 4-5 of flower.


photo5.JPG photo25.JPG
 

Attachments

HighLowGrow

Well-Known Member
Drilling holes for the misters.

I took a drill bit and a mister. Held the drill bit behind the mister and found a bit that was slightly smaller than the threads on the mister. Again, I eyeballed 5 locations equal distances apart and drilled away. Don't drill all the way through the other side. You don't want holes facing down. Clean up any burs left behind. Run some water through the assembly to get rid of all small plastic pieces. Now screw the misters in. There is no need to glue the misters.


View attachment 1926126 View attachment 1926125 View attachment 1926124
 

HighLowGrow

Well-Known Member
Mister angles.

I configured my misters this way. It provides total coverage but really anyway you turn them will work fine.


photo21.JPG


Here's how I checked:


1. Put the pump assembly into the bucket.
2. Put pucks into the pots
3. Put pots into the lid.
4. Fill the bucket with water so it's over the pump and under the misters.
5. Pop the lid on the bucket.

6. Get a plastic sandwich bag. Leave it flat.

7. Plug the pump in.
8. Now lift up a pot and quickly place the plastic bag over the hole. You will see it instantly get drenched. Replace the pot and move on to the next one. Do the same thing with each pot.


photo3.JPG View attachment 1926142
 

UnderCoverAgentOrange

Well-Known Member
ill idea man, i think i may have to fashion one of these as i am looking for a cloner and don;t really wanna spend all that loot..cheers on the tutorial
 

HighLowGrow

Well-Known Member
Couple things I left out.

Holes in the lid. You can make as many holes in the lid as you want. I kept it to 5 for simplicity. Of course you will need to buy more pots and buy or make more pucks.

Right now it's cold as hell where I am so I have added an aquarium heater.

Power cord or cords exiting the bucket. I'll leave that to your imagination.


I think that's about it.

Happy cloning!


END
 

Gastanker

Well-Known Member
Great DIY. Dunno what that one guy was talking about regarding 5 being to many holes... The 60 site EZ cloner is only 3 times the volume and has the inserts all of an inch and a half from each other - 5 in 5 gallons for a cloner is definitely not too much - you could probably even double the number.
 

dbkick

Well-Known Member
100_1171.jpg100_1170.jpgfor a better handle on temperatures if thats important to you , a small igloo cooler in place of the bucket..........
 

HighLowGrow

Well-Known Member
That's a cool idea with the cooler. I was thinking about wrapping the bucket with some type of insulation during winter along with the aquarium heater inside.
 

dbkick

Well-Known Member
That's a cool idea with the cooler. I was thinking about wrapping the bucket with some type of insulation during winter along with the aquarium heater inside.
Do you cycle your water pump? no need for a heater if you don't, I've found(especially with an insulated res) that a water pump running 24/7 adds much heat. In the cloning process this is good(to a point) but in veg we all know higher temps are gonna lead to problems.
 

Beagle

Well-Known Member
That's the wall separating the veg from flower. It's black visqueen for landscaping, I had a ton of it laying around. My setup is mostly diy/homemade.
 
Top