Cloning made easy

Night Claptoman

Well-Known Member
PLEASE DO NOT POST UNTIL YOU SEE THE TOUGHEST PERSON IN THE WORLD.


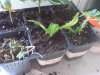
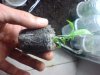
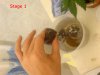
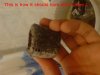
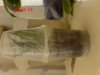
I know some are having trouble cloning. Well, this is my current method which works great and is ultra-easy.

I've took some pictures of my way of doing it, and I hope it will help someone :)
 

Attachments

  • DSC01225 (Small).JPG
    DSC01225 (Small).JPG
    86.9 KB · Views: 2,850
  • DSC01226 (Small).JPG
    DSC01226 (Small).JPG
    51.9 KB · Views: 2,782
  • DSC01228 (Small).JPG
    DSC01228 (Small).JPG
    56.5 KB · Views: 2,778
  • DSC01229 (Small).JPG
    DSC01229 (Small).JPG
    45.3 KB · Views: 2,773
  • DSC01235 (Small).JPG
    DSC01235 (Small).JPG
    57.8 KB · Views: 2,779
  • DSC01233 (Small).JPG
    DSC01233 (Small).JPG
    65.9 KB · Views: 2,772
  • DSC01232 (Small).JPG
    DSC01232 (Small).JPG
    65.7 KB · Views: 2,787
  • DSC01230 (Small).JPG
    DSC01230 (Small).JPG
    50.7 KB · Views: 2,791
  • DSC01236 (Small).JPG
    DSC01236 (Small).JPG
    49.4 KB · Views: 2,769
  • DSC01237 (Small).JPG
    DSC01237 (Small).JPG
    61.9 KB · Views: 2,766
  • DSC01241 (Small).JPG
    DSC01241 (Small).JPG
    53.3 KB · Views: 2,763
  • DSC01242 (Small).JPG
    DSC01242 (Small).JPG
    59.5 KB · Views: 2,752
  • DSC01249 (Small).JPG
    DSC01249 (Small).JPG
    49.9 KB · Views: 2,733
  • DSC01247 (Small).JPG
    DSC01247 (Small).JPG
    48.7 KB · Views: 2,736
  • DSC01244 (Small).JPG
    DSC01244 (Small).JPG
    40.3 KB · Views: 2,736
  • DSC01243 (Small).JPG
    DSC01243 (Small).JPG
    61.9 KB · Views: 2,738
  • DSC01251 (Small).JPG
    DSC01251 (Small).JPG
    75.3 KB · Views: 2,751
  • DSC01252 (Small).JPG
    DSC01252 (Small).JPG
    99.3 KB · Views: 2,751
Ingredients;

412290d1241898521-cloning-made-easy-dsc01225-small-.jpg


1. Mother plants - something to take cuttings from.
2. Jiffy (peat pellets) in the emount of clones you intend to take. You need to pre-soak them in PH 5.5-6.0 water for at least 3 hours. 12 hours is better.
3. Clear plastic cups, I've used small one used for wine tastes because the jiffy fills one almost perfectly. Any will do. You will need 2 times plastic cups the emount of Jiffies.
4. Clean sharp blades. I've used utility knife blades because I lost my scalple, but you would rather use the later.
5. Rooting hormone. Either powder like mine or jel.
6. Clear masking tape.
 
Step 1:
412291d1241898521-cloning-made-easy-dsc01226-small-.jpg

Take a jiffy and squeeze it to lose the excess water. You need it soaked but not to the stage it drips.

412292d1241898521-cloning-made-easy-dsc01228-small-.jpg


Stage 2:

412293d1241898521-cloning-made-easy-dsc01229-small-.jpg


Put the Jiffy in a cup and put your pinky in to make a hole. A pencil could work too. Or the back of the scalple.

You should have a hole by now.
412295d1241898556-cloning-made-easy-dsc01230-small-.jpg


Stage 3:

412296d1241898556-cloning-made-easy-dsc01232-small-.jpg


Cut your cutting in a sharp angle - the sharper the better. You want to expose as much inner core as possible.
You should take a cutting from a branch with at least 3 nodes.


Stage 4:

412297d1241898556-cloning-made-easy-dsc01233-small-.jpg


Dip you cutting in the water used for soaking the Jiffies.
 
This is how your cutting should look like:
412298d1241898556-cloning-made-easy-dsc01235-small-.jpg


Stage 5:

412299d1241898587-cloning-made-easy-dsc01236-small-.jpg


Cut shallow cuts all over the bottom of the stem.


Stage 6:

412300d1241898587-cloning-made-easy-dsc01237-small-.jpg


Dip the cutting in water again. Remember, the cutting DIES when air gets in the stem.


Stage 7:

412301d1241898587-cloning-made-easy-dsc01241-small-.jpg


Dip the cutting in the rooting hormone.


Stage 8:

412302d1241898587-cloning-made-easy-dsc01242-small-.jpg


Put the cutting covered with the rooting hormone in the Jiffy. Take caution to keep the rooting hormone on the stem and not on the top of the Jiffy.


Stage 9:

412303d1241898620-cloning-made-easy-dsc01243-small-.jpg


Squeeze the jiffy to hold the cutting. You need to squeeze it pretty good to get the Jiffy to touch all the stem.
 
Stage 10:

412304d1241898620-cloning-made-easy-dsc01244-small-.jpg


Cut a cross in the top of another cup.


Stage 11:

412305d1241898620-cloning-made-easy-dsc01247-small-.jpg


Put that cup on the cup with the cutting.


Stage 12:

412306d1241898620-cloning-made-easy-dsc01249-small-.jpg


Cover the gap with the masking tape and LABEL you clone.
 
This is how your effort should look like:

412307d1241898642-cloning-made-easy-dsc01251-small-.jpg


To get them to root ASAP you need to give them the following conditions:
1. High humidity. Which will occure naturally due to the closed cups. the small hole in the top should be enough for them to breath.
2. A temp of around 26C.
3. Check every other day to see if roots popped.

When you see the first root coming out that time to open the top cup and transplant the plant.


412308d1241898642-cloning-made-easy-dsc01252-small-.jpg
 
Perhaps the best explanation on this subject for people not using a hydro setup. You can also use 20oz water bottles. Cut the top off right at the top of the straight part of the bottle. Take off labeling and put upside down over the jiffy.
It should go down pretty far on the jiffy and still leave some room for air. You can keep the bottle on the plant after you transplant.
 
Thanks.
And yes, forgot to mention - the Jiffy should go into dirt and not hydro setups as the peat will hold too much water cause rot.

In my bigger veg room I kept the jiffies in clear soda bottles cut at the half almost completly but kept somehow attached, put the jiffy in and closed it keeping the "cork" out.
 
Good post and nice pics. Clears up some of the missing items I've seen in others.

(and Chuck Norris is so fast, he can run around the world and punch himself in the back of the head)
 
I kept checking my cutting once every 3 days or so, and today I've noticed big roots on 2 out of 3 clones. Been 10 days since.

Probably the third one is ready too, but because of the moisture level I can barely see little roots. Doesn't matter, I have other 6 clones in there waiting so I'm checking anyway.

NEXT PART OF THE TUTORIAL

When your cutting rooted you want to transplant them. you can check the transplanting tutorial in my signature.

VERY IMPORTANT.
In a plants early days it needs a lot of moisture. 80-90% is great. Less than 60% is bad.
Keep one of the plastic cups on the plant after transplanting to keep the humidity inside.
You should remove the dome after 2 new nodes have been grown. Usually takes a week and a half in my setup.

Do not worry about the old leaves deforming or dying, they are weak from all that stress and hard labor you put them through. You'l have new leaves in no time :)
 
internet crashed so couldn't upload the pictures. here they are.
 

Attachments

  • DSC01431 (Small).JPG
    DSC01431 (Small).JPG
    56 KB · Views: 165
  • DSC01429 (Small).JPG
    DSC01429 (Small).JPG
    46 KB · Views: 170
  • DSC01428 (Small).JPG
    DSC01428 (Small).JPG
    29.8 KB · Views: 169
  • DSC01427 (Small).JPG
    DSC01427 (Small).JPG
    37.7 KB · Views: 156
  • DSC01432 (Small).JPG
    DSC01432 (Small).JPG
    49.9 KB · Views: 164
  • DSC01433 (Small).JPG
    DSC01433 (Small).JPG
    34.8 KB · Views: 146
  • DSC01434 (Small).JPG
    DSC01434 (Small).JPG
    52.6 KB · Views: 172
  • DSC01435 (Small).JPG
    DSC01435 (Small).JPG
    40.5 KB · Views: 139
  • DSC01437 (Small).JPG
    DSC01437 (Small).JPG
    41.4 KB · Views: 128
you do nothing but waiting.
the cuts on the top cup lets enought air movment for that stage and humidity rises as the jiffy is packed with water that evaporates.
to get optimal results you wanna use small containers and big jiffy.
 
sweet doing this
i have a plant and its in coco its close to harvest
i know the strike rate of cloning in this stage is low but im wondering if you got any tips
on how to do this
 
sweet doing this
i have a plant and its in coco its close to harvest
i know the strike rate of cloning in this stage is low but im wondering if you got any tips
on how to do this
that would be a waste of bud.
even if do get the clone to root its growth will be stunned for at least 3 weeks. Even then it would probably be weaker than a clone took during veg.

very tight
thanks :)
 
Any reason for not doing bigger cuttings? After seeing the close up next to your fingers, the cutings look to be about 2 inches tall. Any reason you didnt do 4-6 inch cuttings? Also I read that you should group up the leafs and cut them in half this way the leafs wont absorb everything and the rooting system will grow faster? What do ya think? Thanks!
 
I need small plants and I use small containers, so I take small cuttings. You can scale the whole thing up if you want.
However, I got 3/3 plants to root in 10-12 days, so it does work.
I also take small cutting because I had small mother plants. Plus, from a 6 inch branch I can take 3 cuttings, and it still works :D

Cutting the large leaves in half is to make less water evaporate from them. But I don't have any large leaves since my cuttings are so small. And if there is a large leaf even if I cut it in half it won't fit in, so I remove them.
Actually the leaves should absorb stuff - while cloning you count on foliar feeding to give the cuttings energy to root. So probably more leaves = faster rooting.
Cutting the leaves in half does help to identify which leaves are new and which are old.

By the way, my cuttings are usually 1-1.5 inch tall :P
 
for the sceptics - another round of 6 clones all rooted well.

however one died of mold because I haven't moved it for a week after it rooted and 2 died because of lack of water. Had to go for a weekend.

BUT they did root and with attendance they would have survived.
 
Back
Top