I am just going to conclude with this post, and possibly one later with final metrics. This is mostly things I learned, however basic.
· With an approx 4’x4’ area, I need access to 3 sides to be able to ready most everywhere. I have maybe a 2’ reach, so to tuck and lollipop the entire area, I would need access from 3 or preferably 4 sides.
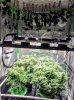
· The combination of a 44” tray inside of a 5’x5’ tent allows you to (barely) rotate the tray. You need a foot or 2 in the front as well. With a scrog net set on ¾” PVC pipes, and the pipes are resting on the inside corners of the tray, it was possible to rotate the tray for harvesting. I wish I realized that this was possible earlier, as one of back plants received no lilipopping, and not enough positioning.
· In early veg, these plants tended to make Huge leaves. They completely overshadowed the branch nodes of the plant, and without tucking I think I just would have ended up with only the tops. It bushed nicely for scrog once the leaves were tucked and the plant topped 2x.
· Keep it clean from the soil line to the net line, and everything above the net will have great bud formation.
· I really really prefer to trim wet. After the first 4 oz, I can make a bud that will look beautify dry, with close multi-tip leaves cut inside the bud.
· This C99 has a lot of leaf to trim. Trim time was about 30 grams (dried weight) / hour? (This is a bit more then 150 grams wet.)
· The plants seemed to do OK at 60,000-66,000 lux. I normally aim for 50,000-55,000 lux.
· The lighting setup was 3 rows of 4 cobs. Front row (always open tent) was 250 watts. Middle was 200 watts. Back was 250 watts for a total of 700 watts. (All 3.5k CREE). In a 48”x48” area, 4 rows of 4 50 watt cobs might be best, utilizing a total of 800 watts. I grew in 13.5 ft/sq (44”x44”), compared to 16 ft/sq (48”x48”).
· I could not keep the room sealed, due to heat, when it was more than 32F outside. Nominally, the room would be approx. 67F-68F. A 475 watt ‘Envi’ heater.
https://www.eheat.com/envi-high-efficiency-whole-room-plug-in-electric-panel-heater-hh1012t/ kept the room minimums in the 70F-72F range. In this room I had heat, de-humid, and an evaporative humidifier. I wasn’t equipped to cool a shut room this winter. Opening it kept the max temperatures below 80F, but at a cost of lost CO2. The room was flawless in the -5F-20F range. But just as I learned in the previous grow that you can get a dry day in the 40’s in July when drying, you can also get a toasty day or more in the dead of winter.
· OxyCloner seems to work. However, I don’t seem to get roots to drop in the cloner, but if transplanted to coco, they will drop there once showing ready in the cloner.
· The Winter grow should start Oct 15 – Nov 1, to allow 10 weeks, and not have the finish of the grow collide with getting early veg garden plants started. (soil = life)
· I have been yielding ¼ per plant since gaining experience. I was hoping to get more from the scrog, but will probably hit my average for a completed grow. (not including the 12/12 from seed grows that I like.)
· A separate veg area, and drying area would be very nice. I am thinking about multiple smaller tents in one climate controlled room.
If I do a spring grow, it will be abbreviated - either 12/12 from seed, or some auto.