And So It Begins.

Jtoth3ustin

Well-Known Member
also ma dude. i noticed you said it is only 50 degrees in your basemant..... your light should bring it up to 60-65... and with the insulation you were talking about. it will go up to 80, no problem...... in ma opinion i keep it at 79 with lights on.....65-69 with lights off. get those funky colord buds :) and you def. got some good ventilation for it..... fucking better than mine. lol...
 

flamdrags420

Well-Known Member
+rep .. sorry man. i couldnt read all of your posts.... smokin a blunt. ukukuk

but dam. if your op. comes out half as good as your plans. you will have some dank dank shit on your hands. def. hop your running a perpetual garden. the setup looks perfect.....

one question though... how tall are those babies under the 4' fluro's?????
Those are the same ones that are actually in the room. I think they were between 14-18 inches when they were moved from my closest to the room.

Thanks for the props. My work has been kind of sloppy. Not my best work I've done so far, but it should turn out ok I hope. Yes, you can see on the plans, that I'm set up for a SOG. Thanks again for stopping by. I just ran out, so hit that Blunt once for me please. :bigjoint:
 

flamdrags420

Well-Known Member
also ma dude. i noticed you said it is only 50 degrees in your basemant..... your light should bring it up to 60-65... and with the insulation you were talking about. it will go up to 80, no problem...... in ma opinion i keep it at 79 with lights on.....65-69 with lights off. get those funky colord buds :) and you def. got some good ventilation for it..... fucking better than mine. lol...
Actually the light brings it up to 70-75 degrees. Last week when it was in the teens out side the room was at 75(no exhaust, only scrubbing) it's been in the negatives all this week and that is when I was going to low 70s. With the light off low was 62. That is still with no door in my room, so the insulation is doing well holding the heat in. The active exhaust brought it back down around 5 degrees back to low 70s. I had to turn the heater up in there. 75 degrees + or - 3 degrees is my target environment.
 

Jtoth3ustin

Well-Known Member
once you can control the air circualtion, and temps like you seem like you are..... get some Co2... its like magic crack..
get humidity down as well, keep it at 40% durin flowering. and like 80 in veg..... no higher. you will be riiiighttt..


def. not sloppy.. if you write down actual schematics of your op. your planning it allot better than most people. me included lol..
i cant wait to get my basemant, im still with my parents. but im moving into the basemant. fully furnished but. def maximize my fucking grow area... your givin me a similar idea.
Pe@ce..
 

Jtoth3ustin

Well-Known Member
yea. the temps can jump with some insulation god dam...


ik i didnt just read you spent 2 grand on your electric for your room. dam.. i like the quality over quantity mentality..
 

flamdrags420

Well-Known Member
wasn't 2 grand bro. Re read that...or maybe I need to re read what I wrote. ahh... the electricians wanted 2 grand to upgrade the box. I told them to fuck off. And just used my circuits not being used for a washer and dryer to supply a fresh line to my room.

I'll add CO2 once the room has paid for itself. I want to see this shit work first before investing in that.

I can't imagine not planning this stuff out. It's nerve racking enough how it is. But plans always change though. That is life. As far as slop, I just think it looks rough. Since I'm doing all the work myself, I feel like its made things a lot more challenging. I had to re poor the floor a bit, but I couldn't use my mixer so I had to hand mix that as I poured it and it turned out shitty. I wanted to be all stealthy in my project. My neighbors are cool, but nosy or rather too friendly. They all know I'm a woodworker, so when I'm in the garage making shit they will come over and see whats up and shoot the shit. I have had to have fake projects going on in there as well as un finshed retired projects and stuff laid around my lathe just to keep things "disorganized" on purpose. I'm a month behind schedule of where I wanted to be because of weather and some budget cuts. I'm jobless right now, and trying to finish this thing up with 900 bucks. That isn't going to get me there, so I have to make a lot of comprises mostly with function over form at this point. This house is so old and out of square, it's hard wanting to square up the space too much, because in some cases, we're talking a loss of 4-5 inches or length or height.

In my case it's about keeping humidity up. Right now without anything in there the humidity locks at 16%. I can get it running between 30 and 40% with my vaporizer thing and a bucket of water. I'll add a real humidifier soon. It's actually on my short list of next things to purchase. I just want to see that this next round of purchases I made stands, and won't need any more for that.

This goes back to planing. It's one thing to design and build a room. But to do so for hydroponics without knowing what the hell I truly need and how it works it's different. The little things add up. Timers, Outlets, shit like that. A lot of things are also trial and error. Will this or that work what wont? A lot of what I read on here I have to take with a grain of salt, because you really have to have the BS filter on when gathering information on here.

so that is that. Sorry I get carried away. I don't say much as I tend to keep to myself. But when you get my interest on a topic I have a strong passion about, then it's hard to get me to shut up.
 

Jtoth3ustin

Well-Known Member
ayyyy no prob man... i feel ya on the long spiels. lol..
hear ya on the "unemployed at the moment".. if you only got 900 bux and no job... i step back from builidin for minute. just let your ladies grow. get a nice crop off, and get your money up....
yea my basemant is the same, im moving into it about amonth but im re-re-doing my bathroom down there. half is concrete floors, the rest is like cobble tiles. lol
If you whanna bump your humidity up.. just spray your plants down every couple hours on top of the bucket and towel method.... its teidious but it works..

about the hydro i cant help you out there. im soil. organics allllll the way.... ik a lil hydro from my buddy down the street. but if this is your first grow.. just go with the flow. youl get the experience your looking for sooner or later. just keep on trying new things, or improving on the old....
hehe gotta keep the neighbors off your back too. when your start a compost pile in the middle of the ghetto. its hard to explaine
still like the plans tho man.. keep at it..... and get some more picys
Pe@Ce
 

flamdrags420

Well-Known Member
Ok so this week it's been all about the clone box. It's been really cold in the garage. As always work is at half speed. Quality is suffering, but all in all, I'm pretty happy with the results so far.

Here is the game plan:
1 box
4 2 foot T-5 Lamps.
1 optional Humidome
1 Cloning tray
40mm rockwool cubes
120 mm fan 120VAC (You can get these at radio shack. no need to buy a pc fan (unless you are using an extra) and then freak out about how to run these)
Heating controller - Lux Win 100

Should have it up and operational (minus doors) Tomorrow night. I'm happy with the progress so far. As you can see in the plans, when the temp gets too hot, my 120 mm will kick on and draw the heat out hopefully allowing the passive venting to bring the cool air in. The passive venting I'm pretty confident will be light proof. I have the top and bottom chambers painted black. I modified the venting numbers and locations differently than what's drawn in the original plans. I have 3 smaller holes on each side instead of 2. The 2 larger holes on the bottom I have in line in the middle on the horizontal plane. I did this so that the angle of the light that hits the holes and will create a shadow instead of a path out. The initial testing with a spot light has been promising. The doors are still being thought on as I want them to be light proof also.

As always, questions, comments, and thoughts welcome and appreciated. Thanks for stopping by.

~~ Flams ~~

Progress Pics:

1.) Blue prints of clone box. (doors and trim are being designed on the fly)

2.) Material was switched to MDF to save on cost. A note to those using sheet goods; use a high quality oil based exterior grade primer. It's going to be better against moisture. This is the first time working with MDF as a cabinet time structure. You have to be really delicate when handling it. I usually work with this material with someone to help me as it's heavy. If strength is a factor, go with plywood. I dinged and beat up a lot of corners and surfaces while working with this stuff. Also, pre-prime and get at least 1 coat of top coat paint color on the full sheet before cutting. This will decrease total work time leaving only touch up painting during assembly. It will also save money because you end up using less paint too.

3.) Even though I have a small portable table saw, I'm flying solo on this project. To make life easier. You can make a shuttle tray for your circular saw to make great straight cuts. However, if your saw is crappy like mine, be careful of your bevel angle of the blade. I need a new one, I'm using an old craftsman circular saw and the blade comes out of square resulting in a cut out of line of the shuttle. I know this happens with mine so I purposely cut about a quarter inch more than needed. Because the piece is cut from the full sheet now, it's easier to handle and I can bring it to final dimension with the table saw.

4.) You don't need to spend a lot of money on a table router. You can convert a piece of board and some screws quickly into one.

5.) Lay out lines for the dado joints. I ran into a lot of problems here. Again the MDF. A heads up to all in the works. (If I had 100 bucks I would have went out and got a dado table saw blade. I defintly will pick one up in the spring) OK so anyways, the lumber companies are very cheap as any other company as you can imagine. Lumber comes in nominal dimensions(What it's known by) and what it actually is. IE a 2x4 is really a 1.5x 3.5. The same is true for plywood thicknesses. Companies known this of course and my router bits are designed for this. My 3/4 inch dado bit is undersized to match plywood sheets. However, MDF is true meaning all my dadoes were too tight. When shit happens with your project, my advice is to stop right there. grab a cup a coffee. Light your bowl and think of a good solution. Being frozen and in a hurry to get that days work done I decided to sand the dadoes wider, but of course it made them deeper too. This created problems down the road, but all is ok now.

6.) Sizing up, cutting, and mounting the active exhaust fan.

7.) Even though I used great primer, the cold kicked my cheap black paints ass. It crackled even after bringing my boards inside to dry. (the MDF was still frozen from being in the garage)

8.) Assembly of sides and passive levels. You can see the holes on the side. The cut out in the back is for my power. It will come out off the wall. It fits through the cutout, and then I'll have a cover plate for it making it look nice and sweet. Also on the top (can't see it in today's batch of pics) will be a cut out that I will move the light switches for my work lights. I didn't think ahead on the initial blue prints of the room, so instead of splicing wires and moving the switches, I'm just going to move them to the clone box which because of the size would have covered the switches up.

9.) The Fan is mounted! Took me for ever to find the right length screws at lowes. Pissed me off! I hate when people cover the items you want with the wrong items. I feel sorry for the guy who get's to clean up the mess I made at the store looking for them.

10.) Another picture of assembly. I caulked all joints that I could. Not really needed with dado joinery but it doesn't hurt. My white nail putty was frozen. Thank g-d for red oak putty! It will sand out fine. I'll prolly have to do to more finish coats instead of one. oh well. I prefer Alex brand caulking for woodworking. For exterior needs MP1 is the shit. You can also see the cut out on the side for the work light switches.
 

Attachments

flamdrags420

Well-Known Member
MDF huh......rutrow.......humidity will cause it to swell and eventually fall apart......otherwise things look good.

:peace:
It's a crap shoot I know. But I think it's going to be ok. Considering how my natural humidity is 16% I'm going to be ok. I used a pretty good oil based exterior primer, so I think it's going to be ok. If it does swell, which I don't think it will, it will lead me to make it better. See below =) Thanks for checking in old.
 

flamdrags420

Well-Known Member
~~ Update 1/26/09 ~~

Damn time goes by fast. Sorry for not getting updated sooner but went out this weekend.

Ok, so the bottom line right now of the clone box. A lot of good. A lot of bad. Right now, I'm more pissed than happy about it, but it's functional. As you guys know it's the middle of winter right now. Working in the garage has been a bitch. If it's in the teens, then I'm a happy man, but it's just a bear to work in. Bottom line though, my paint job/finish turned out like shit. It was just too cold to let the paint do it's thing. It dried and sanded like shit. It got all tacky, and I have scuffs, chips, marks, dings, and finger smears all over the damn thing.

I did able to get it into the grow room today and put up in it's spot. I have it on cleats still as I just have the box tacked in, because it will have to come down when the walls are put in the room. Also I was thinking about moving it to the other corner where I plan on having storage cabs. This is subject to change when the flower trays are installed and I can see how it is to move and work around. Ref pics 1 and 3 on post #12.

https://www.rollitup.org/grow-room-design-setup/135406-so-begins-2.html#post1710154

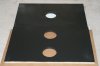
The other thing that I'm pissed about is the top panel. The binding post screws blew out, and now I'm kind of SOL there. I may try to fix it, but it's on the back list of things to do. I'll build some doors for it later. As planned, the box is light proof (minus the doors of course). There is a small leak where the pulley wire comes out, but I'm going to put a rubber stopper (the little rubber things on chemistry vials) with a slit for the wire to put in the bushing there.

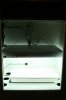
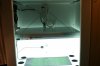
So with that said. Here is my clone box.
Along with the box, I started a seed last week under the T-5. It is my thank you plant. I wanted to dedicate this plant to the following for their help, support, knowledge, love, lessons, criticisms, all things said good and bad to lead me to where I am now. I'm a long way to go, but I'm getting there.

widow maker, pot-roast, FDD, No Drama, pan hand
Special thanks to Al B Fuct, Stink Bud, VV, Old, and many others whos threads helped me create my notes, plans, and my room.

Not labeling this batch of pics. You can note a few things. Yes, my natural humidity is really 16%. You can see that careful thought and planning payed off when designing the layout and size of the vent holes. You can see with the top panel off the angle the light hits. You can also see that I have the lights off in the room in some of the shots, and you can see that the rest is completely pitch black. My make shift pulleys are under sized. Down the road I'll beef them up and if I can find a small size ratchet hand winch/ reel thing, I want to upgrade that.

As always, thanks for stopping by. All comments questions etc. welcome.
Be blessed!
~~ Flams ~~
 

Attachments

flamdrags420

Well-Known Member
~~ Update 1/31/09 ~~

Just been doing a lot of little things. Nothing super cool to report on today. Been going around the room making sure I have all the metal plates covering the wire holes. Got my hatch patched up in mortar and then 2x10s framed around the hole to support that. I finally have my hatch door figured out, and will start on that finally. I think I said I was going to do that a while back, but I wanted to wait til I got the clone box done, because It wouldn't have fit through the final door size to get into the room. I also got the final frame of the mother tank done. I'll start on that soon too.

The final plan for the tank is pond liner, then cement board, then red guard water proofing membrane. That should do me right I hope. I'll post new things and pics as it comes along. I'm officially out of money now on the room, so it will be very slow going until I get more income coming in.

Thanks for stopping by.

~~ Flams ~~
 
Top