16000+ watts medigrow: og kush+ 13 x 1kw hps + 3 x t5 badboys + grotek = *HAPPY JOY*

mellokitty

Moderatrix of Journals
thank you for joining in, i felt that a fresh grow deserved a fresh journal.

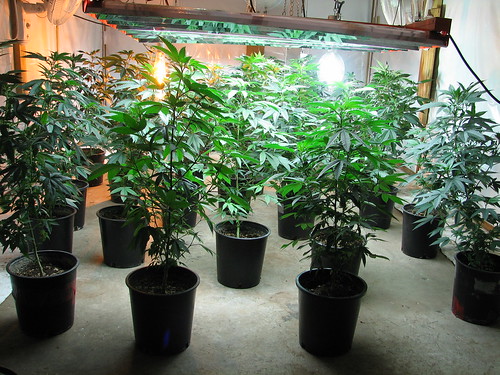
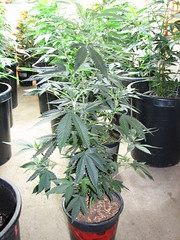
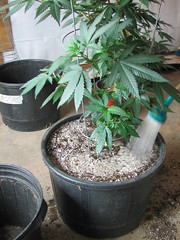
a couple of room shots:


a brief synapsis: the girls are og kush from clone:

for our veg, we are running:
2 x 12 bulb t5 badboy
1 x 8 bulb t5 badboy
2 x 1kw mh (we were running 1 mh and 1 hps, but the difference in vegetative growth was noticeable so we recently switched out the hps for another mh)

in flower, we will be running
13 x 1000w hps
and possibly doing some blue spectrum supplement experiments with the t5's (nods to pr0fesseur)

nutes will be
grotek solotek bloom (1 part base nute)
pro-silicate (stress relief + K)
vitamax (b complex)
calmax (cal/mag supp)
.... and a couple other things; we'll talk about them as we come to them

here's the first video update of the current girls :
[youtube]0OsEePKDqRc[/youtube]

thank you for tuning in, please stay tuned, more updates to come!
 

mellokitty

Moderatrix of Journals
feels good to have a fresh start!

side by side pic updates from before the transplant:

the group

june 12:

june 20:


eva (the "teacher's pet" lol)

june 12:

june 20:


some gratuitous shots i particularly enjoyed:


mellokitty

Moderatrix of Journals
before:


the pots:


the dirt:
(amending with a product called "Black Pearl" -> a chitosan and biochar soil builder)


the during:


and don't forget to water!


a few days later:

[youtube]5FipzzGLW50[/youtube]
background track: velvet underground & nico - femme fatale

next up: topping update!


mellokitty

Moderatrix of Journals
apologies for the double-posting, i just wanted to consolidate all the information from this round into one thread.

**calling woodsmaneh!**

would you mind posting the 2 articles about pm and botrytis in here at some point please? those are must-reads!
 

mellokitty

Moderatrix of Journals
use a clean, sharp blade/scissors and make as perpendicular a cut possible.

we usually make our cuts here:


step-by-step (mr. mello modeling):


topping and cloning video (one glove = me, both gloves = mr. mello):

[youtube]VJn6RqTubL0[/youtube]
background track: eyedea & abilities -pushing buttons
 

mellokitty

Moderatrix of Journals
since we had to top anyways, instead of throwing those nice tops out, we made them into clones.

step-by-step with photos:

making the cut on the diagonal to increase surface area:


the incision:


scoring the other side:


double dip in gel and powder:


making sure it's in there good and tight:


ta-da!


a word about the cutting: mr. mello and i have slightly different methods when it comes to how we cut the bottom of the clones. we've done side-by-sides and have never noticed a difference in rooting time or vigour so we each stick to our preferred cuts.
you can see the difference in this video (one glove = me, two gloves = him):

[youtube]qmasxSES2kI[/youtube]
background track: son of dave - i just wanna get high with you
 

woodsmaneh!

Well-Known Member
As requested....

Here are a few more tips on mildew

CULTURAL CONTROL
Heat

Powdery mildew is sensitive to heat. Neither species will grow at 90 °F (32 °C). and will quickly perish when above 100 ° F (38 °C).
To get a complete kill maintain the temperature for an hour. This may not be a feasible option in most indoor gardens for several reasons. The first is that it may be difficult to heat the space to such a high temperature. The second is that even a single peak of 100 ° F (38 °C) affects the growth of plants. Vegetative plants with flowers or fruits in mid stage growth (weeks 3-7) may stretch a little from the experience. The heat treatment has relatively little effect on first and second week flowers or flowers nearing maturity.
You can minimize heat’s impact on plants in several ways. Heat the garden at the end of the day, as the lights are turned off. Since the plants are not photosynthesizing, they have lower water needs.
If the plants are being grown hydroponically, lower the temperature of the water to 60 degrees. Keeping the roots cool will help the upper plant parts beat the heat. It’s not difficult to do this, even if you don’t have a water chiller. Just add ice to the reservoir or flow through system. Roots of plants growing in soil can also be cooled using thermal ice packs at the base of the stem.
The heat treatment should kill off most of the fungus and its spores. The chances are there will still be some fungal re-growth. These can be eliminated using spot treatments.
Pruning

If one particular plant seems to be infected with a few tiny white spots on a few of its leaves, get a bag large enough to drop the leaves into and then cut them off into the bag. Remove the bag from the room. This prevents spores, the white powder on top of the leaves, from becoming airborne while being removed. Remember to wash your hands and clean the scissors or knife with soap and water, hydrogen peroxide, alcohol or bleach. Spray the plant with one of the sprays listed below after pruning to prevent re-infection and encourage healing.
If, you notice a re-infection a few days later, there is a good chance that this plant is very susceptible to powdery mildew and presents a good location for the infection to start and spread from. The plant should be removed immediately by placing a bag over it and removing it from the space. Then the space should be sprayed with one of the sprays listed below.
ORGANIC and IPM CONTROL


Here are some sprays that you can use to control the powdery mildew in your crop. All of these are safe to use for herb or for edible crops. Sprays are washed away by water, including rain.
Cinnamon Oil and Tea
Cinnamon is an effective destroyer of powdery mildew, with an effectiveness rate of 50-70%. It won’t kill it completely but it will keep it in check somewhat. It also potentiates other suppressive sprays so it is good to use in combination. To make your own, boil water, turn off the heat and add one ounce of ground cinnamon to one and a half pints water. Let the tea cool to room temperature. Add half a pint of 100 proof grain alcohol or rubbing alcohol and let sit. Strain the cinnamon. The spray is ready to use. A faster method is to add 2 teaspoons cinnamon oil to one pint of water and a dash of castile soap. Other herbs are also fungicidal. Clove, rosemary, and wintergreen oils are used in some botanical fungicides. The solution should consist of no more than 2% oil.
Garlic

Garlic is antifungal and anti-bacterial and has several pathways for destroying fungi including its high sulfur content. It can also be added to other anti-fungal sprays. Several garlic sprays are available commercially.
A homemade formula: Soak three ounces of crushed garlic in one ounce of neem or sesame oil and 100 proof or higher drinking alcohol or 70% or higher rubbing alcohol for a day or two. Strain. Then soak the garlic in a cup of water for a day. Strain. Mix the oil/alcohol, soaked water and 1 tablespoon liquid castile soap in a gallon container. Then fill with water and shake. The formula is ready to use.
A simpler brew consists of a teaspoon of garlic oil in a pint of water. To keep the oil and water mixed add a 1/8teaspoon of soap. Use garlic as a vaccination. Spray on new growth before there is a sign of infection.
Garlic is a general purpose insecticide as well as fungicide, so it should be used with caution on outdoor plants. It kills beneficial insects as well as plant pests.
Hydrogen Peroxide
Hydrogen peroxide (hp) is a contact fungicide that leaves no residue. It is an oxidized product of water and has an extra oxygen atom that is slightly negatively charged. When it comes in contact with the fungi the oxygen atoms attach to molecules on the cell walls, oxidizing or “burning” them.
Household hp sold in drug stores has a concentration of 3%. Garden shops sell 10% hp. Zerotol® contains 27% hydrogen peroxide and an unstated amount of peroxyacetic acid. Together they have a more potent chemistry than hp, with an activity of about 40% hp. It is considered hazardous because it can cause skin burn similar to that caused by concentrated acids.
To treat plants with drug store grade 3% hp use 4 1/2 tablespoons and fill to make a pint of solution, or a quart of hp to 3 quarts of water. With horticultural grade 10% hp use about 4 teaspoons per pint, 5 ounces per gallon. With Zerotol® use about 1 teaspoon per pint, 2 1/2 tablespoons per gallon.
Limonene
Limonene is refined from the oil of citrus rinds. It has a pleasant citrus odor and is the active ingredient in many of the new cleaning products. It also has fungicidal qualities. I’ve used pure diluted limonene and it controlled powdery mildew, but did not eradicate it. Perhaps a higher concentration would have been more successful. Start using 0.5-1% limonene in water 1/2-1 teaspoon per pint.
Milk
Milk kills powdery mildew so well that both home and commercial rose growers all over the world have adopted it for their fungicidal sprays. Use one part milk to nine parts water. I’ve only used 1% milk, but other recipes call for either whole or skim milk and use up to 1 part in 5 milk. Some recipes add garlic or cinnamon to the mix. When using more than 30% milk, a benign mold is reported to grow on top of the leaves. Use a milk spray at the first sign of infection then protect the new growth weekly.
Messenger®
Messenger’s active ingredient is a naturally occurring protein called harpin that stimulates the plant’s own natural defense system. It has been proven to promote more vigorous hardier plants that are more resistant to disease and have increased yields. It is used to prevent infection and decrease its virulence
Neem Oil
Neem oil is pressed from the seed of the neem tree (Azadirachta indica), native to Southeast Asia, but now cultivated worldwide. Neem oil has low mammalian toxicity. It degrades rapidly once it is applied so it is safe for the environment including non-target species and beneficial insects.
Neem oil protects plants with its fungicidal properties: it disrupts the organism’s metabolism on contact, forms a barrier between the plant and the invading fungus, and it inhibits spore germination. It has translinear action, that is, it is absorbed by the leaf and moves around using the leaf’s circulatory system – it can also be used as a systemic. When it is applied to the irrigation water it is absorbed by the roots and delivered throughout the plant. Adding a 0.5% solution, about 1 teaspoon per quart, to the irrigation water will protect the plant from infection.
Neem oil is best used before the plant or the garden exhibits a major infection. By using it before powdery mildew appears, it prevents the spores from germinating. It should not be used on buds or flowers.
Oil Spray
Growers have used different oil sprays to prevent and cure fungal infections. Until recently most horticultural oil sprays were made from petroleum distillates. However, most organic growers have switched to using botanical oils. Aside from the safety factor botanicals such as cottonseed, jojoba, neem and sesame oils have fungicidal properties. They can be used in combination with other spray ingredients listed here. The oils are mixed at about 1-2% concentrations. A 1% solution is about a teaspoon per pint or 3 tablespoons per gallon. Add castile soap to help the ingredients mix. Oil sprays should only be used on the leaves, not the buds or flowers. Use weekly on new growth.
pH Up
pH-Up is a generic term for alkaline pH adjustors, used to increase water pH in indoor gardens. They come as either a powder or liquid. Its active ingredient is usually lye (KOH) or potash (K2CO3).
Fungi require an acidic environment to grow and die in alkaline environments. Changing the leaf surface environment from acidic to alkaline clears up the infection. An alkaline solution with a pH of 8 will make the environment inhospitable for the fungus and will stop its growth. This is one of the simplest means of controlling the fungus. It can be used on critically infected plants.
Potassium/Sodium Bicarbonate
Potassium bicarbonate (KHCO3) and Sodium bicarbonate (NaHCO3) are wettable powders that change the pH of the leaf surface toward alkaline. Another reaction takes place; the fungus cell wall actually bursts in the presence of bicarbonate. Potassium is one of the macro-nutrients used by plants and therefore is preferred over sodium, as sodium can build up in the soil. Sodium bicarbonate can be found in your kitchen (baking soda), so some prefer it for ease of obtaining. Both are more effective when used with an oil and spreader such as castile soap. They can be used to cure bad infections and prevents new ones.
Use one teaspoon of bicarbonate powder, a teaspoon of oil and a few drops of castile soap in a pint of water, or 3 tablespoons each potassium bicarbonate and oil and a half teaspoon soap in a gallon of water. Spray on new growth.
Serenade® and Sonata®
Serenade® and Sonata® are composed of different bacteria. They use different pathways to stop mycellial growth. They are considered totally safe to humans and animals since the bacteria attack only fungi. Watch out if you are a mushroom, otherwise you are safe. The two bacteria work well together.
They are easy to use, quite safe and effective.
Sulfur
Sulfur has been used to control powdery mildew for centuries. Sulfur sprays can be used indoors but they are not popular because of residue that remains on the plant. In greenhouses gardeners use sulfur vaporizers that heat elemental sulfur to the point of vaporization. The sulfur condenses on all surfaces including the leaves. A fine deposit of very low pH sulfur granules covers the leaf surfaces. The low pH environment inhibits fungal growth. The heaters use a 60 watt light bulb to heat sulfur which is held in a container above the light. The bulb supplies enough heat to evaporate the sulfur, but not enough for it to ignite. The problem with vaporizers is that they also leave a fine sulfur film on the leaves and flowers.
Active mildew: 7 to 8 hours per night 1 to 2 times a week.
Preventative maintenance: 4 to 5 hours once a week
Vinegar
Apple cider vinegar is toxic to powdery mildew because of its high acidity (low pH). Use it at the rate of 1 tablespoon per quart of water several times a week . Some gardeners recommend alternating using vinegar with potassium bicarbonate and milk.
PREVENTION

  • Isolate all new plants in a separate area where they can’t infect other plants.
  • Filter incoming air to prevent spores from entering the room in the airstream.
  • Install a germicidal UVC light, like the ones used in food handling areas. The light is fatal to all airborne organisms passing through the appliance. This will kill powdery mildew spores that are airborne.
  • Spray the leaves with neem oil weekly. Neem oil presents both a physical barrier and a chemical deterrent.
  • Cinnamon oil and cinnamon tea can also be sprayed as a powdery mildew preventative. If you are using cinnamon oil use 1 part oil to 200 parts water. (1 teaspoon oil in a liter of water.)
 

woodsmaneh!

Well-Known Member
Re-post as requested.

Hi Guys I noticed some of the humidity comments and the fact that some run at 40%, your short changing yourself and your plant. The stomata open wide at higher humidity levels 60 to 70% and can gobble up all that co2, lover levels and they start to close.

Here is everything you need to know in a nut shell well maybe a small book.

[FONT=&quot]Plantworks: Part 1 – Humidity and Vapor Pressure Deficit[/FONT]
[FONT=&quot]By [/FONT][FONT=&quot]Urban Garden Magazine[/FONT][FONT=&quot]⋅[/FONT][FONT=&quot] July 12, 2010 [/FONT][FONT=&quot]⋅[/FONT][FONT=&quot]Email This Post[/FONT][FONT=&quot]⋅[/FONT][FONT=&quot]Print This Post[/FONT][FONT=&quot]⋅[/FONT][FONT=&quot]Post a comment[/FONT]
[FONT=&quot]Filed Under[/FONT] [FONT=&quot] humid, [/FONT][FONT=&quot]humidity[/FONT][FONT=&quot], [/FONT][FONT=&quot]Issue 11[/FONT][FONT=&quot], [/FONT][FONT=&quot]vapor pressure deficit[/FONT]
[FONT=&quot]“Think like a plant.”[/FONT]
[FONT=&quot]Have you ever been given this odd-sounding advice? Even when we are encouraged to try and understand how plants work, our inherent tendency to personify the natural world is inescapable. Growers often like to draw parallels between humans and plants, after all, there’s no doubt that plants are marvellous, highly specialized and well-adapted organisms. You might even go as far to say they are “intelligent.” But let’s be honest here. Plants are totally different from us, especially in the way they react and respond to their environment. However, if we can get our heads around the world from a plant’s perspective, we become what is commonly referred to as “green-fingered.” We become … better growers.[/FONT]
[FONT=&quot]Have you ever wondered how plants “feel” humidity? An understanding of what humidity is, what it means to plants, and how you can manage it in your indoor garden will help you and your plants stay happy all year round.
The humidity of the air is basically the amount of water in the air. Water can only truly stay in the air when it is the invisible gas – water vapour. Small droplets of water in air, such as fog or mist, are not water vapor; they are simply larger particles of water temporarily suspended in the air that are ready to be turned into water vapour by evaporation.[/FONT]
[FONT=&quot]Temperature plays an important role when it comes to humidity. The warmer the air, the more water vapour it can hold. This means the maximum amount of water that air can hold is directly related to the temperature of the air. As the amount of water air can hold constantly changes with temperature it is difficult to pin an absolute or fixed amount of water that can be held by air. So what’s the best way to quantify humidity if the goal posts are changing all the time? The answer is something called Relative Humidity (RH) – this is a measure in terms of percentage, of the water vapor in the air compared to the total amount of water vapor that the air could potentially hold at a given temperature.[/FONT]
[FONT=&quot]Why is RH so important?[/FONT]
[FONT=&quot]As growers we measure the RH of our gardens using digital or analogue hygrometers. These readings are very important because RH has a direct effect on the plant’s ability to transpire and therefore grow. Generally, plants do not like to lose lots of water through transpiration. Plants have some degree of control of their rate of transpiration through management of their stomata but the general rule is the drier the air, the more plants will transpire.
Now let’s move on to the idea of “pressure” – this is an important concept to grasp when it comes to understanding a plant’s response to humidity. All gasses in the air exert a pressure. The more water vapor in the air the greater the vapor pressure. This means that in high RH conditions there is a greater vapor pressure being exerted on plants than in low RH conditions. High vapor pressure can be thought of as a force in the air pushing on the plants from all directions. This pressure is exerted onto the leaves by the high concentration of water vapor in the air making it harder for the plant to ‘push back’ by losing water into the air by transpiration. This is why with high RH plants transpire less. Conversely, in environments with low RH, only a small amount of pressure is exerted on the plants’ leaves, making it easy for them to lose water into the air.[/FONT]
[FONT=&quot]What is Vapor Pressure Deficit (VPD)?[/FONT]
[FONT=&quot]VPD can be defined as the difference (or deficit) between the pressure exerted by water vapor that could be held in saturated air (100% RH) and the pressure exerted by the water vapor that is actually held in the air being measured.
The VPD is currently regarded of how plants really ‘feel’ and react to the humidity in the growing environment. From a plant’s perspective the VPD is the difference between the vapor pressure inside the leaf compared to the vapor pressure of the air. If we look at it with an RH hat on; the water in the leaf and the water and air mixture leaving the stomata is (more often than not) completely saturated -100% RH. If the air outside the leaf is less than 100% RH there is potential for water vapor to enter the air because gasses and liquids like to move from areas of high concentration (in this example the leaf) into areas of lower concentration (the air). So, in terms of growing plants, the VPD can be thought of as the shortage of vapor pressure in the air compared to within the leaf itself.[/FONT]
[FONT=&quot]Another way of thinking about VPD is the atmospheric demand for water or the ‘drying power’ of the air. VPD is usually measured in pressure units, most commonly millibars or kilopascals, and is essentially a combination of temperature and relative humidity in a single value. VPD values run in the opposite way to RH vales, so when RH is high VPD is low. The higher the VPD value, the greater the potential the air has for sucking moisture out of the plant.
As mentioned above, VPD provides a more accurate picture of how plants feel their environment in relation to temperature and humidity which gives us growers a better platform for environmental control. The only problem with VPD is it’s difficult to determine accurately because you need to know the leaf temperature. This is quite a complex issue as leaf temperature can vary from leaf to leaf depending on many factors such as if a leaf is in direct light, partial shade or full shade. The most practical approach that most environmental control companies use to assess VPD is to take measurements of air temperature within the crop canopy. For humidity control purposes it’s not necessary to measure the actual leaf VPD to within strict guidelines, what we want is to gain insight into is how the current temperature and humidity surrounding the crop is affecting the plants. A well-positioned sensor measuring the air temperature and humidity close to, or just below, the crop canopy is adequate for providing a good indication of actual leaf conditions.[/FONT]
[FONT=&quot]Managing Humidity[/FONT]
[FONT=&quot]
[/FONT]
[FONT=&quot]Managing the humidity in your indoor garden is essential to keep plants happy and transpiring at a healthy rate. Transpiration is very important for healthy plant growth because the evaporation of water vapor from the leaf into the air actively cools the leaf tissue. The temperature of a healthy transpiring leaf can be up to 2-6°C lower than a non-transpiring leaf, this may seem like a big temperature difference but to put it into perspective around 90% of a healthy plant’s water uptake is transpired while only around 10% is used for growth. This shows just how important it is to try and control your plants environment to encourage healthy transpiration and therefore healthy growth.
So what should you aim to keep your humidity at? Many growers say a RH of 70% is good for vegetative growth and 50% is good for generative (fruiting /flowering) growth. This advice can be followed with some degree of success but it’s not the whole story as it fails to take into account the air temperature.[/FONT]
[FONT=&quot]Humidification systems to increase RH.[/FONT]
[FONT=&quot]Table 1 shows the VPD in millibars at various air temperatures and relative humidity. Most cultivated plants grow well at VPDs between 8 and 10, so this is the green shaded area. Please note that the ideal VPD range varies for different types of plants and the stage of growth. The blue shaded are on the right indicates humidification is needed where the red shaded area on the left indicates dehumidification is needed.[/FONT]
[FONT=&quot]
[/FONT]
[FONT=&quot]By looking at this example we can see that at 70% RH the temperate should be between 72-79°F (22-26°C) to maintain healthy VPDs. If your growing environment runs on the warm side during summer, like many indoor growers, a RH of 75% should be maintained for temperatures between 79-84°F (26-29°C.)[/FONT]
[FONT=&quot]The problem with running a high relative humidity when growing indoors it that fungal diseases can become an issue and carbon filters become less effective. It is commonly stated that above 60% RH the absorption efficiency drops and above 85% most carbon filters will stop working altogether. For this reason it is good practice to run your RH between 60-70% with the upper temperature limit depending on your crop’s ideal VPD range, in the example it would be 64-79°F (18-26°C.)[/FONT]
[FONT=&quot]The table also shows that if your temperature is above 72°F (22°C), 50% RH becomes critically low and should generally be avoided to minimize plant stress.
Please understand that by presenting this information we do not want you to go to your indoor gardens and run your growing environment to within strict VPD values. What’s important to take from this is that VPD can help you provide a better indication of how much moisture the air wants to pull from your plants than RH can. If you want to work out for yourself the VPD of your plants leaves you can follow the steps below:[/FONT]

  1. [FONT=&quot]Measure the leaf temperature and look up the vapor pressure at 100% RH on table 2 below.[/FONT]
  2. [FONT=&quot]Measure the air temperature and relative humidity and look up the nearest vapor pressure figure on table 2.[/FONT]
  3. [FONT=&quot]Subtract the air vapor pressure from the leaf vapor pressure[/FONT]
[FONT=&quot]Example:
Leaf Temperature = 24°C (100% RH) Leaf VP: 29.8
Air Temperature = 25°C @ 60% RH Air VP: 19.0
VPD= 10.8[/FONT]
[FONT=&quot]
[/FONT]
[FONT=&quot]Humidity’s Effect on Plants[/FONT]
[FONT=&quot]Plants cope with changing humidity by adjusting the stomata on the leaves. Stomata open wider as VPD decreases (high RH) and they begin to close as VPD increases (low RH). Stomata begin to close in response to low RH to prevent excessive water loss and eventually wilting but this closure also affects the rate of photosynthesis because CO2 is absorbed through the stomata openings. Consistently low RH will often cause very slow growth or even stunting. Humidity therefore indirectly affects the rate of photosynthesis so at higher humidity levels the stomata are open allowing co2 to be absorbed.[/FONT]
[FONT=&quot]
[/FONT]
[FONT=&quot]Leaf roll on Thai basil- Localized humidity stress causes by the lights being too close.[/FONT]
[FONT=&quot]When humidity gets too low plants will really struggle to grow. In response to high VPD plants will try to stop the excessive water loss from their leaves by trying to avoid light hitting the surface of the leaf. They do this by rolling the leaf inwards from the margins to form tube like structures in an attempt to expose less of the leaf surface to the light, as shown in the photo.[/FONT]
[FONT=&quot]For most plants, growth tends to be improved at high RH but excessive humidity can also encourage some unfavourable growth attributes. Low VPD causes low transpiration which limits the transport of minerals, particularly calcium as it moves in the transpiration stream of the plant – the xylem. If VPD is very low (95-100% RH) and the plants are unable to transpire any water into the air, pressure within the plant starts to build up. When this is coupled with a wet root zone, which creates high root pressure, it combines to create excessive pressure within the plant which can lead to water being forced out of leaves at their edges in a process called guttation. Some plants have modified stomata at their leaf edges called hydathodes which are specially adapted to allow guttation to occur. Guttation can be spotted when the edges of leaves have small water droplets on, most evident in early morning or just after the lights have come on. If you see leaves that appear burnt at the edges or have white crystalline circular deposits at the edges it could be evidence that guttation has occurred.[/FONT]
[FONT=&quot]
[/FONT]
[FONT=&quot]Guttation on tomato plants caused by high RH and wet coco coir.[/FONT]
[FONT=&quot]
[/FONT]
[FONT=&quot]Powdery Mildew from poor humidity control.[/FONT]
[FONT=&quot]Most growers are well aware that with high humidity comes and increased risk of fungal diseases. Water droplets can form on leaves when water vapor condenses out of the air as temperature drops, providing the perfect breeding ground for diseases like botrytis and powdery mildew. If humidity remains high it further promotes the growth of fungal diseases. The water droplet exuded through guttation also creates the perfect environment for fungal spores to germinate inviting disease to take hold.[/FONT]
[FONT=&quot]Quick reference chart:[/FONT]
[FONT=&quot]Low VPD / High RH[/FONT]
[FONT=&quot]High VPD / Low RH[/FONT]
[FONT=&quot]Mineral deficiencies[/FONT]
[FONT=&quot]Wilting[/FONT]
[FONT=&quot]Guttation[/FONT]
[FONT=&quot]Leaf roll[/FONT]
[FONT=&quot]Disease[/FONT]
[FONT=&quot]Stunted plants[/FONT]
[FONT=&quot]Soft growth[/FONT]
[FONT=&quot]Leathery/crispy leaves[/FONT]
[FONT=&quot]So hopefully now you are not just ‘thinking like a plant’ – you’re ‘feeling it’ too![/FONT]
[FONT=&quot]Next time, part two of Plantworks will be looking at foliar spraying and how plants absorb nutrients into their leaves.[/FONT]
[FONT=&quot][/FONT]
[FONT=&quot]references are:[/FONT]
[FONT=&quot]BCMAFF Floriculture Factsheet No.400-5 (June 1994) [/FONT]
[FONT=&quot]Autogrow Systems Ltd – [/FONT][FONT=&quot]Humidity and VPD[/FONT]
[FONT=&quot]If you are interested in calculating VPD, an on-line calculator can be found here: [/FONT][FONT=&quot]Autogrow VPD Calculator[/FONT]

[FONT=&quot]In situations where CO2 is used there is little point in injecting the CO2 when the stomata are closed – so avoid having an environment where the VPD is high (above 11 millibars (approx.)) during this period. A lowish VPD (between 6-
will encourage the stomata to open wide and gobble up all that lovely CO2. If you can’t get the VPD down when the lights are on then maybe switch off CO2 injection and save the planet.[/FONT][FONT=&quot]During the night period, VPD is not as important because stomata are closed. However, problems can occur when indoor gardens run with a drastically higher VPD during the night in comparison to the day, which could come from using excessive dehumidification during the night. You should aim to have slightly lower VPD in the night than during the day, which is usual for most indoor growers. [/FONT][FONT=&quot]If fungal growth is your main concern, running the RH between 55-65% at 70F during the night should be fine. Even running as low as 45% at 70F in the last few weeks should be ok if you want peace of mind when growing varieties that are particularly susceptible to botrytis or mildew. Note that RH can vary from place to place inside the grow area so you may be getting 65% at your RH sensor but without any air stirring going on it could be getting much higher in cooler areas (a cold corner or inside a crowded crop canopy facing a cold wall) where there is not much air movement.[/FONT]
 

woodsmaneh!

Well-Known Member
Here is the other one you wanted,peace

<b>
Here is some info on Botrytis, I use an Ozone generator and follow the steps below and have not had any issues in a few years. I will also run a dehumidifier on a timer at night. Hope this helps.

Bud Rot

Bud rot (Botrytis) is a very common worldwide fungus that attacks both indoor and outdoor crops under certain conditions. “Bud rot” is also known as “brown rot”, “grey mould” and other names. Airborne Botrytis spores can be found everywhere, all times of the year, and will attack many different species of plants. Botrytis will attack flowers, and eventually leaves and stems.

Growers running sea of green, perpetual harvest, remote grows, outdoor, or multiple strains (each with different flowering periods) should keep an eye out for Botrytis near harvest time.


Outdoor growers need to be hypersensitive to weather conditions near harvest time. Rain, morning dew, frost and cool fall nights may increase the risk of bud rot and powdery mildew.


Fully developed marijuana buds provide ideal conditions for spore germination: warm and moist plant tissues. Botrytis will initially attack the largest and densest buds in the garden, because they provide the ideal conditions for germination. Weak plants will also be attacked rapidly.


[FONT=&quot]Identifying and preventing budrot[/FONT]


Budrot will infect and turn colas to mush in a matter of days and may destroy a crop in a week if left unchecked. Botrytis loves warm, and humid (50% or over humidity) conditions. Lowering humidity will slow and stop spore germination. Good ventilation and decent air circulation help prevent infection.

A grow room may smell noticeably moldy if Botrytis has attacked one or more colas. Once a cola has been infected, Botrytis will spread incredibly fast. Entire colas will turn to brown mush and spores will be produced, attacking other nearby colas. Ventilation may spread viable spores throughout the room.

[FONT=&quot]Measures to prevent bud rot in the final stages of flowering:[/FONT]


Early veg and flower pruning of undergrowth to promote air circulation

Hepa filter room and intake air sources.
Introduce low levels of ozone into room air
. Ozone is effective against pollen, powdery mildew and other airborne spores.
Lowering room humidity
(warming nighttime air and venting frequently or using a dehumidifier)
Decreasing watering
cycles and amounts to reduce room humidity
Large, dense colas should be periodically inspected. Brown tissues deep within the bud will smell mouldy and may become liquid.
Removing fan leaves during the last few days before harvest to promote air circulation

Serenade

"Serenade controls the following: ....Botrytis, Powdery mildew, Downey mildew..."

"Certified organic by OMRI
and EPA/USDA National Organic Program, Serenade offers growers the luxury of application without weather or timing restrictions and there are no phyto-toxicity issues"
"To apply, simply spray on leaves and shoots to provide complete coverage. Best results will be had be pre-treating plants before signs of disease set it and then every week to protect newly formed foliage"

[FONT=&quot]What if bud rot is found?[/FONT]

Once bud rot has been detected, the grower should isolate infected buds by removing them from the grow room immediately and harvesting the infected colas, followed by a rapid dry of the harvested colas. Take immediate steps to reduce room humidity. Afterwards, the entire crop should be carefully inspected for infection and damage. The grower may want to harvest early if more than one rotting cola has been found. Spores may have spread and are germinating deep within other colas.

[FONT=&quot]Can I salvage budrot-infected colas?[/FONT]


Yes. Remove the infected colas from the main room, Trim out the infection (Trim more than you can see – Botrytis often infects adjacent tissues) and quick-dry them. Re-inspect buds – they should
[FONT=&quot]not[/FONT] smell mouldy.

</b>
 

woodsmaneh!

Well-Known Member
and for good measure something extra

[FONT=&quot]Diagnosing Nutritional Deficiencies[/FONT]
[FONT=&quot]Texas Greenhouse Management Handbook[/FONT]
[FONT=&quot]The correct diagnosis of nutritional deficiencies is important in maintaining optimum plant growth. The recognition of these symptoms allows growers to "fine tune" their nutritional regime as well as minimize stress conditions. However, the symptoms expressed are often dependent on the species of plant grown, stage of growth or other controlling factors. Therefore, growers should become familiar with nutritional deficiencies on a crop-by-crop basis.[/FONT]
[FONT=&quot]Record keeping and photographs are excellent tools for assisting in the diagnosis of nutrient deficiencies. Photographs allow growers to compare symptoms to previous situations in a step-by-step approach to problem solving. Accurate records help in establishing trends as well as responses to corrective treatments.[/FONT]
[FONT=&quot]Because plant symptoms can be very subjective it is important to approach diagnosis carefully. The following is a general guideline to follow in recognizing the response to nutrient deficiencies:[/FONT]
[FONT=&quot]Nitrogen (N)[/FONT][FONT=&quot] - Restricted growth of tops and roots and especially lateral shoots. Plants become spindly with general chlorosis of entire plant to a light green and then a yellowing of older leaves which proceeds toward younger leaves. Older leaves defoliate early.[/FONT]
[FONT=&quot]Phosphorus (P)[/FONT][FONT=&quot] - Restricted and spindly growth similar to that of nitrogen deficiency. Leaf color is usually dull dark green to bluish green with purpling of petioles and the veins on underside of younger leaves. Younger leaves may be yellowish green with purple veins with N deficiency and darker green with P deficiency. Otherwise, N and P deficiencies are very much alike.[/FONT]
[FONT=&quot]Potassium (K)[/FONT][FONT=&quot] - Older leaves show interveinal chlorosis and marginal necrotic spots or scorching which progresses inward and also upward toward younger leaves as deficiency becomes more sever.[/FONT]
[FONT=&quot]Calcium (Ca)[/FONT][FONT=&quot] - From slight chlorosis to brown or black scorching of new leaf tips and die-back of growing points. The scorched and die-back portion of tissue is very slow to dry so that it does not crumble easily. Boron deficiency also causes scorching of new leaf tips and die-back of growing points, but calcium deficiency does not promote the growth of lateral shoots and short internodes as does boron deficiency.[/FONT]
[FONT=&quot]Magnesium (Mg)[/FONT][FONT=&quot] - Interveinal chlorotic mottling or marbling of the older leaves which proceeds toward the younger leaves as the deficiency becomes more severe. The chlorotic interveinal yellow patches usually occur toward the center of the leaf with the margins being the last to turn yellow. In some crops, the interveinal yellow patches are followed by necrotic spots or patches and marginal scorching of the leaves.[/FONT]
[FONT=&quot]Sulfur (S)[/FONT][FONT=&quot] - Resembles nitrogen deficiency in that older leaves become yellowish green and the stems become thin, hard, and woody. Some plants show colorful orange and red tints rather than yellowing. The stems, although hard and woody, increase in length but not in diameter.[/FONT]
[FONT=&quot]Iron (Fe)[/FONT][FONT=&quot] - Starts with interveinal chlorotic mottling of immature leaves and in severe cases the new leaves become completely lacking in chlorophyll but with little or no necrotic spots. The chlorotic mottling on immature leaves may start first near the bases of the leaflets so that in effect the middle of the leaf appears to have a yellow streak.[/FONT]
[FONT=&quot]Manganese (Mn)[/FONT][FONT=&quot] - Starts with interveinal chlorotic mottling of immature leaves and, in many plants, it is indistinguishable from that of iron. On fruiting plants, the blossom buds often do not fully develop and turn yellow or abort. As the deficiency becomes more severe, the new growth becomes completely yellow but, in contrast to iron necrotic spots, usually appear in the interveinal tissue.[/FONT]
[FONT=&quot]Zinc (Zn)[/FONT][FONT=&quot] - In some plants, the interveinal chloratic mottling first appears on the older leaves and in others, it appears on the immature leaves. It eventually affects the growing points of all plants. The interveinal chlorotic mottling may be the same as that for iron and manganese execpt for the development of exceptionally small leaves. When zinc deficiency onset is sudden, such as the zinc left out of the nutrient solution, the chlorosis can appear identical to that of iron and manganese without the little leaf.[/FONT]
[FONT=&quot]Boron (B)[/FONT][FONT=&quot] - From slight chlorosis to brown or black scorching of new leaf tips and die-back of the growing points similar to calcium deficiency. Also the brown and black die-back tissue is very slow to dry so that it can not be crumbled easily. Both the pith and epidermis of stems may be affected as exhibited by hollow stems to roughened and cracked stems.[/FONT]
[FONT=&quot]Copper (Cu)[/FONT][FONT=&quot] - Leaves at top of the plant wilt easily followed by chlorotic and necrotic areas in the leaves. Leaves on top half of plant may show unusual puckering with veinal chlorosis. Absences of a knot on the leaf where the petiole joins the main stem of the plant beginning about 10 or more leaves below the growing point.[/FONT]
[FONT=&quot]Molybdenum (Mo)[/FONT][FONT=&quot] - Older leaves show interveinal chlorotic blotches, become cupped and thickened. chlorosis continues upward to younger leaves as deficiency progresses.[/FONT]
[FONT=&quot]Summary[/FONT][FONT=&quot][/FONT]
[FONT=&quot]The diagnosis of nutrient deficiencies can be a key to optimizing plant growth. However, this technique is very subjective and requires careful observation. Plants respond to nutrient deficient conditions in several different ways. Growers must become familiar with these on a crop-by-crop basis. Photographs and record keeping can be very useful tools in the diagnosis of nutrient deficiencies.[/FONT]
 

Devildog93

Well-Known Member
Hey MelloKitty..............Meooooooooooooooooowwwwww!

Looking good.......and the room/setup ain't bad either. Fsssst Raaaawwrr
 

mellokitty

Moderatrix of Journals
thanks again, woodsmaneh! important references all!

devildawwwg thanks for stopping in, it's aboot to get exciting....
 

Kottonmouth king15

Well-Known Member
lookin good as usuall melowkitty! i like the vertical bulbs too! but your room is off the chains!! outstanding setup! high-five lady!lol
 

woodsmaneh!

Well-Known Member
As a vertical light user what do you do about the outside row of plants do they only get light on the top and 50% of the side?
 

mellokitty

Moderatrix of Journals
we turn them... and switch them around every so often so nobody spends too much time on the outside (sort of like penguins in winter ;)). i want some of those plant holders with castors on them, dammit.

we're growing og's now, but i've heard from collective gardener that bubba kush seemed to *prefer the lack of light - he said his bubbas on the outside row outperformed the ones getting the full dose of light in the middle. (i mention this because we *could get bubba babies if we want)
 
Top