You are using an out of date browser. It may not display this or other websites correctly.
You should upgrade or use an alternative browser.
You should upgrade or use an alternative browser.
Seeking Help - Building Custom-Designed DIY LED Grow Lights using CREE CXA3070 COBs
- Thread starter Gaius
- Start date
Positivity
Well-Known Member
You could probably clean up the wiring a lot with some sheathing and adhesive backed plastic clips. Would take some stress off of the connections also. Steves leds has a nice selection of sheathing and the wire clips are everywhere..amazon, radioshack, mouser. Just some stuff to consider.
smokey the cat
Well-Known Member
Clever use of materials - the use of the shelf looks really well chosen. Good to hear your not seeing much heat off the drivers - can totally believe that at ~85% efficiency they'd barely feel warm.
Gaius
Active Member
NICE!
You can by U shape hangers to angle the outer chips inward
Any idea on total wattage for each stage?
The outer chip tilt angle can be adjusted by loosening one of the screws in the heatsink fins. Was a nice little extra feature I noticed while assembling it.
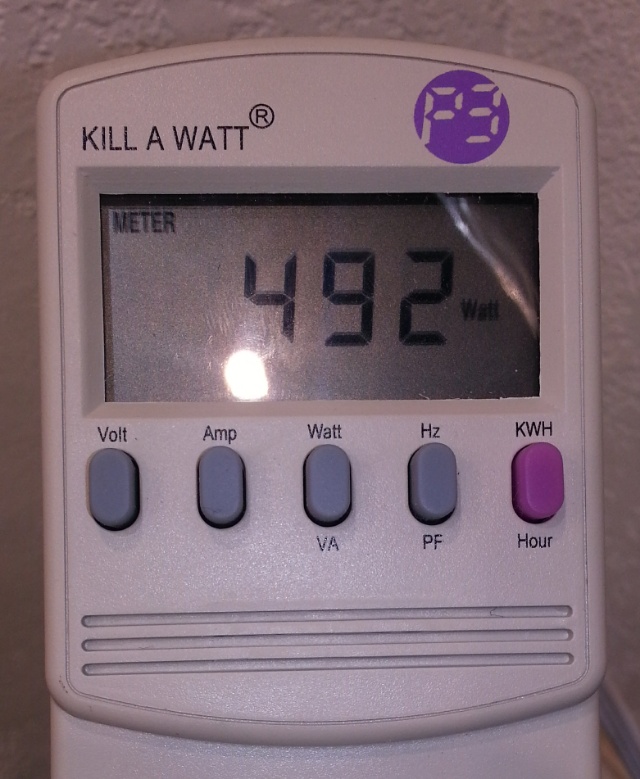
Lights are off right now. I'll throw it on the killawatt this evening when they are back on.
smokey the cat
Well-Known Member
Awful maths incoming:
1400mA driver. Cree data sheet shows 3070 using ~37V at that current.
= 51.8W per CXA.
I suppose with heat/voltage change this will swing back and forward.
Around 420W of LED power - according to manufacturer.
Do you know what the overhead of your 12V & cooling fans Gaius? Care to kill them for a second or two and see what they're using?
captainmorgan
Well-Known Member
Didn't read the whole thread. Has anyone suggested adding some deep red 660 nm. Looking at the graphs of your chips,that combo looks a little lacking in deep red.
midgetaus
Member
The BOM is just over $700. That doesn't count some of the tools and supplies I didn't have.
really that much...
Mellodrama
Well-Known Member
Has anyone suggested adding some deep red 660 nm. Looking at the graphs of your chips,that combo looks a little lacking in deep red.
This whole deep red subject - it sounds good but I don't understand the application. Is this something you'd want running all day with the other lights? Or is that the bandwidth you use when you're simulating sunset, and you only run it for a half hour or so at the end of the day after the other lights have turned off?
Gaius, if you have the time, it'd be super helpful to break down that BOM. Some DIY'ers might already have metal brackets, or a pile of heatsinks, or etc. Could you provide a rough tally of what it cost for the guts of the Battleship (COB's and drivers)? Then maybe wires, plugs, etc.
Hey, guys, I successfully installed one of those Ideal CXA30 holders and wanted to share with you. Gaius, I hope you don't mind...
Let's see if this works. It's my first attempt to link an image from outside RIU

Mellodrama
Well-Known Member
OMG -
The forum wouldn't allow me to add 10 minutes of typing so here's the rest...
Hey, it worked kind of. I wanted it in the thread full size but I guess that'll work. It was a challenge with this CPU heatsink because I threaded my own holes (#6-32) and had to be very careful to avoid puncturing the heat tubes. It'd be way easier on a big heatsink like Supra uses.
I think this is a great way to go, especially if you don't want to solder on your COBS. Those little white plastic arms push down on the COB's electrical contacts. If you strip the wires back to the proper length, they'll insert right up to the wire insulation. It's easy to disconnect the wires by jabbing into the second opening with something small and pointy.
The COB does snap into the holder, but its grip is tenuous. I'd suggest marking the spot and applying thermal paste to the sink, not the COB, in case it falls out of the holder at the wrong moment. You wouldn't want the COB to pick up every bit of dirt on your bench.
The holder has tiny tangs that keep it from sucking right down to the sink and crushing the COB. So you want to apply even torque to the screws, working them down evenly, and stop when the screws have just begun to pull the holder towards the sink, causing just a bit of deflection.
I used a hobby visor and a bright light to closely inspect the finished product. You want to see the COB pushed evenly down onto the sink. I had to do it all over again because a little bit of grit got into one corner and was holding that part of the COB off the sink.
For those of you who are wondering about the rest, I used one of the eBay 700mA drivers mentioned in Supra's thread. Post #91. I had several chunks of loose wire laying around, and 120V cords from dead appliances. Problem with the 120V cords I had was that none of them had polarized plugs. I went to the store and bought a 3-prong plug. Although there's nothing connected to the ground prong, it ensures that I can't plug this in backwards. In the US the narrower blade is the positive blade. So that goes to the + side of the driver's AC IN. The broad blade goes to the - side of the AC IN. Then it was just a matter of connecting the driver's DC OUTPUT correctly. "L" is positive, "N" is neutral.
It's brighter than hell even using Supra's modest 700mA driver.
MOST IMPORTANT THING OF ALL: Be very careful with your screwdriver when tightening down the screws! The tip of the screwdriver is very close to the COB. One slip and it could be bad. I was lucky. Found some tiny Torx screws. Way more secure than Philips or straight slot. I didn't think of it til just now, but you could always shield the COB with a thin piece of plywood or plastic.
Similar threads
- Replies
- 46
- Views
- 6K
- Replies
- 48
- Views
- 9K
- Replies
- 250
- Views
- 25K
- Replies
- 20
- Views
- 3K
- Replies
- 138
- Views
- 26K