Thedude4552s' Perpetual multi-chamber Grow Cab Build

LoudBlunts

Well-Known Member
the POS i talked to, WAS the manager...lol

thanks to egging me on.... cuz i was supposed to contact home office....but i just pushed it aside.

you've inspired me to call and bitch to the home office
 

420weedman

Well-Known Member
the POS i talked to, WAS the manager...lol

thanks to egging me on.... cuz i was supposed to contact home office....but i just pushed it aside.

you've inspired me to call and bitch to the home office

with a name like "LoudBlunts" you better call !! lol
id have a hard time letn $10 go to some bs like that ... but 250 ... u better believe !:fire::cuss::fire:
 

The Dude 4552

Well-Known Member
Hey thanks for the advice, Loudblunts. When I built the cabinet, I reinforced all the shelves with 1" wood screws, 2 on each side. They give you the little metal supports to fit in the holes but they weren't sturdy enough to fit my specifications. Trust me the wardrobe is sturdy, and for moving it I just put a dolly under one side, lift and move.

Only the cloner is Hydroponic (DWC), the rest will be soil pots.

I also purchased 8 L-Brackets as a 'just in case,' so should I notice any problems with weight I will install the brackets.

Glad to see some peaking interest in this project...
 

The Dude 4552

Well-Known Member
GrayGhost,

I am here to help. I made this journal so that people can learn from my design and re-create it for themselves.

Having said that, putting the wardrobe together was a very difficult task. If you can, see if you can acquire a wardrobe of the same dimensions pre-built and get it delivered. If you want to buy it, I got the wardrobe for 169.99 (its now 149.99 :)) and it comes in an extremely heavy box.

Once its assembled however and doesn't need to be moved, the rest of the process is tedious but not necessarily difficult.

A 'cooltube' is a glass fixture that fits over the bulb that can be attached to ducting. Basically a cooltube draws air from a fan and blows that cool air over your light fixture, cooling the lamp and reducing heat. The cooltube is simply some PVC pipe and a Pyrex Bake-A-Round.

The Pyrex Bake-A-Round is a glass bread baking cylinder. The glass is tempered to withstand the heat of a 350f oven, so naturally is safe for a light. They have since been discontinued so are not in stores, but can be found on eBay for a reasonable price.

Here is a tutorial on how to make a cooltube so you can see what goes into the construction, or you can wait and see how I build mine...

DIY Cool Tube - Rollipedia

You can also buy a pre-built cooltube for roughly $100.

http://www.htgsupply.com/viewproduct.asp?productID=48137
 

LoudBlunts

Well-Known Member
the dude....guess what?

i just tried to send you a message in a response and instead of it going to you....it went to Rollitup....


go figure!

told you they are intercepting our private messages
 

LoudBlunts

Well-Known Member
dont be surprised if you see me banned....lol


they will claim that it was cuz of spam.....


well they shouldnt be reading our PRIVATE messages anyway
 

The Dude 4552

Well-Known Member
Construction Update!!!

So today I went to do some supply shopping at Home Depot and I swung by Tiger Direct for some fan research...

I picked up a whole bunch of stuff, so I will only list what I used for this update:

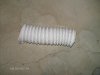
(1) 8' x 3" vinyl duct
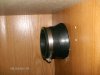
(2) 4" x 3" rubber coupling
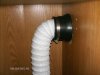
(1) 3" PVC Tee
(1) pack of 5 Paint Brushes
(1) Quart white semi-gloss mould & Mildew Resistant primer

After Home depot I stopped by Tiger Direct to check out the varying DbAs and CFMs for there PC fans.

I decided to trade up for my exhaust fans:


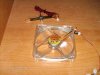
(2) Thermaltake 12cm Case Fan w/speed control.

I am going to wire these for manual speed control using the knob. On the minimum setting it uses 0.12 amps, makes 17dBA of noise, and moves 38.6 CFM. On the max setting it uses 0.48 amps, makes 46.5dBA of noise and moves 93.7 CFM!!! I will put the speed controls in the filter chamber and will change them accordingly. I will adjust for an average CFM of 80 in each fan. I also have rubber grommets for when I install the fan in order to curb vibration and noise.

==========================================================================================

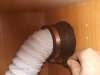
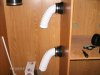
I took the 8' of duct and cut 2 smaller pieces for the chamber exhaust.


Now the coupling is installed for a snug fit and I used the clamps to keep the duct firmly in place.


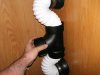
Now I take the 3" PVC tee and attach both ducts to the ends and leave the other hole for attaching the duct for the cooltube. I didnt drill the PVC in place yet as I still have to paint. I held it up for a demonstration.


Join me for my next update: painting + who knows!
 

Attachments

grayghost

Active Member
Thanks for the info. on the cool tube and the wonderful details you provide. I really think I can do this! :lol:

What is your opinion on the Homebox? Does anyone out there have experience with them?
 

The Dude 4552

Well-Known Member
Unfortunately I have no experience with HomeBoxes. Just spend some time reading through the hundreds of topics up for discussion and use the search feature to find things you're looking for...
 

tom__420

Well-Known Member
The Dude 4552, where ya at man? I have been looking forward to see an update on this but it seems you have disappeared! If you get a chance post some updates and some pics so we can see what's going on

Tom bongsmilie
 

fishindog

Well-Known Member
I know i wanna see how this is coming along too!!!! WHERE YOU AT DUDE!!!!?!?!?!?!?!?!

Lookin good REP++
 
Top