Successful Cloning

hermex

Active Member
Tip: Opening the thread in one window and the photos in another seems useful until I spend time captioning my photos.
-------
Hi all, thanks for reading the thread. If you've been growing for a while, then you probably already know what I am about to post, but if you are new to growing, or new to cloning, then you might use this as a simple starting point.

First off, I've cloned in anything from a cup of un-PH'd tap water to a 36 site aero cloner that a friend has. I've cloned in dirt with ziploc humidomes and I've cloned in cubes with water trays. Attached is a pdf I made when I was trying to re-invent the wheel with cloning, so to speak.

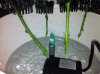
I use the daisy cloner because it is simple, cheap, and it produces results.

This is a step-by-step method of cloning that should work for you like it does for me if you do what I do...assuming strong genetics.

For anything I do I am using water that has been in a 20 gallon tub bubbling with 2 air stones for at least 2 days.

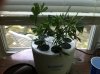
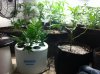
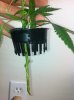
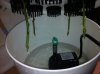
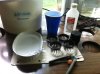
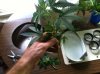
Step 1: Prepare your area and materials (Photo 1)
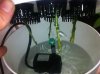
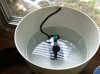
-I have my daisy cloner (Photo 2), a cup of water (PH 6.5), alcohol to sterilize my cutting tools, a tray of water (PH 6.5) large enough to cut in, a razor blade, and some sharp scissors.
-Sterilize your cutting tools and fill your daisy cloner with filtered water (PH 6.5) until the pump is covered up to the neck. I have used rooting gels and nutrients in the past, but regular water works for a strong strain and it is free.

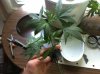
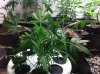
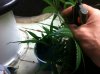
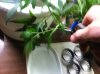
Step 2: Take your cuttings
- (Photo 3) I have allowed two of the lower branches of two plants (4 branches) to grow without trimming. You can see trimmed branches in the photo as well. This plant will receive its first flower nutrients in 4 days and go into flower in about 8 days. I usually take clones just before a plant goes into flower.
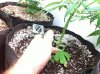
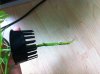
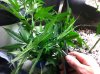
- Cut the branch that will be your clone right down at the base of the trunk and immediately place it in your cup of water (Photo 4). Repeat (Photo 5)

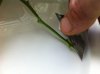
Step 3: Trim the cutting
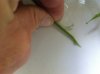
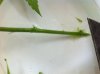
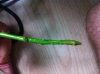
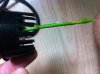
-Trim off as many nodes (Photos 6 and 7) as is necessary to make the size clone you need. I like large clones because they really hit the ground running.

Step 4: Make your 45 degree cut and prep the clone.
-Now you have nodes available to cut (Photo 8.) Using your sharp, sterilized razor blade, make a 45 degree cut through a node (or two if you can find them closely spaced) (Photo 9). Make this cut under water so that an air bubble does not enter the stem. You should now have something like (Photo 10 on the next post).
-I use my razor blade to scrape up the base (Photo 11 on the next post). Do this under water. Don't get too aggressive, but you are opening the stem to allow water absorption.
-Now you will cut some of the leaves in half (Photo 12 on the next post). Don't cut them all, just some of the oldest growth. I like to leave the new growth intact. The photo is pre-cut, but you can see the cuts in the next photo.

Step 5: Repeat for the number of cuttings you have
-(Photo 13 on the next post) I only needed 2, so I made 4. I would bet that all will take in 7-10 days if I change the water in 4-5 (or when it needs it), but plan for losing half just in case. At that point I'll either toss the two that took longest to root or look weaker, or I will trade them for some new strains.
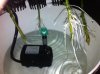
-(Photo 14 on the next post) The cloner can go right back in under your veg light. With a T5, you don't have to worry about getting too close, but you want to be 2-3ft away. I put mine nearest the fan so that they are underneath the direct air flow and don't get hit too hard with the moving air.
---------------------------------

(Photo 15 on the next post) is about 2 hours after cloning and these girls should be fine. I check my pump more often than I should because if it clogs, your clones will die in 3-4 hours. The advantage of different models of aeroponic cloners is that they have multiple jets and if one clogs you don't lose your entire batch. The nozzles that come with the daisy cloner work best if you bore them out a little bit with a safety pin. Home improvement stores sometimes have nice spinner heads and grow shops of course have them. You can get a filter bag, but the best way to avoid a clogged pump is by keeping your water clean!

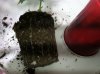
I will be back with photos as they progress (assuming I remember...quality testing the current harvest can take its toll), but here is a photo of a clone from when I first ordered the daisy cloner (Photo 16 on the next post). (Photo 17 on the next post) is me verifying that the pump is working as I finish this post and that water is dripping off of the cuttings. (Photo 18 on the next post) is the very base of the first cutting I took - it's fan leaf was one of the squared off leaves of when this mother was a clone. Circle of life man, circle of life. Happy cloning!
 

Attachments

Last edited:

hermex

Active Member
So, it's been 6 days. About 2 days ago all of the cuttings developed little nubs. Many of these nubs will develop into roots. As you can hopefully see in the photo, there is one spot that already has roots protruding. All of the cuttings look like the one in the photo to some extent...some take longer than others, some develop more nubs and roots, some never take at all...you can speed things up and remove some of the error by using rooting hormone gels and solutions, but that stuff is really expensive.

Now that the nubs are showing, the next time I change the water I'll add just a splash of Grow Big and a couple drops of Superthrive to keep the girls from yellowing up too bad. These are my normal veg nutrients and I don't purchase anything extra for cloning. Remember, they've had only water up to this point. Honestly, I went out of town for a few days and didn't even change the water yet...bad habits develop fast.
 

Attachments

bravedave

Well-Known Member
You mention the cost of hormone. What is the cost of your cloning set-up? I bought a bottle of Rootone btw, for $8 and cloned 20 cuttings and barely touched the surface of the jar. I see it lasting for a 3 or more years. I also just did it in Promix soil and solo cups. If I clone 4 times a year I see my costs being less than a $2 a time. This was my first solo cloning and I was 18/20 successful and I doubt I would have lost the 2 if it were not for deviating from my mentor's advice. (I added some flowering nutes to my clone watering at a rate larger than suggested (by mistake)). I will be culling the 18 down to either 8 or 6 in the next couple of weeks. But anyway, that said ...I like your set-up also, but just found what I do to be cheap, easy, and successful and kinda wonder if it was lack of success in the others that had you go with the Daisy...as to be honest with the air stones, an bubbler and Daisy it seems a bit much. And maybe I misunderstood...you actually have your T5s 2 feet above your clones??? Mine has been inches away from the start.
 

hermex

Active Member
Some new pictures of three of the clones are attached. The fourth isn't doing much other than pimpling up at this point. This is the fun part where you get to watch the roots explode! The last picture is a fun picture of the harvest I just spent eight hours trimming. After moving my veg room into a larger area, I turned the old one into a drying room....that I also use as a storage closet. Right now it's at 74 degrees and 60% RH, so I'm anticipating about 36 hours on the line before jarring everything up and working it toward the curing stage, but only time will tell how long it will actually take.

Yeah bravedave, you did misunderstand a little. I have two 20 gallon tubs of water that are constantly bubbling with airstones, not the daisy cloner. I was trying to say "if you have city water, then evaporate some chlorine out of it."....something that should be obvious, but it looks like I should have come out and said that. The cost of the cloning setup was a one time investment four years ago, so I am not sure your question is relevant, but the answer is $72.45, I believe. At 8 clones per month and 96 per year...that's...you have a calculator, it's cheap per clone.

When I do purchase hormones it is a bottle of Clonex gel and a bottle of Clonex solution. You can look up the cost, but I'd estimate $50 total for the sizes I get. Yes, they do last for a long time if you are careful not to contaminate your main bottle. No, I am not taking suggestions for new nutrients or hormones.

Read the pdf file attached to the original post to get an idea of what I've compared to the daisy cloner. Whatever the method, I've had success, but the daisy cloner produces the best end results by far, in my experience. Also, I need a reliable timeline to keep my rolling harvests on track. A failed batch of clones could result in a gap where I have no harvests coming in for a month or so...and that is unacceptable.

Clones do not need a lot of light. Yes two feet usually, right now the light is probably three feet away, actually. Having yours inches away isn't going to hurt, nor is it going to help. When I had a clone cabinet powered by two pigtail CFLs I had them about a foot away and that worked fine

Listen, I have grown plants from cubes and plants from cloners side by side. The plants from the cloner are weeks ahead of the plants from cubes and, quite honestly, they open sooner and push harder once they are in flower. I am guessing you used a humidome and, quite honestly, I don't want to tend a humidome in addition to everything else I have to do, so some sort of aeroponic device will always be in my garden.

I clone once a month, not four times per year, so I think we are in slightly different positions in terms of our gardens.

If your addition of nutrients caused the loss, then I'd wager you would have seen a rate greater than 10%. That kind of attrition is pretty normal in any system, but the daisy cloner usually gives 100% success with just plain water.
 

Attachments

bravedave

Well-Known Member
Very nice. First a couple misconceptions...I wasn't boosting any particular product...I was not confused between your air-stoned, bubbled water, buckets and your Daisy and I did read already the numerous methods you have used. It was the rationale for going to what you were doing that I was missing mainly because...sorry...it still seems far easier and cheaper if you can successfully drop a cutting in a cup and spritz. Maybe if I had to deal with 50 clones it would be a different story ...but I just dealt with 20 and it was a snap. Concerning the light distance. I would have thought you are begging for stretchy plants having a T5 that far away. When I started I was told to put it pretty much right on top of the plants...and I have and they seem to be liking it. I am starting with smaller cuttings though. And no I don't use a dome...just solo cups under a light in a cabinet. But, I see a dome being less trouble than the clogging etc. you describe above. I did discover that you can eliminate the initial droop by taking a clear solo cup and doming the planted one...that I did do for about 10 days on a few as an experiment and worked great. Another thing I did is I plant in a clear cup and drop it in a red cup...so I don't have to dump dirt to see roots. But no, not dissing your method as what works, works and you can read every day here about someone having trouble.
 

hermex

Active Member
Right on track...today should include a water change...but I've been known to push that off for quite a while if everything looks ok...which things kind of do right now. Like I said in an earlier post, I'll be changing the water and adding a splash of nutrients. As you can see in the photo, the girls are looking a little weak up top (the very light yellowing beginning to appear, particularly on the two in the bottom of the photo. It is faint on the other two, but beginning to appear). They are still alive and doing fine, but would benefit from a little bit of food in the near future.
 

Attachments

hermex

Active Member
Very nice. First a couple misconceptions...I wasn't boosting any particular product...I was not confused between your air-stoned, bubbled water, buckets and your Daisy and I did read already the numerous methods you have used. It was the rationale for going to what you were doing that I was missing mainly because...sorry...it still seems far easier and cheaper if you can successfully drop a cutting in a cup and spritz. Maybe if I had to deal with 50 clones it would be a different story ...but I just dealt with 20 and it was a snap. Concerning the light distance. I would have thought you are begging for stretchy plants having a T5 that far away. When I started I was told to put it pretty much right on top of the plants...and I have and they seem to be liking it. I am starting with smaller cuttings though. And no I don't use a dome...just solo cups under a light in a cabinet. But, I see a dome being less trouble than the clogging etc. you describe above. I did discover that you can eliminate the initial droop by taking a clear solo cup and doming the planted one...that I did do for about 10 days on a few as an experiment and worked great. Another thing I did is I plant in a clear cup and drop it in a red cup...so I don't have to dump dirt to see roots. But no, not dissing your method as what works, works and you can read every day here about someone having trouble.
Well, but you are dissing my methods.

It sounds like you have no experience with actually doing this other than the 20 you have right now. You said my bubbler seemed cumbersome or something: Ok, so you didn't understand that you should have a water reservoir and not just pull from the tap, that's our first clue.

"begging for stretchy plants" Seriously? First, in the two weeks that they are in the cloner- largely producing roots and not new growth- how much stretching occurs? You are dissing my process based on faulty logic and it doesn't sound like you have any experience to back it up! You don't have to worry about stretch with a T5 because of the full spectrum! Again, faulty logic. You are confusing the stretch associated with a metal halide bulb and the predominantly blue spectrum.

You can't diss my methods and then say "I'm not dissing your methods." Your premise has now become that avoiding a clog is cumbersome...no, it isn't and I explained how they are easily avoided. You also completely avoided the quality of the clone produced. The root balls are massive and they can go straight into 7 gallon pots in about 14 days - or a little longer if you don't use nutrients and hormones.

Now, before you respond with something about how you've been watching someone else grow for years and you've been reading things and this and that. I am a medical caregiver with years of experience and you are arguing with me about how to improve my methods on a post that I wrote to help new people like you who will waste their time telling themselves that they've found a better way. You can decide if you want to respond, but the answer is supposed to be no.
 

bravedave

Well-Known Member
Pucker down bud. No. I wasn't dissing your method. It too is relatively economical, fairly easy to employ, and obviously successful. The method I have started with has shown to have all three advantages also, while seemingly being cheaper, easier, and so far pretty successful. Sorry you felt the need to tap down my newbieness, I was not hiding that by giving the comparison. You kinda started that with your statement about hormone products being "really expensive". So yeah, newbie looking to be convinced why the success he has seen could be enhanced by something else...instead finds...well... you. "Circle of life, man". I leave you to your lonesome.
 
Last edited:

hermex

Active Member
The thing that should have convinced you was the picture of the root ball generated by the cloner (in the second post).

You can't compare McDonalds to fine dining just because they both fill you up, you have to look at things like cholesterol and the quality of the turd that comes out.

Read more, why would you spend $8 on rooting hormone when you can make it from the new shoots of a willow tree?

Of course I was not talking about a generic rooting product from Walmart. Run it against a control group along with a willow group and a clonex group to see if they even do anything - now THAT would make an excellent contribution to the site.

Circle of life, don't contaminate people's posts with untested (unreplicated) opinion.
 

hermex

Active Member
We started on the 24th of July and here we are on the 3rd of August, so 11 calendar days, but it's been a little less in terms of hours. Two of the clones have great roots showing, one has fewer and smaller protrusions, and one is really lagging by just showing the beginning pimpling up. Overall, this is a normal cloning attempt with a normal timeline. The two slow ones will catch up over the next couple of days.

I like to skip the dixie cup if I'm not giving them away, so I'll let these go for at least a week before transplant. These girls seem like an excellent candidate for a start to finish photo journal.

The addition of a splash of nutrients (PH 6.5, just under 2 teaspoons of Grow Big and 3 drops of Superthrive to approximately 1 gallon of water) slowed/reversed the yellowing I was beginning to see and boosted root growth, as you can see by comparing yesterday and today's photos. I wait until I see roots to add diluted food because, depending on your water temperature, nutrients can lead to rotten water. Less is more until they are at least 3 weeks old in my opinion. I am not a hydroponic grower and, with the exception of the cloning stage, do not pretend to be.
 

Attachments

RockyMtnMan

Well-Known Member
Yeah bravedave, you did misunderstand a little. I have two 20 gallon tubs of water that are constantly bubbling with airstones, not the daisy cloner. I was trying to say "if you have city water, then evaporate some chlorine out of it."....something that should be obvious, but it looks like I should have come out and said that.


.

Many people add bleach to their cloning systems. I use the straight chlorinated tap water and add H2O2.
Chlorine is your friend here.
The only time I ever PH, is in the cloning system. 5.8 - 6.0.
Bloom nutes low in N and high in P and Molybdenum are best.
Don't go over 200ppm
 

hermex

Active Member
Many people add bleach to their cloning systems. I use the straight chlorinated tap water and add H2O2.
Chlorine is your friend here.
The only time I ever PH, is in the cloning system. 5.8 - 6.0.
Bloom nutes low in N and high in P and Molybdenum are best.
Don't go over 200ppm
Yeah, the person maintaining my buddy's garden never ph'd anything either...about week 6 of flower everything turned yellow from the lockout and the medicine was pretty wretched, but his starting water must be different. There is an article in this month's High Times about PH, but there are also plenty of sources on rollitup if you are interested in learning about growing.

some combinations of nutrients level out my tap water to 6.5-6.8, but usually my nutrient solutions have a PH of 5.1-5.3, so I do have to raise them to a level better for my growing medium.

You won't sell anyone on the legitimacy of not PH'ing anything and water reservoirs are fairly standard practice when growing using soil.

Personally, the only time I use chlorine bleach is to clean everything between batches and the only time I use a dilute solution of H202 is if white mold or mildew begins to develop and even then it is just for foliar application.....but I haven't had substandard cleanliness since I grew in that basement back in 2009, so mildew isn't an issue. My water doesn't rot, so I can't see a need for H2O2 at this point. If I had rotten water, then I could see the benefit.

Again though, I took the time to make a tutorial complete with photos, so anyone who wants to do the same and show the progression of their clones, please do.
 

RockyMtnMan

Well-Known Member
If you are giving permission to post here, sure.
I ran a thread doing a side by side comparison about aero cloners vs root plugs.
When you start an informative thread designed to instruct, it's best to have scientific links to why you use your methods.
Years of experience doing the same thing doesn't mean anything.
Increasing knowledge through research and a willingness to accept varying opinions facts and making educated conclusions based on those facts, is what growing, learning, becoming an expert is all about.
Speaking in a condescending nature won't get you far. I think you made the assumption based on your incredibly large ego, that I was in need of instruction.
I was merely clarifying that chlorine is a benefit when cloning.
A little research in botany will prove that point, you just have to be willing to learn.
 

hermex

Active Member
Here they are this morning. The one on the left has protrusions on the far side, but they aren't very big. She'll catch up, but that'll be the one I trade for new genetics.

Again, this is just the cloner and water to start and then very dilute veg nutes once they show. If it weren't for taking pictures I probably wouldn't even check them every day. If you know your water is clean you don't have to worry about clogs and the system is pretty automatic. Now that I have a good amount of roots though, they'll drink the water and I'll want to check the level.
 

Attachments

bravedave

Well-Known Member
Figured you might need a bump as your fantastic post seems to just keep sliding off to oblivion. I just checked roots on the half of my clones that I cut a few days post-veg (when I needlessly, feared for the lives of those I first cut.) Man, do they look good. My first set of clones (10/12 success rate) I used just ProMix while this second set I used a mixture of K-Mart generic dirt mixed 2to1 with cow manure. (Total $: $6.89 and will save manure mixture for next 10 grows or so). This is at 12 days of cloning...10 for 10 on this batch. Who knew it was so easy...Now I can use that $70 I might have wasted on a Daisy cloner and buy that LUX thermostat I wanted and maybe set aside the rest to cover my next couple years of cloning.cl2.jpg

btw...You too are on or about day 13, eh? A couple of those in your last picture are looking sorta sparse but yeah they are bound to catch up some day...I'll be flowering about then. ;) Circle of Life, man.
 

mr sunshine

Well-Known Member
You mention the cost of hormone. What is the cost of your cloning set-up? I bought a bottle of Rootone btw, for $8 and cloned 20 cuttings and barely touched the surface of the jar. I see it lasting for a 3 or more years. I also just did it in Promix soil and solo cups. If I clone 4 times a year I see my costs being less than a $2 a time. This was my first solo cloning and I was 18/20 successful and I doubt I would have lost the 2 if it were not for deviating from my mentor's advice. (I added some flowering nutes to my clone watering at a rate larger than suggested (by mistake)). I will be culling the 18 down to either 8 or 6 in the next couple of weeks. But anyway, that said ...I like your set-up also, but just found what I do to be cheap, easy, and successful and kinda wonder if it was lack of success in the others that had you go with the Daisy...as to be honest with the air stones, an bubbler and Daisy it seems a bit much. And maybe I misunderstood...you actually have your T5s 2 feet above your clones??? Mine has been inches away from the start.
It doesnt matter how close your light is...
 

bravedave

Well-Known Member
It doesnt matter how close your light is...
I really hope both of you are correct on this, but not only did the guy who got me started tell me "inches" but you can search right here and find numerous examples suggesting that same distance. Also when I started my second batch of clones, this session, they were a couple inches shorter than the others and they DID "seem" like they were stretching for the light.
 

mr sunshine

Well-Known Member
Are you saying the cuttings will stretch unless you have the light close? I don't understand what your trying to say!
I really hope both of you are correct on this, but not only did the guy who got me started tell me "inches" but you can search right here and find numerous examples suggesting that same distance. Also when I started my second batch of clones, this session, they were a couple inches shorter than the others and they DID "seem" like they were stretching for the light.
 
Top