Pictures of your DIY lights - Post your pics!!!

randydj

Well-Known Member
Ok I finally got my cob holders and have finished machining and mounting the cobs, 730nm Semi LEDs, and thermal switches. Tomorrow is our 30th wedding anniversary so there will no progress on the light. The wiring of the cobs is next and I need to fool around with the Arduino programming for the controller.
DSC00153.JPG DSC00152.JPG
 

sixstring2112

Well-Known Member
Ok I finally got my cob holders and have finished machining and mounting the cobs, 730nm Semi LEDs, and thermal switches. Tomorrow is our 30th wedding anniversary so there will no progress on the light. The wiring of the cobs is next and I need to fool around with the Arduino programming for the controller.
View attachment 3825315 View attachment 3825316
sweet build randy.so are the thermal switches to control independant fans of for dimming each cob ?
 
Nice work Randy, I'm still working on thermal protection design for fans and liked what Dawg suggested about the dimming circuit. Are your COBs are in series with NC switches? I guess that would shut down the entire COB array on failure and what switch temp switch did you go for?
 

randydj

Well-Known Member
Nice work Randy, I'm still working on thermal protection design for fans and liked what Dawg suggested about the dimming circuit. Are your COBs are in series with NC switches? I guess that would shut down the entire COB array on failure and what switch temp switch did you go for?
Yes the cobs are in series with NC thermal switches KSD301 70°C. It will cycle four of the eight cobs on a single fan failure as the thermal switch will reset as the heat sink cools by convection and wind from the other fans. There are two driver circuits so four cobs would remain unaffected by a single fan failure. In a total fan failure, such as a power supply failure all cobs would eventually cycle off and on. Since I am using an Arduino to control all aspects of light timing, CO2 and Exhaust Fan I could add a sensor to warn me about a heat problem but I just don't think it is necessary. I consistently check on my grow at least twice a day so that is a short time for any failure to cause much of a problem.

By the way this design is from other more experienced DIYers than me. Most of them on this forum. Without Growmau5 and some others I never would have attempted this build. I truly appreciate their time and knowledge.
 

randydj

Well-Known Member
Ok so the wiring of the fixture is nearly completed; I cannot find my Molex crimper to complete the pigtail so a small delay. I think I know where it is in the garage but it requires moving a bunch of stuff to get to it. I knew from the beginning that it would look a little frankenstein because of all the wires needed but it is not too bad.

DSC00159.JPG DSC00161.JPG DSC00162.JPG
 

Yomandude!!!

Active Member
Alpine 64 GT Rev.2 fans off for machining. I was trying to build this light assembly for less than $200. not possible but I think I may come in under $300.
very nice and clean! I love the way you spaced them out on the frame, what space are you covering with that?

I used the Alpine 11 plus with Vero29s at 2.1A (around 80W) and they barely even get warm. I used Epoxy thermal paste, much easier and cheaper than machining, glued the COB and the holder with it to hold the reflector. And on the ones I put lenses I simply used self taping screws.


Good work!! you do have a bit to spend on it, but it is far less than a pre built light! :) I love DIYs
 

randydj

Well-Known Member
very nice and clean! I love the way you spaced them out on the frame, what space are you covering with that?

I used the Alpine 11 plus with Vero29s at 2.1A (around 80W) and they barely even get warm. I used Epoxy thermal paste, much easier and cheaper than machining, glued the COB and the holder with it to hold the reflector. And on the ones I put lenses I simply used self taping screws.


Good work!! you do have a bit to spend on it, but it is far less than a pre built light! :) I love DIYs
Yomandude: thanks. I have a 3x3 right now but will be upgrading in the near future to a 4x8 since weed just got legal here. I will build a second light at that time; the plan is to cover ~ 4x4. I did not use epoxy because I may upgrade the cobs to Cree sometime in the future. The price on the 3590s should be coming down when they release the new 200W cobs.
 

randydj

Well-Known Member
Ok so the wire glands I had were the wrong size - of course! So I am waiting on the arrival of the correct ones to continue with the control center for my new COB LEDs. I think I have figured out how to error correct my Arduino program to pick-up where it left off after a power failure. Still writing that program based on a real time DS3231 clock. Anyhow having a very tolerant wife helps when the dining room table looks like this for a week already:-P.

DSC00215.JPG
 

FREEK1

Well-Known Member
What is the Blue going to influence?
Is it for the extra resin production?

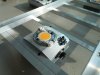
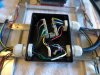
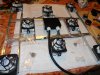
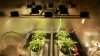
I am running 370 or so watts in my 2x4 spread out over 12 cobs right now.
My Killawatt burned out so exact driw is unknown, as I dim (2) hlg-240s to keep temps down

I like the effects of most hazes, but dont care for the taste much.
Not sure what the Sannies Jack tastes like, but not tasty to me, more chemical, ugly smell like dried hay, grass, spices, and menthol is very faint.
Smelled fruity first weeks into flower, so I dont know what happened.
This and SSH are my main experience with hazes besides C99.
The SSH smells and tastes bad to me as well, but the high is nice till the end when I run out of energy and drive.
Not sure if all good hazes taste/smell like this...

Im way down on grow area from past, but would love a perpetual grow.
I like to have different strains, and get bored easily I think, or maybe I just love seeing them flower and the smells.

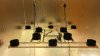
What temp are the cobs? They look very dark when not illuminated, maybe 3000K?
I have 2 separate bloom areas , the first one I made with 3000-3500 CCT and the second was a mix of 3500 and 1/4 4000 ...so far the resin production with the additional bluer spectrum is killing it in resin production. So much that I have order some 5000k cobs for the all red bloom area.
 

FREEK1

Well-Known Member
I have 2 separate bloom areas , the first one I made with 3000-3500 CCT and the second was a mix of 3500 and 1/4 4000 ...so far the resin production with the additional bluer spectrum is killing it in resin production. So much that I have order some 5000k cobs for the all red bloom area.
An update for all those that care, I got the 5000k cob, all I can say it's a huge difference in trichome production after 7 days. My pineapple express went from dry to sticky. I use UV bulb, but I am thinking the combo of red and blue cct is the answer. It makes sense because with the input of the blue the light is closer to the sun at it's strongest during the day, making the plant think it needs to preserve it's moisture. currently now both of my rooms have 25% 4000 and 5000k cobs. This is definitely not a fluke because with the ease of replacing cobs I was able to do a controlled experiment. Happy growing, can't wait til harvest.
 

Evil-Mobo

Well-Known Member
An update for all those that care, I got the 5000k cob, all I can say it's a huge difference in trichome production after 7 days. My pineapple express went from dry to sticky. I use UV bulb, but I am thinking the combo of red and blue cct is the answer. It makes sense because with the input of the blue the light is closer to the sun at it's strongest during the day, making the plant think it needs to preserve it's moisture. currently now both of my rooms have 25% 4000 and 5000k cobs. This is definitely not a fluke because with the ease of replacing cobs I was able to do a controlled experiment. Happy growing, can't wait til harvest.
I am very happy with my 5K Cree's in veg and my three autos just started flowering under them. This is a strain I have grown before and it's know for being full of trichs and resin to begin with so I am VERY curious to see how the 5K does for them.

My 3K in Flower is killing it too, I have a sativa at 55" of height from the dirt, she went into 12/12 at 24" @ 3 weeks ago lol. These COB's continue to impress and have made me stop, sit back, and hold off on considering any further changes/testing to my lighting at the moment.
 
Top