Concord Dawn
Well-Known Member
First, I would like to thank: Illegal Smile, blueybong, tom__420, JonnyBtreed for using their information and or quotes that I have used in this post. I have taken some of their info and reworded it for my micro grow. This is micro grow will be based on all that I have read and learned on this forum.
The first thing I will go over is the DWC bubble system "I" will use.
 
I have nothing against drips. A well-designed and calibrated drip system can water very reliably. I just don't like submerged pumps and feeder tubes and think it best to eliminate them when they provide no advantage for DWC. For a small growing area built around a bucket or a tote, this is easier, less costly and works better. I'm not describing the entire system here. I'm assuming a tote with holes cut for net pots, an air pump, 1/4 inch hose, and air stones along with the use of hydroton and rock wool cubes. On a side note, I may rig up a gallon milk jug and some drip nozzles and hose i have at first and gravity feed them for the first couple weeks, might try it, might not, hey it's cheap and no heat. We'll see???
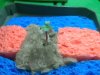
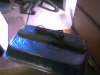
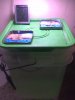
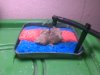
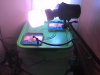
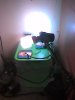
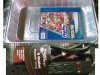
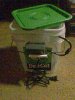
This approach is the "real" bubble-based hydroponics because it relies on and is powered by the bubbles, not a water pump and feeder tubes. So the heart is a good pump. I will be using a cheap air pump from WalMart that runs $6. You can get a more expensive pump with more power if you like. Next comes the air stones. I am using a 3 1/2 gallon kitty litter bucket for this micro grow which I will try to grow 2 or 3 bag seed plants. I will use 2-small air stones, the kind that are all stone not a piece of stone inlaid in plastic. Check them in your kitchen sink to make sure they bubble well. Scrubbing them with a brush if needed. These get clogged so check them often once you get started to make sure you have the needed bubble action. I use new ones for each grow or you can boil old ones for a few minutes to clean them. I will use a 1/4 inch "T" to make 2 outlets and run 2 stones. Be sure to run your air line through the side of the tub and not the top, just below the lid. The air stones were $1.12 for a pair at WalMart. I might switch to 2 6" stones??? we'll see.
That is why I tell people not to mess with the water pump I would rather grow DWC and have colder water temps than bubbleponics with warm water temps
The water pump is absolutely unnecessary.
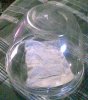
How do you know if you have enough bubbles? Hold your hand about 2 inches above the water. You should feel tiny bubbles breaking on your hand. If not you need more air pressure. So now you have your bubbles and you're ready to put them to work. You want to be able to control exactly how wet your pots are getting and to be able to dial it up and down. You can do that with water level. I start by setting water level 2 inches below the bottoms of the net pots. I then load a net pot with hydroton and a rock wool cube or rapid rooter, but no seed. I use this to monitor wetness because I can easily pull it out, open it up and check the wetness. It should be damp but not sopping wet. You have to develop a feel for how damp/wet with experience but too wet can cause stem rot.
Too wet, lower the water, not wet enough, raise the water (in small increments). I recommend you leave this monitoring net pot in the system for the first couple weeks of your first grow, but after that you will have the idea and won't need it, or give your system a couple days of test running. The air pump is on 24/7 and once adjusted creates a perfect environment for germinated seeds. The amount of water is the root space the plants will have. Root space limits final plant size. So it depends on how large you want to grow the plants. For example, one gal per plant is not really enough except if small plants are the goal. 2 gal for med plants, 3 gal and up can grow trees.
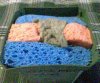
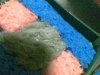
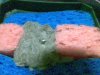
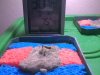
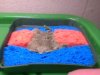
For this grow, I am trying something different for the grow medium, I will put the rock wool cubes once sprouted, into sponges instead of the hydroton into the net pots. Might work, might not. When roots start emerging they are being watered/fed by the breaking bubbles in a fine mist not unlike an aeroponic spray. The airspace between the water and the lid, the space where the root system grows, is a 100% humidity environment that is about as good as you can get. I start light nutes on day 7. Once the roots are well into the water the bubbles are no longer critical for feeding but are still maintained for oxygenation of the water.
Think - 200 years ago in America if someone found out you were growing a plant with no dirt you would of probably been burned at the stake... yet in Babylon 1000's of years ago it was commonplace. weird huh...
I soak my seeds for 24 hrs in a cup of water. Then I put them in a moist, warm paper towel. Once the seed cracks and a root is seen, I put it into the RW(with ph balanced warm water). I then place the RW into a plastic greenhouse that sits in a dark warm spot, i.e. on top of the water heater.
Once the sprout pops out of the RW, I then place it into the system. I use the 1.5" RW cubes.
You can start a seed this way, I germinate mine until they crack first just to make sure they are viable seeds. No approach is right for every grower. But if you want a small grow system that is as easy as it gets to make and set up, and that veteran DWC growers have gotten great production from, try this! It costs next to nothing, the only real additional expense over what many of you are using now or contemplating, is a robust pump which you really should have anyway.
The air pump is on 24/7 and once adjusted creates a perfect environment for germinated seeds.
Now for the CFL lights I will use.
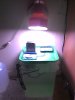
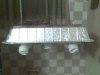
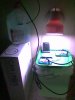
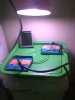
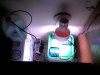
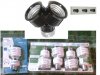
I bought a Chrome 3 bulb vanity fixture from Lowe's for $9.99. Then 2 bulb splitters for $2,49 each to make a total of 5 bulb sockets. I bought a 4 pack of 23 watt, 1600 lumens, 2700k, 100 watt equivalents, and 1 23 watt, 1600 lumens, 6500k just for a little mix. Total for the bulbs was around $12. The I got a aluminum turkey pan that is 19" x 12" x 4" for the hood/reflector for $3 at WalMart. The plan is to mount the fixture up inside the pan with a piece of 1" x 4" wood on the other side with some hooks for support and hang chains from it to raise as needed. I took an old extension cord and the female part of the cord off to use for the power cord on the fixture. I also used screw on caps for the wire connections. I will put the 4 2700k bulbs on the 2 ends in the splitters and the 6500k bulb in the middle single socket for a good light mixture. That will be total of 8000 lumens which I hope will be enough for this small grow. Remember, this is a micro grow.
Next: the cabinet and ventilation.
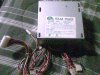
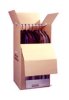
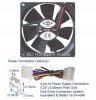
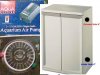
I think I will use the small one from WalMart, it's only like $42 and if your store doesn't have it, you it order it online and have it shipped to your store for free. The size measures approximately 25-3/4" L x 19" W x 35-3/4" H. Should be the perfect size for a amigo grow like this. I will line the cab with a roll of this reflective stuff I saw at Lowe's for like $15. It looks 2 sided and has like a liner on the inside, Hope it works???? I will also cut a hole in the lower part for the air intake and another one on the other side for exhaust. Remember, hot air rises so the exhaust fan should be at or above the light. I will use 2 of the small cheap fans that are less than $8 each at WalMart.
Ok, a quick review.
So far, I have spent a total of about $40 for my supplies. That's light bulbs, light fixture, splitters, air pump, air stones and foil pan. That leaves the cabinet, 2 small fans, reflective stuff, which will be about another $80 with tax. Stuff I had, 6 outlet strip, cheap timer, I will only need 1 for the lights, 1/4" air tubing and a T, lightweight chain and screw in hooks for hanging the light. So more or less, I'm at a stand still till get the cabinet. More to come soon, Time to hit the bowl. Stay tuned, LoL. Dam this shit is FUN!!!
The first thing I will go over is the DWC bubble system "I" will use.
 
I have nothing against drips. A well-designed and calibrated drip system can water very reliably. I just don't like submerged pumps and feeder tubes and think it best to eliminate them when they provide no advantage for DWC. For a small growing area built around a bucket or a tote, this is easier, less costly and works better. I'm not describing the entire system here. I'm assuming a tote with holes cut for net pots, an air pump, 1/4 inch hose, and air stones along with the use of hydroton and rock wool cubes. On a side note, I may rig up a gallon milk jug and some drip nozzles and hose i have at first and gravity feed them for the first couple weeks, might try it, might not, hey it's cheap and no heat. We'll see???
This approach is the "real" bubble-based hydroponics because it relies on and is powered by the bubbles, not a water pump and feeder tubes. So the heart is a good pump. I will be using a cheap air pump from WalMart that runs $6. You can get a more expensive pump with more power if you like. Next comes the air stones. I am using a 3 1/2 gallon kitty litter bucket for this micro grow which I will try to grow 2 or 3 bag seed plants. I will use 2-small air stones, the kind that are all stone not a piece of stone inlaid in plastic. Check them in your kitchen sink to make sure they bubble well. Scrubbing them with a brush if needed. These get clogged so check them often once you get started to make sure you have the needed bubble action. I use new ones for each grow or you can boil old ones for a few minutes to clean them. I will use a 1/4 inch "T" to make 2 outlets and run 2 stones. Be sure to run your air line through the side of the tub and not the top, just below the lid. The air stones were $1.12 for a pair at WalMart. I might switch to 2 6" stones??? we'll see.
That is why I tell people not to mess with the water pump I would rather grow DWC and have colder water temps than bubbleponics with warm water temps
The water pump is absolutely unnecessary.
How do you know if you have enough bubbles? Hold your hand about 2 inches above the water. You should feel tiny bubbles breaking on your hand. If not you need more air pressure. So now you have your bubbles and you're ready to put them to work. You want to be able to control exactly how wet your pots are getting and to be able to dial it up and down. You can do that with water level. I start by setting water level 2 inches below the bottoms of the net pots. I then load a net pot with hydroton and a rock wool cube or rapid rooter, but no seed. I use this to monitor wetness because I can easily pull it out, open it up and check the wetness. It should be damp but not sopping wet. You have to develop a feel for how damp/wet with experience but too wet can cause stem rot.
Too wet, lower the water, not wet enough, raise the water (in small increments). I recommend you leave this monitoring net pot in the system for the first couple weeks of your first grow, but after that you will have the idea and won't need it, or give your system a couple days of test running. The air pump is on 24/7 and once adjusted creates a perfect environment for germinated seeds. The amount of water is the root space the plants will have. Root space limits final plant size. So it depends on how large you want to grow the plants. For example, one gal per plant is not really enough except if small plants are the goal. 2 gal for med plants, 3 gal and up can grow trees.
For this grow, I am trying something different for the grow medium, I will put the rock wool cubes once sprouted, into sponges instead of the hydroton into the net pots. Might work, might not. When roots start emerging they are being watered/fed by the breaking bubbles in a fine mist not unlike an aeroponic spray. The airspace between the water and the lid, the space where the root system grows, is a 100% humidity environment that is about as good as you can get. I start light nutes on day 7. Once the roots are well into the water the bubbles are no longer critical for feeding but are still maintained for oxygenation of the water.
Think - 200 years ago in America if someone found out you were growing a plant with no dirt you would of probably been burned at the stake... yet in Babylon 1000's of years ago it was commonplace. weird huh...
I soak my seeds for 24 hrs in a cup of water. Then I put them in a moist, warm paper towel. Once the seed cracks and a root is seen, I put it into the RW(with ph balanced warm water). I then place the RW into a plastic greenhouse that sits in a dark warm spot, i.e. on top of the water heater.
Once the sprout pops out of the RW, I then place it into the system. I use the 1.5" RW cubes.
You can start a seed this way, I germinate mine until they crack first just to make sure they are viable seeds. No approach is right for every grower. But if you want a small grow system that is as easy as it gets to make and set up, and that veteran DWC growers have gotten great production from, try this! It costs next to nothing, the only real additional expense over what many of you are using now or contemplating, is a robust pump which you really should have anyway.
The air pump is on 24/7 and once adjusted creates a perfect environment for germinated seeds.
Now for the CFL lights I will use.
I bought a Chrome 3 bulb vanity fixture from Lowe's for $9.99. Then 2 bulb splitters for $2,49 each to make a total of 5 bulb sockets. I bought a 4 pack of 23 watt, 1600 lumens, 2700k, 100 watt equivalents, and 1 23 watt, 1600 lumens, 6500k just for a little mix. Total for the bulbs was around $12. The I got a aluminum turkey pan that is 19" x 12" x 4" for the hood/reflector for $3 at WalMart. The plan is to mount the fixture up inside the pan with a piece of 1" x 4" wood on the other side with some hooks for support and hang chains from it to raise as needed. I took an old extension cord and the female part of the cord off to use for the power cord on the fixture. I also used screw on caps for the wire connections. I will put the 4 2700k bulbs on the 2 ends in the splitters and the 6500k bulb in the middle single socket for a good light mixture. That will be total of 8000 lumens which I hope will be enough for this small grow. Remember, this is a micro grow.
Next: the cabinet and ventilation.
I think I will use the small one from WalMart, it's only like $42 and if your store doesn't have it, you it order it online and have it shipped to your store for free. The size measures approximately 25-3/4" L x 19" W x 35-3/4" H. Should be the perfect size for a amigo grow like this. I will line the cab with a roll of this reflective stuff I saw at Lowe's for like $15. It looks 2 sided and has like a liner on the inside, Hope it works???? I will also cut a hole in the lower part for the air intake and another one on the other side for exhaust. Remember, hot air rises so the exhaust fan should be at or above the light. I will use 2 of the small cheap fans that are less than $8 each at WalMart.
Ok, a quick review.
So far, I have spent a total of about $40 for my supplies. That's light bulbs, light fixture, splitters, air pump, air stones and foil pan. That leaves the cabinet, 2 small fans, reflective stuff, which will be about another $80 with tax. Stuff I had, 6 outlet strip, cheap timer, I will only need 1 for the lights, 1/4" air tubing and a T, lightweight chain and screw in hooks for hanging the light. So more or less, I'm at a stand still till get the cabinet. More to come soon, Time to hit the bowl. Stay tuned, LoL. Dam this shit is FUN!!!
Attachments
-
 49.9 KB Views: 272
 -
 47.9 KB Views: 277
 -
 73.9 KB Views: 245
 -
 50.1 KB Views: 262