Mixing White & Multi Spectrum Chip LEDs to Grow MedMan Silver Skunk BX1
- Thread starter PetFlora
- Start date
PetFlora
Well-Known Member
Received this a while ago. Now, more than ever I am excited
Greetings from Austin Texas!
Your order is now on our build schedule and I thought you might like to know a little about the way we build each fixture.
We use a combination of state-of-the-art robotic equipment combined with hand assembly to create each fixture. My associates and I start with one 12” printed circuit board for each 12” of fixture (nano fixtures use 7” boards). We build the LED board from scratch using a robotic assembly machine to place the combination of LED colors you’ve selected onto each circuit board. Once the LEDs are positioned on the circuit board they are slowly run through an oven that gradually heats the boards from 75 to 465 degrees Fahrenheit. This melts the solder evenly and permanently fuses the LEDs to the circuit board.
When they cool we check them by eye for obvious problems and electrically test each LED board to make sure they are performing properly. Once everything looks good, we begin the assembly process. Up to this point, we have spent about an hour working on your fixture.
Once the LED board is assembled, the rest of the building process is done by hand. We start by mounting the LED circuit boards into the aluminum fixture case. We’ll wire the system, check and secure the connections and align our highly reflective optical system. We then install your selected lens onto the fixture and seal it to protect the fixture from water damage. End caps are added and the fixture is then ready to bench test.
First, each fixture (and the power supply that will ship with it) is plugged in and tested for at least 4 hours -- we call this the “burn-in” process. If there is a bad LED it will fail within a few minutes but we also want to make sure we catch any short circuits or poor connections that we missed in our earlier visual inspection. It is also a final test of the power supply. We use hand-held laser scanner that quickly reads temperature with tremendous precision. We run the laser along the fixture looking for warm or cool areas -- a sign that something is not right. If we find an area with a temperature variation greater than +/- 4 degrees F, we assume there is a problem and the fixture is scrapped.
After the Burn-In test is complete, we test the dimming function of the fixture. If you ordered a dimmer, we test using your dimmer, if not we use a test dimmer. We want to make sure the LEDs dim properly: if they don’t dim, there is something wrong with the LEDs or the Power Supply.
While all of these steps take time, we very, very seldom find problems and our goal is to make sure each fixture is 100% trouble free and ready to go to work.
As you can see, we don’t just take a mass-produced fixture off a shelf and send it out -- we truly build each one to order and this takes time. I estimate that your order will ship in the next 2-3 days. You will get an update when it ships or if there is going to be a delay.
Thank you for ordering from us -- I know you won’t be disappointed!
The Operations Team from Build My LED, LLc.
DiyKindaGuy
Active Member
Thats awesome news... thats real classy.. thanks for posting it pet
★★★kushed_out★★★
★★★kushed_out★★★
PetFlora
Well-Known Member
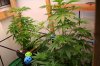
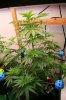
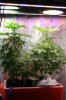
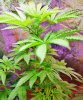
Photo day
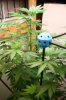
It's easy to see now, which is the pick of the litter
I have tucked some of the side branches under the Cube bars
You might notice I removed a bunch of shade leafs
More light for the secondary branching and the soon to be crib development
The 2 in led are growing nice as well, though one is showing balls
Note the pic of the 1 x 4 WW with diffuser removed.
I am using that panel sideways in the led tent
Attachments
-
 1.8 MB Views: 45
 -
 2.3 MB Views: 51
 -
 1.2 MB Views: 40
polyarcturus
Well-Known Member
Yeah I got an led panel on vert with 400w mh & hps and it does wonders fir the lower growth and helping with the stretch. Of course it's an old multi color panel
polyarcturus
Well-Known Member
I breed with everything. It's at least worth a try. Sometimes you can never tell what's gonna be great till you grow it.
PetFlora
Well-Known Member
It was a beautiful day. I wanted to go for a nice motorcycle ride and run some errands, but had to wait for the light bars
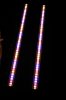
It's 6pm Saturday, and the bars finally arrived.
They have way more 450 and 660 than I chose (I hate when that happens), so time will tell if they do as well (or better) than I anticipated
I see what happened. The pattern on the BML site only shows 15 diodes, and the 3 footers have 45 diodes, so the pattern is 12" x 3ft in this case= 36", so what I chose was multiplied by 3
I am seeing spots from looking up (and not directly) to count them
Changed nutes to kick them off. Now 570ppm
Doubling the wattage should make them eat more too
Attachments
-
 898.8 KB Views: 90
 -
 2.5 MB Views: 107
 -
 2.5 MB Views: 92
Last edited:
stardustsailor
Well-Known Member
They look awesome ..
Is it Oslons ?
Is it Oslons ?
Greengenes707
Well-Known Member
Very nice pet. You finally have all the power you wanted. Should get some nice big nugs.
PetFlora
Well-Known Member
Somehow I did not save the email regarding that, but I think he said OSRAM/OSLON XB seriesThey look awesome ..
Is it Oslons ?
They are 3w diodes, and appear rectangular
PetFlora
Well-Known Member
Yep, I would say lack of sufficient umoles/m^ has been my Achilles HeelVery nice pet. You finally have all the power you wanted. Should get some nice big nugs.
Working on the spectrum layout for a 600 Spydr to replace my hot5

PetFlora
Well-Known Member
I just sent this to BML:
I was confused by the BML Custom template
I thought of it as being divided into thirds, as I ordered 3ft bars, I expected the 12” template to be spread out to accommodate various lengths (in my case 3ft)?
Instead the initial spectrums chosen on the 12” template/bar is simply multiplied by the number of feet
Consequently, my bars have 3 times the 450/660 than I was expecting
They should still work, and possibly quite well, but...
I anticipate lots of negative feedback from my thread followers, as I am a huge promoter of 3000/2700 for flowering
I only added 2 @ 450 and 3 @ 660 per bar just to cover all bases, but in my mind they were going to be placed far apart
Instead each bar has 6 @ 450 + 9 @ 660 per bar
Example
For the Spydr 600 to be an effective multi-purpose light, the middle section (vegetative stage) should be 5000/3500, the 2 outside sections (used during flower stage) mirror images of 3000/2700
Hopefully when the Spydr page is created it can be designed this way

PetFlora
Well-Known Member
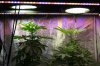
A grow update + possible game changer
Light scattering nano-particles imitates Day Light LED, but is it a game changer for us?
http://www.electronicproducts.com/O...g_nanoparticles_to_imitate_real_sunlight.aspx
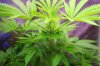
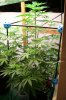
It is not so much amazing as it is comforting to know how much fatter my 2 led plants have gotten since doubling the amount of light (pics 1&2)
It seems the one on the left may be a female after all
Also the hot5 continues to grow, but is also filling in since I repositioned the 6500s closer to the middle (pics 3&4)
I also added a second level to the Cube as the upper side branches are almost long enough to tie down
Attachments
-
 2.7 MB Views: 20
 -
 3.9 MB Views: 23
 -
 1.8 MB Views: 26
 -
 1.8 MB Views: 20
Last edited:
digimidgi
Well-Known Member
There are a few threads in this LED forum that excite me and this is one")
To supplement my 240 watts of Plant photonic light I'm thinking about purchasing a 36" LED bar with - - -
2700k - 3000k - 2700k - 3500k - 2700k - 3000k - 2700k - 3500k - 2700k - 3000k - 2700k
Lovely looking weeds you got there Just up the nice work.
To supplement my 240 watts of Plant photonic light I'm thinking about purchasing a 36" LED bar with - - -
2700k - 3000k - 2700k - 3500k - 2700k - 3000k - 2700k - 3500k - 2700k - 3000k - 2700k
Lovely looking weeds you got there
PetFlora
Well-Known Member
It occurred to me that by watering every 30 minutes my plants might be growing too fast! lol, but true
I probably should have done this 2 weeks ago
I usually increase the intervals once sex shows, but decided to do so now. Sex should be showing any day, anyway.
Now feeding 30 seconds/45 minutes, which will soon stretch to 30/60 minutes
No science behind the 30 seconds. It's simply that my DIY flood table, which is an inverted large tote lid, perimeter lip cannot handle longer feed cycle without spilling over. Besides, during the 30 seconds, the plants are getting ample nutes
LED
I had to lower the plants as the tops were abut to hit the 2 ufos
I need to lower the 2 BML bars also.
PetFlora
Well-Known Member
Thanks for the props!There are a few threads in this LED forum that excite me and this is one
To supplement my 240 watts of Plant photonic light I'm thinking about purchasing a 36" LED bar with - - -
2700k - 3000k - 2700k - 3500k - 2700k - 3000k - 2700k - 3500k - 2700k - 3000k - 2700k
Lovely looking weeds you got there
If your PP light lacks WHITE diodes then I would add ~ 20% 5000/5700 to your mix
2 smaller bars are better than one long bar - allows you to put one on each side of the PP
Hit me up with a PP link so I can better help