mrcryce
Well-Known Member
My first grow (which is only in its 24th day) is proving to be such a rewarding experience to watch that I just can't get enough! Planned out a new set up last week based upon lots of looking around on this site. Here are the results:
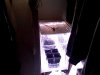
(Please excuse the poor picture quality, I broke my camera so had to use my phone )
)
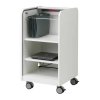
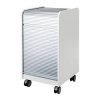
The chassis is an Ikea ASPVIK
(found here -- http://www.ikea.com/us/en/catalog/products/90146692)
Dimensions are:
Width: 18 1/2 "
Depth: 19 5/8 "
Height: 35 3/8 "

It's got this cool door that you slide up! It looks like metal but actually is plastic.
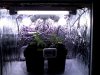
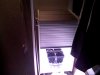
Then with about $100 of supplies from home depot, I turned it into this:


(This box resides in my closet by the way, so the things hanging on the side are my clothes)
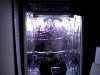
All the inside surfaces are covered with a sheet of mylar.
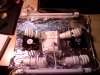
Using zip ties I mounted 4 outlet -> CFL sockets, and two 12" T5 florescent lamps to the peg board. Using the existing holes in the furniture, I use four screws at the level I wish to set the lights at, and then the top rests on it. I will be mounting a SCROG screen in the same manner.
Here is a picture taken from a bottom angle to shed some more clarity on how I arranged the lights. It is looking up at the ceiling of the box. I am quite bad at taking pictures blindly and I didn't want to keep trying because my phone is a laggy piece of crap, so the second T5 florescent light is cut off from the bottom of the picture.

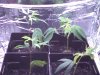
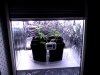
There are 4x 5" pots which I will be filling with fox farms ocean potting soil, and some clones from a local dispensary which I am planning on visiting tomorrow.
I am planning on buying a different outlet to mount the 4 CFLs in the middle because right now they come down at an angle, which should save me about 2" of very precious vertical space. To deal with odor issues later, I will be cutting two holes to accomodate 80mm fans (to be mounted on the underside of the peg board) and attaching two very mini DIY carbon filters which I built out of a tiny net pots. I am not expecting massive yields from this grow so I hope this will be sufficient to control the odor. I have instructions to a standalone DIY odor scrubber as well just in case. Still thinking about how to elegantly ventilate the case though. I think i will be drilling circular holes in the bottom and mounting 80mm fans there as well for circulation, and then attaching a thick fabric with mylar glued on the inner surface as a skirt. When the lights are on, light leaks out from the back due to the nature of this cabinet's design which I can only really think of solving by placing a blanket over the box. Fortunately my closet is quite dark so I doubt it will be an issue. I will be spray panting the area in the back matte black just in case though, to prevent minimze stray light from bouncing into the box during dark hours.
Any questions/comments please do not hesitate to reply")
PS: The T5s are that off color because they are the lower K lights - I bought cool white 12" T5s for veging too but I cannot for the life of me figure out how to take the old ones out?! I may have to go to home depot and look like a total noob and ask them. If anybody out there knows how to replace it please let me know!
They are GE like these and come in a very similar but blue packaging and say "Slim Line Fluorescent Fixture" http://www.amazon.com/gp/product/B000HJ99G0/ref=cm_cr_asin_lnk
(Please excuse the poor picture quality, I broke my camera so had to use my phone
The chassis is an Ikea ASPVIK
(found here -- http://www.ikea.com/us/en/catalog/products/90146692)
Dimensions are:
Width: 18 1/2 "
Depth: 19 5/8 "
Height: 35 3/8 "
It's got this cool door that you slide up! It looks like metal but actually is plastic.
Then with about $100 of supplies from home depot, I turned it into this:
(This box resides in my closet by the way, so the things hanging on the side are my clothes)
All the inside surfaces are covered with a sheet of mylar.
Using zip ties I mounted 4 outlet -> CFL sockets, and two 12" T5 florescent lamps to the peg board. Using the existing holes in the furniture, I use four screws at the level I wish to set the lights at, and then the top rests on it. I will be mounting a SCROG screen in the same manner.
Here is a picture taken from a bottom angle to shed some more clarity on how I arranged the lights. It is looking up at the ceiling of the box. I am quite bad at taking pictures blindly and I didn't want to keep trying because my phone is a laggy piece of crap, so the second T5 florescent light is cut off from the bottom of the picture.
There are 4x 5" pots which I will be filling with fox farms ocean potting soil, and some clones from a local dispensary which I am planning on visiting tomorrow.
I am planning on buying a different outlet to mount the 4 CFLs in the middle because right now they come down at an angle, which should save me about 2" of very precious vertical space. To deal with odor issues later, I will be cutting two holes to accomodate 80mm fans (to be mounted on the underside of the peg board) and attaching two very mini DIY carbon filters which I built out of a tiny net pots. I am not expecting massive yields from this grow so I hope this will be sufficient to control the odor. I have instructions to a standalone DIY odor scrubber as well just in case. Still thinking about how to elegantly ventilate the case though. I think i will be drilling circular holes in the bottom and mounting 80mm fans there as well for circulation, and then attaching a thick fabric with mylar glued on the inner surface as a skirt. When the lights are on, light leaks out from the back due to the nature of this cabinet's design which I can only really think of solving by placing a blanket over the box. Fortunately my closet is quite dark so I doubt it will be an issue. I will be spray panting the area in the back matte black just in case though, to prevent minimze stray light from bouncing into the box during dark hours.
Any questions/comments please do not hesitate to reply
PS: The T5s are that off color because they are the lower K lights - I bought cool white 12" T5s for veging too but I cannot for the life of me figure out how to take the old ones out?! I may have to go to home depot and look like a total noob and ask them. If anybody out there knows how to replace it please let me know!
They are GE like these and come in a very similar but blue packaging and say "Slim Line Fluorescent Fixture" http://www.amazon.com/gp/product/B000HJ99G0/ref=cm_cr_asin_lnk
Attachments
-
 5.5 KB Views: 317
 -
 25.3 KB Views: 314
 -
 25.3 KB Views: 312
 -
 81.9 KB Views: 311