Iso \
- Thread starter R00R420
- Start date
R00R420
Active Member
Yea when thundercat finishes up I would nominate his as well... I just thing collectively we could put up a couple stickies. Some of the wax makers can put how to properly use a vac and purge and a good bho tutorial. And there should be a iso as well, I see people putting threads in the growing section and stuff not having a clue talking about a 3 min iso wash or a month long qwet.....anyway just my thoughts.....
thats the point of this thread...
Thundercat
Well-Known Member
Would you guys like me to repost that from my thread onto here and ask for this thread to be stickied?
WarMachine
Well-Known Member
A sticky is a thread that is always on top of the first page regardless if there was a post today or one three years ago.you can post whatever you want in here as long as it is iso related..I'm new here though and don't know what a sticky is? I was really just trying to get an iso thread started to see what other people are doing out there and if good info comes thats good too.
And yes Thunder , you should repost it here.
Thundercat
Well-Known Member
Here ya go:
OK guys I've been making some oil for just under a year now, and feel like I've learned alot and want to share! With that I bring you.......................................
First off some tunes for the process
[video=youtube;MfVDicnvnFc]http://www.youtube.com/watch?feature=player_detailpage&v=MfVDicnvnFc[/video]
and now an RIU exclusive presentation.......

^this is the oil I make in the tutorial, Cindy99 bud sap!
Step 1. Gather Supplies. In my case I use mason jars for my material. I have both metal and paper coffee filters. I have been using a clothe bag I got from target in the canning section as sort of a catch bag for all heavy material, it was called a "jam straining bag". I've got my frozen 91% or better alcohol, and some collection containers for it. Pretty much everything has been in the freezer for atleast 24 hrs other then the bag and paper filters. From what I've found doing the inital extraction with everything cold seems to help keep the end product cleaner and smoother.

Step 2. The wash. With this run I was using Cindy 99 buds which had been dried and have been curing for a couple weeks. I used 10 grams of the fluffier buds off the bottoms. I chopped this bud gently to a texture a little larger then what I would roll into a blunt, so that the alcohol would have good access to the bud structure. The bud was frozen for about 24 hours before the wash. I added alcohol till it covered the bud, then a splash more. Once the alcohol is in I start counting, and I don't leave the alcohol on the bud more then about 30 seconds.

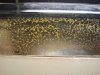
During that 30 second wash I will GENTLY, oscillate the jar, or tip it 90 degrees to the side and back up. I don't actually shake the jar on the first wash. In the picture I was swirling the solution. You should be able to see the level of the alcohol, as well as the coldness of the jar.

Once I get to the 25 second mark counting, I open her up, and dump the contents into the strainer bag over the top of the metal filter which is sitting in my collection container.

I allow the heaviest of the liquid to drain through, and then twist the bag up and squeeze the rest out.( note we are still under 1 minute from when we started) This is one reason I like this bag is it makes it real easy to handle the trim, and transfer it in and out of the jars.

Now the trim goes back into the jar, and the solution we just washed goes into the freezer with the lid on for a minute while I do the second washs.

I repeat "THE WASH" process once more for trim, but on this bud I did 3 total rinses.

now after a bowl, or a dab or two while the solution chills for an hour or so in the feezer.
Step 3. Filtering.This seems to be one of the most important parts of the oil making process. If you don't get out any impurities you won't get a nice clean/smooth oil. I've recently been told about a micron syringe filter( thanks qwizo) and would like to get one as I feel filtration is the next place for me to improve my system. Anyway, currently I'm using multiple coffee filters to filter my extractions. I place 3 filters into my metal filter to hold them and let it drain through into the another collection container.

I allow this to drain in the freezer for as long as it takes.....usually about a half hour. Here you can see my freezer, the square plastic containers are each different washes at various stages during the last few days. The iso bottle that looks green is also a wash I'm working on. Its actually 2 b grade washes I just poured in there for someplace to store it till I can evap it. Then the quart jar in the middle that is almost empty is my seagrams seven I infused last week.

So now after the first filtration I like to put it back into the freezer for a few hours. Typically I can see some residue collect on the bottom after some time. Then I take it, and do a second filtration. Same deal another 3 filters, same set up.
Oh a note....after the filtration I've been squeezing out the filters into a container of "wash" alcohol. I use it to wash out the dishes after I scrape them, and I squeeze the filters out into it.
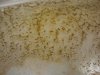
Step 4. Evaporation. This is something I've changed how I do in the last few months, and I am loving my new method. In the past I had used heat to assist in the evap process.(mostly to hurry it along) I always ended up with an "oily" extract when I was done. Recently I've began to evap the solution with far less heat (only what the exhaust of a dehumidifier puts out). Now my extracts are turning out as a shatter or a taffy sometimes. Here is the dish after a few hours of evaping.

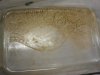
Step 5. Scraping/processing. I have found that the type of razor blade in the picture seems to work best as they have some flex to them. I have also found I like real pyrex dishes not off brands as they have much smoother bottoms.(something you don't notice until your scraping oil off it") ) I kinda forgot to get a pic of the whole dish but here is a small bit as I was scraping it.
) I kinda forgot to get a pic of the whole dish but here is a small bit as I was scraping it.

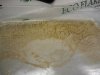
After I scrape the whole dish onto a piece of parchment paper(my new best friend), I fold the parchment into a packet with the oil in the middle.

At this point I mush it with my fingers in the packet, and that little bit of heat helps it form into a nice smooth mass. At this point I usually spread it out a bit and take a nice picture for you, like this again.
Then I fold it a few times into a little thicker piece and weigh it. Which I'm very pleased to say turned out well from my bud run.
The Wrap Up. I used 10 grams of bud, and I was able to get 1g(minus a dab) off just the first wash. I have about twice the amount of solution evaping from the second/third wash so I'm eager to see how that turns out. Either way I got my 10% plus, and some very delicious golden oil so I'm very pleased.
That being said, the flavor is my favorite part so far. It tastes exactly like the Cindy it came from but intensified. I can't imagine Kite Highs giant Cindy oil run he did that had to be amazing! Its very sweet, some fruitiness, a little citrus, and the distinct Cindy flavor I have a hard time describing. All in all I'm very happy.
So guys I hope this brings some light to how I've been doing things. Maybe it will help someone, maybe you'll have some good ideas or suggestions if you see something I'm doing wrong. Hopefully it will help those of you that havn't had the pleasure of making your own extractions be able to do so, and do it well. With that I give you a shot of what was on my dabber a few minutes ago .


Peace, may your dreams be oily.
OK guys I've been making some oil for just under a year now, and feel like I've learned alot and want to share! With that I bring you.......................................
First off some tunes for the process
[video=youtube;MfVDicnvnFc]http://www.youtube.com/watch?feature=player_detailpage&v=MfVDicnvnFc[/video]
and now an RIU exclusive presentation.......
^this is the oil I make in the tutorial, Cindy99 bud sap!
Step 1. Gather Supplies. In my case I use mason jars for my material. I have both metal and paper coffee filters. I have been using a clothe bag I got from target in the canning section as sort of a catch bag for all heavy material, it was called a "jam straining bag". I've got my frozen 91% or better alcohol, and some collection containers for it. Pretty much everything has been in the freezer for atleast 24 hrs other then the bag and paper filters. From what I've found doing the inital extraction with everything cold seems to help keep the end product cleaner and smoother.
Step 2. The wash. With this run I was using Cindy 99 buds which had been dried and have been curing for a couple weeks. I used 10 grams of the fluffier buds off the bottoms. I chopped this bud gently to a texture a little larger then what I would roll into a blunt, so that the alcohol would have good access to the bud structure. The bud was frozen for about 24 hours before the wash. I added alcohol till it covered the bud, then a splash more. Once the alcohol is in I start counting, and I don't leave the alcohol on the bud more then about 30 seconds.
During that 30 second wash I will GENTLY, oscillate the jar, or tip it 90 degrees to the side and back up. I don't actually shake the jar on the first wash. In the picture I was swirling the solution. You should be able to see the level of the alcohol, as well as the coldness of the jar.
Once I get to the 25 second mark counting, I open her up, and dump the contents into the strainer bag over the top of the metal filter which is sitting in my collection container.
I allow the heaviest of the liquid to drain through, and then twist the bag up and squeeze the rest out.( note we are still under 1 minute from when we started) This is one reason I like this bag is it makes it real easy to handle the trim, and transfer it in and out of the jars.
Now the trim goes back into the jar, and the solution we just washed goes into the freezer with the lid on for a minute while I do the second washs.
I repeat "THE WASH" process once more for trim, but on this bud I did 3 total rinses.
now after a bowl, or a dab or two while the solution chills for an hour or so in the feezer.
Step 3. Filtering.This seems to be one of the most important parts of the oil making process. If you don't get out any impurities you won't get a nice clean/smooth oil. I've recently been told about a micron syringe filter( thanks qwizo) and would like to get one as I feel filtration is the next place for me to improve my system. Anyway, currently I'm using multiple coffee filters to filter my extractions. I place 3 filters into my metal filter to hold them and let it drain through into the another collection container.
I allow this to drain in the freezer for as long as it takes.....usually about a half hour. Here you can see my freezer, the square plastic containers are each different washes at various stages during the last few days. The iso bottle that looks green is also a wash I'm working on. Its actually 2 b grade washes I just poured in there for someplace to store it till I can evap it. Then the quart jar in the middle that is almost empty is my seagrams seven I infused last week.
So now after the first filtration I like to put it back into the freezer for a few hours. Typically I can see some residue collect on the bottom after some time. Then I take it, and do a second filtration. Same deal another 3 filters, same set up.
Oh a note....after the filtration I've been squeezing out the filters into a container of "wash" alcohol. I use it to wash out the dishes after I scrape them, and I squeeze the filters out into it.
Step 4. Evaporation. This is something I've changed how I do in the last few months, and I am loving my new method. In the past I had used heat to assist in the evap process.(mostly to hurry it along) I always ended up with an "oily" extract when I was done. Recently I've began to evap the solution with far less heat (only what the exhaust of a dehumidifier puts out). Now my extracts are turning out as a shatter or a taffy sometimes. Here is the dish after a few hours of evaping.
Step 5. Scraping/processing. I have found that the type of razor blade in the picture seems to work best as they have some flex to them. I have also found I like real pyrex dishes not off brands as they have much smoother bottoms.(something you don't notice until your scraping oil off it
After I scrape the whole dish onto a piece of parchment paper(my new best friend), I fold the parchment into a packet with the oil in the middle.
At this point I mush it with my fingers in the packet, and that little bit of heat helps it form into a nice smooth mass. At this point I usually spread it out a bit and take a nice picture for you, like this again.
Then I fold it a few times into a little thicker piece and weigh it. Which I'm very pleased to say turned out well from my bud run.
The Wrap Up. I used 10 grams of bud, and I was able to get 1g(minus a dab) off just the first wash. I have about twice the amount of solution evaping from the second/third wash so I'm eager to see how that turns out. Either way I got my 10% plus, and some very delicious golden oil so I'm very pleased.
That being said, the flavor is my favorite part so far. It tastes exactly like the Cindy it came from but intensified. I can't imagine Kite Highs giant Cindy oil run he did that had to be amazing! Its very sweet, some fruitiness, a little citrus, and the distinct Cindy flavor I have a hard time describing. All in all I'm very happy.
So guys I hope this brings some light to how I've been doing things. Maybe it will help someone, maybe you'll have some good ideas or suggestions if you see something I'm doing wrong. Hopefully it will help those of you that havn't had the pleasure of making your own extractions be able to do so, and do it well
Peace, may your dreams be oily.
WarMachine
Well-Known Member
Looks really good Thunder! Every time I go use a razor to gather everything, it becomes dark. Yours kept the color beautifully.
Thundercat
Well-Known Member
Thanks War, I was very pleased with how that batch turned out being my first bud run. I did a wash today with trim I cut off a plant last night, and some small popcorn buds off it. i froze it over night, and did the wash this afternoon. I think it turned out real nice, but we'll see after the evap.
WarMachine
Well-Known Member
How did the other rinses come out? Good yield and quality? I'm thinking of trying your method with some of the stuff I got from Kase.
R00R420
Active Member
War how long are you waiting before scraping it up? Does it look dry or does it look more like an oil when you scrape? I have noticed a change if scraped to early which i used to do when I was first making ISO. Just an idea if you are saying that it is the desired color before and it is changing after the scrape? Try waiting a little bit longer before the scrape and there might be a difference. Especially since you don't use heat if I rem correctly.
Thundercat
Well-Known Member
War the second and third wash I decided to mix together for the sack of less time evaping then 2 seperate washs. The B grade was only .6g and is darker in color, and not as smooth but still has ok flavor and is a shatter at room temp. With the 1g A and .6 B grade, that gave me a 16% return on my 10g of bud I used for the project.
I like Roors idea of letting it dry longer.
I like Roors idea of letting it dry longer.
Guzias1
Well-Known Member
nice tute and pics man, simple!
parchment has been my best friend for the past year. oil slick pads and what not sounds nice, but i tend to use a LOT of paper, and i like it being disposable, give away-able.
i do the pyrex route, then get to my paper once most solvent is gone.
i ran into some delays, but will have my A-B-C test up very soon here. maybe get even the vac/heat purged ISO test up tonight.
natural evap is very nice and cheap on the smaller scale though.
WarMachine
Well-Known Member
I usually wait 24 hours before the scraping but if in a hurry at least 6-8 hours (on small batches). It looks really dry when I go to scrape it, where I can touch it and not have anything on my finger. But ya basically it starts off looking really nice in the plate and then when I go to scrape it becomes rather dark. For example, when Thunder scraped his razor had golden goodness, I on the other scrape and get dark goodness. I can try perhaps 48 hours instead of 24. I hardly use heat and when I do it was to make the shatter. Even then though, I wait til it's full dry then place in hot/warm water for 15-20 mins.War how long are you waiting before scraping it up? Does it look dry or does it look more like an oil when you scrape? I have noticed a change if scraped to early which i used to do when I was first making ISO. Just an idea if you are saying that it is the desired color before and it is changing after the scrape? Try waiting a little bit longer before the scrape and there might be a difference. Especially since you don't use heat if I rem correctly.
Thundercat
Well-Known Member
I think your last sentence says it all war. Try skipping the warm oven stage as an experiment. I scrape it at room temp, and am just gentle to control it from flaking all over.
Thanks alot Guz for the nice words. You mention the natural evap being good for smaller scale. That is one of my next project. I want to figure out a way I can evap atleast 3-4 dishs at once. I'm currently thinking about mounting a pie rack to the wall above my dehumidifer, so I can put dishes on each rack, and the air will still move around the dishes well. I might just build something, either way I wanna try to figure out a good way to evap on a larger scale. I've got 3 washes in my freezer right now just waiting to evap, and I've been doing a dish a day pretty much the last week or 2.
Thanks alot Guz for the nice words. You mention the natural evap being good for smaller scale. That is one of my next project. I want to figure out a way I can evap atleast 3-4 dishs at once. I'm currently thinking about mounting a pie rack to the wall above my dehumidifer, so I can put dishes on each rack, and the air will still move around the dishes well. I might just build something, either way I wanna try to figure out a good way to evap on a larger scale. I've got 3 washes in my freezer right now just waiting to evap, and I've been doing a dish a day pretty much the last week or 2.
WarMachine
Well-Known Member
This last batch I made was made with no heat what so ever so we will see if it changes color when I go to scrape it.
WarMachine
Well-Known Member
So I scraped up the batch today that I have been letting dry since Monday. It was a nice yellow on the pan but when scraped up, once again was dark. No heat what so ever used. It was still potent and enjoyable, just wonder why it's darker when I go to scrape.. Could it be from me using material as opposed to nug? I will upload pics tomorrow.
Btw,r420, where is that guide still?!
Btw,r420, where is that guide still?!
qwizoking
Well-Known Member
Its not going to change, degrade or otherwise just from you collecting the oil. Doesn't matter really how you do it. It will get darker from balling it, especially the more impurities. That's why most spread it out and shine light during a pic... but other than that, before and after scrape I don't see why it would be a different oil...mines always darker till it finishes purging and completely dry.... idk man, that's all I can tell ya
WarMachine
Well-Known Member
I understand it isn't changing or being degraded I just find it weird. It could be that I have more impurities. Here are the pics of the pan. It was a bit darker than I'd like but like qwizo said, hold it to the light, and it looks good.
WarMachine
Well-Known Member
On the next run I think I might do 10 second wash instead of the 20-30 second wash. I would do a pour over but like I said, I just feel like I didn't get it all so maybe with 10 seconds I'll feel better about it haha.