sgtjayne
Member
It's called vermicomposting, and it's a simple and easy way to save some money and get some nice soil additive and or nute tea mix. I'm not going into deep detail with this because it is just the DIY but there is plenty of stuff here on rollitup to get you by. If you can grow cannabis then you can collect your own worm casting. Btw casting means "poop" *giggle* 
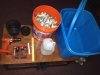
Items Needed
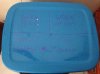
2 non-transparent plastic bins w/lids 10+ gallons (No not 5 gallon buckets.)
Ruler, tape measure (something to measure with)
Paint marker or other marking device
Drill
1/4" & 1/16" drill bits
Shredded up newspaper & cardboard (slightly damp, damn I had to use a 5gal bucket but we'll get thru this DIY with-out using duct-tape at least!)
4 small flower pots with drain tray bottom popped off (this are only used as spacer blocks so anything you have laying around will be okay. I use these because I get 8 spacers out of them.)
1 pound red wiggler composting worms (not pictured)
1 shovel full yard dirt (not pictured)
Some fruit or veggie peels
Step 1.
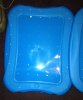
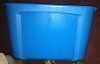
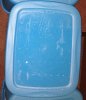
Wash your bins and let them dry thoroughly. Using your paint marker and ruler, or what ever you have, make a 2" grid of dots all over the outside bottom of both of your bins. Using the totes again measure down 2 inches and 4 inches from the top rim of the tote. Make at least 4 dots for each distance on the long sides and 2 dots for each distance on the shorter sides, you can make as many as you want but at least make the stated amounts. Now take 1 lid and do the same over the top of it in a 1.5" grid. ONLY 1 LID!!! (The other lid is used as a catch tray.) Now you can section your lid off with a marker like I did or just remember the different zones.
Step 2.
Using the 1/4" bit drill out all the marks on the bottoms of the two bins, switch over to the 1/16" bit and drill out the marks along the top of the bins and on the single marked lid. The 1/4" holes are for worm movement and the 1/16" holes are for air circulation.

Step 3.
Lay down the saved lid upside down on the ground or floor of where ever you plan to keep your worm farm. Place 4 spacers on the lid to sit the bin on, place bin on spacers and then put additional spacers in the bottom of the bin. Place the second bin inside the first on top of the additional spacers fill 3/4 full with your newspaper/cardboard mix. Dump in your shovel of dirt and mix it all up, the newspaper and cardboard should be damp but not soaking, fluff the shredded paper and cardboard up. Place the fruit or veggie peels in one of the zones that are marked by your lid, and then cover it up with some more newspaper/cardboard mix to keep it from stinking. Put your lid on and your done!


Wait... What about the worms?
Step 4.
Wait 2 days at least before you decide to drop your worms in, give your farm time to stabilize itself. Do you have to wait, no, but it does make it easier for the worms to adapt to their new home sooner. When you do purchase your worms and are ready to put them in their new home place them in a different zone then you placed the food. When they are ready they will go to the food, if you waited and let the food compost some before adding the worms this part will be faster. Now just keep them moist and fed and you will be harvesting worm casting in a few short months.
Hope everyone enjoyed") )
)
Here's a great thread of follow-up info.
http://rollitup.org/t/vermicomposters-unite-official-worm-farmers-thread.637587/
Peace
Sgt J
Items Needed
2 non-transparent plastic bins w/lids 10+ gallons (No not 5 gallon buckets.)
Ruler, tape measure (something to measure with)
Paint marker or other marking device
Drill
1/4" & 1/16" drill bits
Shredded up newspaper & cardboard (slightly damp, damn I had to use a 5gal bucket but we'll get thru this DIY with-out using duct-tape at least!)
4 small flower pots with drain tray bottom popped off (this are only used as spacer blocks so anything you have laying around will be okay. I use these because I get 8 spacers out of them.)
1 pound red wiggler composting worms (not pictured)
1 shovel full yard dirt (not pictured)
Some fruit or veggie peels
Step 1.
Wash your bins and let them dry thoroughly. Using your paint marker and ruler, or what ever you have, make a 2" grid of dots all over the outside bottom of both of your bins. Using the totes again measure down 2 inches and 4 inches from the top rim of the tote. Make at least 4 dots for each distance on the long sides and 2 dots for each distance on the shorter sides, you can make as many as you want but at least make the stated amounts. Now take 1 lid and do the same over the top of it in a 1.5" grid. ONLY 1 LID!!! (The other lid is used as a catch tray.) Now you can section your lid off with a marker like I did or just remember the different zones.
Step 2.
Using the 1/4" bit drill out all the marks on the bottoms of the two bins, switch over to the 1/16" bit and drill out the marks along the top of the bins and on the single marked lid. The 1/4" holes are for worm movement and the 1/16" holes are for air circulation.
Step 3.
Lay down the saved lid upside down on the ground or floor of where ever you plan to keep your worm farm. Place 4 spacers on the lid to sit the bin on, place bin on spacers and then put additional spacers in the bottom of the bin. Place the second bin inside the first on top of the additional spacers fill 3/4 full with your newspaper/cardboard mix. Dump in your shovel of dirt and mix it all up, the newspaper and cardboard should be damp but not soaking, fluff the shredded paper and cardboard up. Place the fruit or veggie peels in one of the zones that are marked by your lid, and then cover it up with some more newspaper/cardboard mix to keep it from stinking. Put your lid on and your done!
Wait... What about the worms?
Step 4.
Wait 2 days at least before you decide to drop your worms in, give your farm time to stabilize itself. Do you have to wait, no, but it does make it easier for the worms to adapt to their new home sooner. When you do purchase your worms and are ready to put them in their new home place them in a different zone then you placed the food. When they are ready they will go to the food, if you waited and let the food compost some before adding the worms this part will be faster. Now just keep them moist and fed and you will be harvesting worm casting in a few short months.
Hope everyone enjoyed
Here's a great thread of follow-up info.
http://rollitup.org/t/vermicomposters-unite-official-worm-farmers-thread.637587/
Peace
Sgt J


