DIY kits now available from Timber!
- Thread starter tstick
- Start date
tstick
Well-Known Member
Hi Verticalgrow!
I LOVE the Stellas...however...they aren't the ideal lens choice for scrog style growing because they do not spread the light out evenly enough in a square space (like my tent). They do provide EXCELLENT penetration for growing "tree" style...which is the way I used the Vero240 fixture. But they are for sure the coolest lens technology out there because they are made from liquid silicone and....you jut have to feel them to see what I mean!")
I like Timber lights a lot because they are put together so well and the attention to detail is amazing...All their pre-fabs are built like tanks! I decided to go for broke and get their CXB400R (top of their line) commercial fixture this time...and it has the Ledil Angelina reflectors and diffusers....so I'll have to hold off on how they perform in comparison to the Stella-Equipped fixtures for now...but stay tuned!!")
...I am expecting big things to come on my next grow with the new light!
I LOVE the Stellas...however...they aren't the ideal lens choice for scrog style growing because they do not spread the light out evenly enough in a square space (like my tent). They do provide EXCELLENT penetration for growing "tree" style...which is the way I used the Vero240 fixture. But they are for sure the coolest lens technology out there because they are made from liquid silicone and....you jut have to feel them to see what I mean!
I like Timber lights a lot because they are put together so well and the attention to detail is amazing...All their pre-fabs are built like tanks! I decided to go for broke and get their CXB400R (top of their line) commercial fixture this time...and it has the Ledil Angelina reflectors and diffusers....so I'll have to hold off on how they perform in comparison to the Stella-Equipped fixtures for now...but stay tuned!!
...I am expecting big things to come on my next grow with the new light!
Last edited:
tstick
Well-Known Member
New pictures are up for some new Timber 5-COB kits. Looks like a really nice price for 5 CXB3590 based set up, too! Without the driver, the 5-COB kit is running at $86 per COB...and WITH the Meanwell driver option, they run at $100 per COB -all wired up and ready to go!
http://timbergrowlights.com/products/
http://timbergrowlights.com/products/
tstick
Well-Known Member
Shoot Dan an email and he will arrange a shipment plan for you, Bobby_G.i tried to put some in my cart and they say:
"Unfortunately one or more items in your cart can't be shipped to your location. Please choose a different delivery address."
RainDan
Well-Known Member
Hi @BOBBY_Gi tried to put some in my cart and they say:
"Unfortunately one or more items in your cart can't be shipped to your location. Please choose a different delivery address."
Was a minor website glitch - all fixed now.
If you run into any other issues placing your order please let me know.
Thanks in advance for the opportunity to earn your business.
Best Regards,
Dan
Marvin2006
Active Member
Question for RainDan
Are there four holes for mounting the Ideal 50-2303CR CXB Holder and the Ideal 50-2300AN Adapter onto the pin cushion heat sinks or just two as the picture on the website seems to show? From what I've read they are supposed to be connected to the heat sinks with four screws not two.
Are there four holes for mounting the Ideal 50-2303CR CXB Holder and the Ideal 50-2300AN Adapter onto the pin cushion heat sinks or just two as the picture on the website seems to show? From what I've read they are supposed to be connected to the heat sinks with four screws not two.
Last edited:
RainDan
Well-Known Member
Hi @Marvin2006,
Yes - you are absolutely correct. The Ideal 50-2303CR holders and 50-2300AN adapters are installed on the heat sinks according to IDEAL specs, which is (2) screws each for the COB holder and reflector holder - a total of (4) screws.
My apologies - the pics will be rendered again to reflect this more clearly.
Thank you for the feedback - we appreciate it.
Regards,
Dan
Nu-Be
Well-Known Member
A couple of weeks ago, I ordered FIVE (5) of the 4-COB CXB3590 3500CD bin kits from Dan @ www.TimberGrowLights.com. He was kind enough to work with me on the price, meaning that I only had to give him about $150 more than buying them unassembled from the cheapest all-in-one DIY option (PLC after discount), including shipping, and he threw in diffusers on top for me.
These were cheaper than ordering from Cutter, and they come assembled and pre-wired, with professional, waterproof connectors.
Because of a delay in getting the 100K pots, he overnighted all five kits to me after a day of burning-in on their test bench. Talk about great service, and the packaging was secure and solid. Today, I was finally able to spend a couple hours building the frames from 1x1 1/8" thick AL angle, and wanted to do a quick review.
These utilize the 100mm x 70mm Cooliance CPL10070-XXX heatsink (datasheet attached - good for 73w in a 25C room, 63w in a 35C room), pre-drilled and tapped with Allen bolt socket head cap screws for mounting. Here's the cob assembly on one already installed.
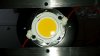
As you can see, the tapped holes for mounting are a little close to the cob holder, but with careful measurements, it wasn't too hard to finish.
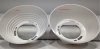
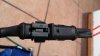
Of course, Timber mounts the cob holders, cobs (with Arctic Silver thermal paste), and Ledil reflector adapters for you, then wires them all up to the Meanwell HLG-185H-C1400B dimmable drivers

with 10a waterproof fuses inline
plus 100K ohm pots
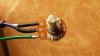
and solid power plugs.
I got mine in 110v style - yeah, I know the efficiency takes a hit, but it's my only option. Everything has ground wires built in, so you can attach to your frame or whatever to make it safe.
Here's the 4x3 assembly on lowest dim (need to tame the extra wiring once mounted)
And off completely.

The frame is simply a few pieces of 36" long, 1/8" thick, 1"x1" 6061 aluminum angle stock screwed together. The cobs are spaced nine inches apart, starting at 4.5" from each end, and the rows are are 16" apart on center.
This will be going in my 4x4 flower tent once I get the diffusers, which were backordered. So far, I've had it burning in at 100% here at home for a few hours and, while the heatsinks are only warm to the touch, they're rockin' in a room with zero airflow and having zero issues. For 50W per cob, these heatsinks are just the right size.
Thanks a bunch, Dan. You have a good product that I happily recommend.
Next up will be my 3x2x3 build for my 4x4 veg tent.
These were cheaper than ordering from Cutter, and they come assembled and pre-wired, with professional, waterproof connectors.
Because of a delay in getting the 100K pots, he overnighted all five kits to me after a day of burning-in on their test bench. Talk about great service, and the packaging was secure and solid. Today, I was finally able to spend a couple hours building the frames from 1x1 1/8" thick AL angle, and wanted to do a quick review.
These utilize the 100mm x 70mm Cooliance CPL10070-XXX heatsink (datasheet attached - good for 73w in a 25C room, 63w in a 35C room), pre-drilled and tapped with Allen bolt socket head cap screws for mounting. Here's the cob assembly on one already installed.
As you can see, the tapped holes for mounting are a little close to the cob holder, but with careful measurements, it wasn't too hard to finish.
Of course, Timber mounts the cob holders, cobs (with Arctic Silver thermal paste), and Ledil reflector adapters for you, then wires them all up to the Meanwell HLG-185H-C1400B dimmable drivers
with 10a waterproof fuses inline
plus 100K ohm pots
and solid power plugs.
I got mine in 110v style - yeah, I know the efficiency takes a hit, but it's my only option. Everything has ground wires built in, so you can attach to your frame or whatever to make it safe.
Here's the 4x3 assembly on lowest dim (need to tame the extra wiring once mounted)
And off completely.
The frame is simply a few pieces of 36" long, 1/8" thick, 1"x1" 6061 aluminum angle stock screwed together. The cobs are spaced nine inches apart, starting at 4.5" from each end, and the rows are are 16" apart on center.
This will be going in my 4x4 flower tent once I get the diffusers, which were backordered. So far, I've had it burning in at 100% here at home for a few hours and, while the heatsinks are only warm to the touch, they're rockin' in a room with zero airflow and having zero issues. For 50W per cob, these heatsinks are just the right size.
Thanks a bunch, Dan. You have a good product that I happily recommend.
Next up will be my 3x2x3 build for my 4x4 veg tent.
Attachments
-
452 KB Views: 22
Last edited:
Nu-Be
Well-Known Member
My consideration when going with Timber was primarily the cost vs. the cheapest DIY option, all other things being relatively equal.
1) These kits only cost me about $30 more per 4cob kit than complete top shelf DIY components purchased separately (including shipping for each option, after 10% discount codes at DIY option websites).
1a) These kits, completely assembled and tested, cost me about $30 per kit LESS (after including shipping for each option) than the same DIY kit from Cutter, except with Cutter's kit you have to wire and assemble everything yourself.
2) This kit has a built-in, 10amp waterproof fuse that I didn't include in the DIY price because I wouldn't have done it myself.
3) This kit is completely pre-wired with enough extra wire for pretty much any configuration. It also has a 100K pot wired in, plus all of the grounding wires.
4) This kit is burn-in tested before shipping.
5) These heatsinks, while smaller than the DIY options, are pre-drilled and tapped for mounting to a frame. Not all DIY options are pre-drilled and tapped, which is a lot of time, although not particularly difficult.
6) These heatsinks are perfectly sized for 1400ma (50w), and could probably support 1750ma per cob passive with good airflow in the room where they're installed.
7) This kit doesn't utilize non-name brand components. It's 100% top of the line for everything, just like if you did it yourself. While that may not make any difference in practice, the peace of mind that comes with having the best components is always nice, especially at this price level.
jeepster1993
Well-Known Member
Just bought a 5 light setup.
Will arrive in a few days. The light is for a gorilla grow 2x2.5x7 grow tent. It will replace a couple of mars2 led lights.
After a lot of searching, i decided this was a good way to spend my light upgrade money.
Have not decided on a mount design yet. A cross, with a cob on each arm and 1 in the middle... ???
Airwalker16
Well-Known Member
Yup, or since you have an extra half foot on a side,Just bought a 5 light setup.
Will arrive in a few days. The light is for a gorilla grow 2x2.5x7 grow tent. It will replace a couple of mars2 led lights.
After a lot of searching, i decided this was a good way to spend my light upgrade money.
Have not decided on a mount design yet. A cross, with a cob on each arm and 1 in the middle... ???
O----------O
------O------
O----------O
Instead of even lengths. Maybe use 2 bars, one on each end @ 24" long.
And a 3rd bar crossing/bridging between them with one centered.
Like an "H". You could even reenforce the spaces with a bar going across the same way the middle bar does. Kind of like a digital clock "8". That's what I'd do. But hey, that's just me.
The sketch is just placement, not design.
Last edited:
jeepster1993
Well-Known Member
What do you all think of the idea of getting, or reusing an hps hood to hold the the 5 cobs? And put the driver in it too?
Gut the insides and get a piece plate the size of the protective glass and drill 5 holes in it for the leds?
Use the fan/filter i have now for cooling and odor to control the heat it would create like i do now with the hps?(the hood is air/fan cooled now, use that hood)
Gut the insides and get a piece plate the size of the protective glass and drill 5 holes in it for the leds?
Use the fan/filter i have now for cooling and odor to control the heat it would create like i do now with the hps?(the hood is air/fan cooled now, use that hood)
Stage420
Well-Known Member
High all,
New here. Thanks for the trove of information. I ordered the 4 cxb3590 cob kit w/mw @ 1400ma.
My goal is 4 light bars at 36 in long and 16 total cobs. A pair at 3000k and 4000k. I'm excited.
For those of us who are uneasy of soldering and wiring...these kits are what the dr ordered.
New here. Thanks for the trove of information. I ordered the 4 cxb3590 cob kit w/mw @ 1400ma.
My goal is 4 light bars at 36 in long and 16 total cobs. A pair at 3000k and 4000k. I'm excited.
For those of us who are uneasy of soldering and wiring...these kits are what the dr ordered.
RainDan
Well-Known Member
@ NuBe - Thank you. I enjoyed working with you on this purchase - your build turned out really clean and nice. If I can be of any assistance down the road, let me know.A couple of weeks ago, I ordered FIVE (5) of the 4-COB CXB3590 3500CD bin kits from Dan @ www.TimberGrowLights.com. He was kind enough to work with me on the price, meaning that I only had to give him about $150 more than buying them unassembled from the cheapest all-in-one DIY option (PLC after discount), including shipping, and he threw in diffusers on top for me.
These were cheaper than ordering from Cutter, and they come assembled and pre-wired, with professional, waterproof connectors.
Because of a delay in getting the 100K pots, he overnighted all five kits to me after a day of burning-in on their test bench. Talk about great service, and the packaging was secure and solid. Today, I was finally able to spend a couple hours building the frames from 1x1 1/8" thick AL angle, and wanted to do a quick review.
These utilize the 100mm x 70mm Cooliance CPL10070-XXX heatsink (datasheet attached - good for 73w in a 25C room, 63w in a 35C room), pre-drilled and tapped with Allen bolt socket head cap screws for mounting. Here's the cob assembly on one already installed.
View attachment 3699857
As you can see, the tapped holes for mounting are a little close to the cob holder, but with careful measurements, it wasn't too hard to finish.
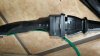
Of course, Timber mounts the cob holders, cobs (with Arctic Silver thermal paste), and Ledil reflector adapters for you, then wires them all up to the Meanwell HLG-185H-C1400B dimmable drivers
View attachment 3699861
with 10a waterproof fuses inline
View attachment 3699862
plus 100K ohm pots
View attachment 3699863
and solid power plugs.
View attachment 3699865
I got mine in 110v style - yeah, I know the efficiency takes a hit, but it's my only option. Everything has ground wires built in, so you can attach to your frame or whatever to make it safe.
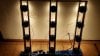
Here's the 4x3 assembly on lowest dim (need to tame the extra wiring once mounted)
View attachment 3699868
And off completely.
View attachment 3699870
The frame is simply a few pieces of 36" long, 1/8" thick, 1"x1" 6061 aluminum angle stock screwed together. The cobs are spaced nine inches apart, starting at 4.5" from each end, and the rows are are 16" apart on center.
This will be going in my 4x4 flower tent once I get the diffusers, which were backordered. So far, I've had it burning in at 100% here at home for a few hours and, while the heatsinks are only warm to the touch, they're rockin' in a room with zero airflow and having zero issues. For 50W per cob, these heatsinks are just the right size.
Thanks a bunch, Dan. You have a good product that I happily recommend.
Next up will be my 3x2x3 build for my 4x4 veg tent.