Building COB array and frame.

KhronicKills

Well-Known Member
image.jpeg image.jpeg image.jpeg image.jpeg image.jpeg 
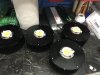
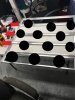
Title says it. In this thread ill post images prices parts and as good as a tutorial as possible. This will be for a 12 COB array. Using Timber grow light kits.

To start im building a 3x3' fixture. Items needed are

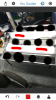
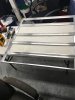
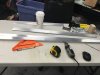
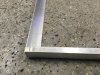
36' of 1"x1" angled aluminum (youll see later on why so much) Bought at home cheapo in 96" lengths for $12 a section.

A dremel with metal cutoff wheel, or a chopsaw (chopsaw would make this wayy faster)


A center punch (again not totally needed, but makes life easier)

Tape measure

Carpenters square or the likes

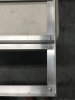
A small file (not needed but im trying to go for clean look, also im OCD with projects)

Nuts and bolts and or pop rivets. (Im using rivets to minimize the profile from nuts and bolts that may possibly get in the way of where id like to place heatsinks.

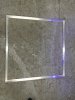
Start by cutting four 3' sections to have your main frame/support.
 
Last edited:

CobKits

Well-Known Member
not to poo-poo so early on but try to find a metal supplier near you. you can can get 1/8" thick for less than you paid for the 1/16" from home depot. the 1/8" when assembled is a lot more rigid than 1/16" and eliminates cross bracing. in my experience 1/16" is tough for anything over 2' as those heatsinks are really heavy and put a lot of torque on the frame
 

KhronicKills

Well-Known Member
not to poo-poo so early on but try to find a metal supplier near you. you can can get 1/8" thick for less than you paid for the 1/16" from home depot. the 1/8" when assembled is a lot more rigid than 1/16" and eliminates cross bracing. in my experience 1/16" is tough for anything over 2' as those heatsinks are really heavy and put a lot of torque on the frame

Bahhh.:dunce: I guess better to find out now. Damn you and thanks Cob
 

CobKits

Well-Known Member
tbh i stopped short of building a 3x3 with 1/16" but i did a 2x2 with 6 pinfins on it and it flopped all over the place.

the 3x3 in 1/8" is more rigid than the 2x2 in 1/16"

what i would do to salvage that material is get yourself some thicker stuff for outer frames and use that for internal rails, basically make 2 frames.

call around i had to go to a couple places but now im in on solid 1x1x 1/8" for about 1.50/foot and its bomber. i actually like 1x1 for the two bottom rails and 3/4 x 3/4 for the internal rails the heatsinks sit on, the 3/4 sits down inside real nice and is plenty strong (and cheaper than 1")

i like 6063 with the square corners (" architectural"). the 6061 is " angle-iron" style with the radius and doesnt fit together as nice imo
 

KhronicKills

Well-Known Member
Thanks a ton dude. Pretty silly on my part to start to make a tutorial for something ive never built before lol. I shall source some 1/8" and give her a go. Cheers
 

researching

Well-Known Member
1/16 will be fine, but 1/8 would be way better. I only went with 1/16 because of weight. Cost was secondary. Mine do twist a tad but they are strong. When hung depending on how you place the hanging wire etc... can help too. My fixtures are 30"x30" w 2 ballasts and 8 cobs.

On second thought would be better off w/ 1/8" since yours will be bigger and have more lights. I was going to build 1 30"x60" fixture with 16 cobs and 4 ballasts but i thought stability may be an issue. With 1/16. Although I used 3/4x3/4"x1/8thick. The 1" should be more rigid.
 
Last edited:

CobKits

Well-Known Member
also a $10 hacksaw will do you right

and if you're dremeling make sure to wear eye protection - they love to throw cutoff wheels
 

KhronicKills

Well-Known Member
also a $10 hacksaw will do you right

and if you're dremeling make sure to wear eye protection - they love to throw cutoff wheels
Ordered that 1/8" already cut so thats at least done. Ill salvage this 1/16" for a 2x2 build for my 3' tent.

All said and done this fixture for my 4x4 will be 12 cobs for a total of 900watts. Using 3 of timber grow lights kits. Probably overkill but I dont know any other way.

Also yeah, those cutoff wheels scare the fuck out of me, I always picture them exploding snd ruining my day.
 

sanjuan

Well-Known Member
But in defense of 6061 aluminum, it is a better alloy structurally [from onlinemetals.com]:

6061 Aluminum is, by most any measure, the most commonly used aluminum alloy. It is specified in most any application due to its strength, heat treatability, comparatively easy machining, and weldability. If that were not enough, it is also capable of being anodized, adding a layer of protection for finished parts.

6061-T6 Aluminum
Ultimate Tensile Strength, psi 45,000
Yield Strength, psi 40,000
Brinell Hardness 95


6063 Aluminum
6063 is often called architectural aluminum for two reasons - first, it has a surface finish that is far smoother than the other commercially available alloys, and second, its strength is significantly less (roughly half the strength of 6061), making it suited for applications where strength is not the foremost consideration.

6063 is rated as "Good" for forming and cold working operations, "Excellent" for anodizing, and "Fair" for machining.

6063-T52 Aluminum
Ultimate Tensile Strength, psi 27,000
Yield Strength, psi 21,000
Brinell Hardness 60
 

popeyesailorman

Well-Known Member

KhronicKills

Well-Known Member
I think you might want to keep all the dimmers close.You can hang the drivers on outside of your frame if you have room in the grow space.
The pots have a good length of wire that I can put them next to each other on side of frame. Dan wired in external pot. Worst case I can make them bir longer and still keep them on frame. Id have room on outside of frame, just trying to keep all in one central location, for space and since fan will be blowing across entire setup. 3-300watt kits...something tells me ill be dimming.
 

CobKits

Well-Known Member
nice! off to a good start- youre lovin that burly 1/8"! You can replace your 4 bolts in the corners with eyebolts for some built in hanging hardware

also dont forget to ground that frame. if youre runnin 320s you want no part of that high voltage
 
Last edited:

KhronicKills

Well-Known Member
nice! off to a good start- youre lovin that burly 1/8"! You can replace your 4 bolts in the corners with eyebolts for some built in hanging hardware

also dont forget to ground that frame. if youre runnin 320s you want no part of that high voltage
1/8 is night and day, its crazy.
 
Top