Beercan CFL reflectors! Cheap, easy and effective! Photo how-to guide
- Thread starter UptheDownstair
- Start date
Ndodson79605
Active Member
Definitely +rep for this tutorial. I'm gonna keep this page bookmarked for when I start my cabinet grow.
imchucky666
Well-Known Member
Very nice, but for a some guys that have holesaws, couldn't they use the holesaw in the bottom of the can and save the snipping and bending of tabs?Hey all,
So I had an idea that Im pretty proud of and thought Id pass it along to my fellow growers. Its the least I can do for the wealth of knowledge and ideas youve been giving me over the years.
Hope you like my first how-to guide.
A few starting points: Be very careful when cutting in this project. Aluminum is sharper than a motherfucker and the flashing you get when cutting with sheers or scissors can poke you pretty good. Same goes for when your using the razorblade to cut the side. But this is all standard safety shit that you all know anyway. Just a disclaimer covering my ass.

Step 1) All the tools and supplies youll need to make one: A pair of needlenose plyers, a pair of sheers or scissors (scissors will be harder to use), a razor-blade or utility-knife, electical tape, a small flat-head screwdriver, mylar film (optional), spray adhesive (optional too if you dont use the mylar), scotch tape (also optional w/out the mylar) and most importiantly, an empty beer or soda can. I chose the Keystone Light can because it is slightly taller and narrower than a standard Oly or Coke can, but any 12oz aluminum can will work. Youll also need a flat, clear, elevated work-space like a table or workbench.

Step 2) Remove pull-tab from can and make marks around the opening. The idea is to widen the opening to fit the socket-end of a standard CFL bulb

Step 3) Make each cut with a pair of sheers or scissors

Step 4) Each tab cut with sheers or scissors

Step 5) Bend down each tab with a pair of needlenose plyers

All tabs bent down with needlenose plyers

Step 6) Test-fitting: With the tabs bent-down and the opening widened and rounded, a CFL bulb now fits inside. If you test-fit yours and it doesnt fit, just cut the tabs a little deeper and bend them again. Dont go too far though! The idea is to get as snug a fit as possible.

Cut marks (black sharpie). You dont have to make these marks for yours, I just put them on for this how-to guide.

Marks for the next cuts youll have to make (black sharpie). Notice how these lines dont touch; you dont want to cut all the way around on the top-part. You can use the pull-tab "outline" as a guide.

Youll have to make a cut straight-down the side of the can (on the side where you would drink from)

Step 7) Carefully begin your cut down the side of the can with a razor-blade or utillity knife. Try to make as straight a cut as possible, but dont worry if it's not perfect.

Step 8 ) Carefully begin cutting around the bottom of the can, starting from your last cut down the side, with a pair of sheers or scissors. It's very importiant to leave a little bit of the rounded part of the bottom of the can when your making the cut.

Continue cutting around the bottom; notice how Im leaving a bit of the rounded part. Try not to cut above it completely or it will be much harder to shape the reflector when youre done.

Step 9) When you get about half-way around, start back where you started and go the other way.

Step 10) Meet your last cut to finish cutting-off the bottom of the can.

Bottom removed

Step 11) Carefully sheer-off a very thin amount of the bottom of the can to clean-up the cut and remove any sharp burrs.

This gives you a better idea of what I mean about leaving a bit of the rounded part of the can. This little detail makes it way easier to adjust how wide the reflector spreads-out and maintains its shape. Youll see what I mean later.

Step 12) Continue by cutting the top of the can. Do it as you did the bottom, but remember not to cut all the way around! Leave about 1/2" - 1" on the side where the tab was.

Step 13) Cut to the end of your guide line (if you drew one)

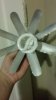
After cutting the top and bottom of the can, you can start to see its final shape

Now that we can get to them, the tabs need to be folded all the way down

Step 14) First, pull out and cut-off the original tab

Step 15) Use needlenose plyers to bend each tab all the way down

Each tab bent flat

Step 16) Use several 3/4"-1" pieces of electrical tape to insulate the opening. Go all the way around the hole. Be careful for sharp edges where you cut.

First piece of electrical tape folded down

Here you may need to use a flat-head screwdriver to tuck the electrical tape in to the lip of the can

Completed taping (inside). Make sure there is no exposed metal around the edge of the hole. This will prevent the reflector from making electrical contact.

Step 17) If you want the best reflection possible, youll want to attach some mylar to the inside of the reflector. Lay a sheet of it at least 5"x9" on the edge of a flat surface and scotch-tape it down on 4 corners to make it as tight and flat as possible. Keep it as close to the edge of your table or workbench as possible.

Step 18 ) Bend-out the sides of your new reflector to open it up and prepare it for the mylar. Now youll see why it is importiant to leave a bit of that rounded edge when you were cutting off the bottom and around the top. If you cut it off by accident, it will still work, you'll just have a harder time making it stay spread-open.

Step 19) Spray a coat of adhesive evenly on the inside of the can; make sure you get the corners and edges.

Step 20) First, MAKE SURE YOUR RAZORBLADE IS WITHIN REACH, now carefully lay the can as flat as possible on the mylar. Make sure the top of the can is as close to the edge of the table as possible. Flush (touching) is best.

Step 21) While youre still holding the can flat on the mylar, use your free hand to cut the mylar along each edge of the can with your razor blade or utillity knife. Lift the reflector off the table and use your thumb to smooth-out any bubbles in the mylar and make sure its adhered completely. Youre done!

Screw your CFL bulb into any standard socket and suspend over your plants. The reflector will rotate freely around the bulb to adjust light direction.
If you'd like a few more detail shots I left out of this post, you can check them out in my gallery here:
https://www.rollitup.org/members/upthedownstair-7216-albums-beer-can-cfl-reflectors.html
Otherwise, I hope this helps some of you shine some more light on your babies and let me know if you need any help.
Peace.
-David
hemptation420
Member
Awesome idea...i may put this to use!!!
UptheDownstair
Well-Known Member
Hey imchucky666,Very nice, but for a some guys that have holesaws, couldn't they use the holesaw in the bottom of the can and save the snipping and bending of tabs?
Thats a good idea, definitely worth a try. Seems like a hole saw might have too coarse of a tooth and want to grab the thin metal and tear it up though. Have you tried it since you posted? Oh, and I love the Stanhope quote.
And to all the others who've posted since my last post and given positive reps, THANKS!!! Been a while since Ive logged in and it's nice to come back to.
BlueDemon62
Well-Known Member
Hell yeah! So glad I found this thread, great idea.
BlueDemon62
Well-Known Member
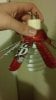
Here's my variation I whipped up real quick, pretty much the same method except instead of cutting horizontally to make a wing shape, you cut vertically to make a cone. Once I get Mylar I'm going to glue it on an cut out a circle to fit the wings, should work out great!

pubicharry
New Member
thats doope check out my thread please !
Weedburger
Well-Known Member
Thanks alot! I was thinking about reflectors and now I won't be spending money for those, just for beer 
Growingforpeace
Well-Known Member
How do you plan to get the mylar on that.Here's my variation I whipped up real quick, pretty much the same method except instead of cutting horizontally to make a wing shape, you cut vertically to make a cone. Once I get Mylar I'm going to glue it on an cut out a circle to fit the wings, should work out great!
View attachment 2720273View attachment 2720274View attachment 2720275
SlimReefer
New Member
Genius. My cabinets holding 6 cfls with no reflectors at the moment... looks like im getting a 6 pack tomorrow 