8 months, $10,000 and a whole lotta hard work=this...

ruwtz

Well-Known Member
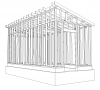
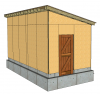
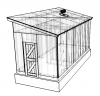
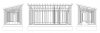
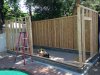
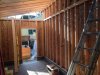
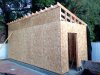
I built my own dedicated bespoke grow room in the back yard, and I have decided now is the time to share this work with RIU.

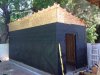
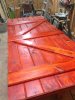
I dropped the best part of $10,000 on this new building: mostly because I wanted to future-proof the structure for other potential uses, and also because I pulled a city permit so everything is to code (ie. no cutting corners). The other reason is I am growing grade A top shelf, no filler and no cash crop, and I believe the finest product demands the finest facility. We building Ferraris here.

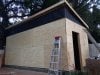
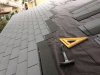
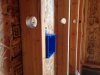
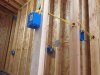
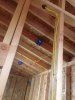
It has taken me 8 months from design through to completion, doing almost everything on my own. If you're interested in any of these steps, I'll show you how.

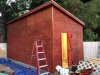
It has been incredibly hard work, I have sweated and I have bled for this, there have been some very tiny tears occasionally, and I have also thrown the towel in at least twice. But I got there and it is done now. As I complete the final phase of fitting out equipment there is HID light at the end of this tunnel, and I am about to commence my latest grow adventure.

I have ample pictures and descriptions of what I have done here and I am happy to share so long as there is interest. I will start brief to get this going. If anyone is interested in seeing more then please reply here and I will carry on.

I have just signed up here today to get involved in your community forum, as it has been incredibly helpful to me through planning my operation, and its time I added something back.

Peace all,
 
Last edited:

ruwtz

Well-Known Member
The journey began on Sketchup. I had to learn fresh how to use this software, and it really is quite brilliant (and free).

I knew what space I had to work with in my limited back yard, so everything was drafted based on real time measurements of this area. I got a bit carried away and ended up modeling a 3D render of my whole house, with accurate measurements of everything from the property lines to the height of fences. I didn't have to do this but once I start something its very difficult for me to stop, and now I have a real-time model of my place for no apparent reason.
 
Last edited by a moderator:

ruwtz

Well-Known Member
Screen Shot 2016-07-17 at 10.57.58.png Here's a few more screen grabs from the Sketchup model, showing a full texture render of the shed with the foundation extruded, a wire frame model, and a parallel projection of the stick frame.

I started by drawing a single 2x4 board and constructed everything from there.

The neat thing with Sketchup is you can work at any size very accurately: you could design the cogs of a wristwatch or a whole jumbo jet from scratch, and the software performs excellently across all scales. I used Sketchup again to design all the storage fittings and workspace I have built inside the structure so I knew exactly what I was doing before I cut a single board.


Screen Shot 2016-07-17 at 10.56.19.pngScreen Shot 2016-07-17 at 10.56.35.pngScreen Shot 2016-07-17 at 10.57.58.png
 
Last edited:

ruwtz

Well-Known Member
From these models I was able to put together blueprints for the city to review for permitting. I drew up these blueprints using a Sketchup add-on called Layout (free in trial period), which pulls all the scale plans from the original 3D model and drafts cohesive and legible blueprints that are absolutely essential for any building project.

I could say a lot more about all the cool features in Sketchup, so feel free to ask if you have any questions. It really is an amazing tool to have if you can tolerate the learning curve.

_blueprints.jpg

I could also say a heck lot more about the city permit process, as that was painful. Bottom line where I live: they are not remotely interested in helping home builders as far as planning is concerned. I met with the city no less than a dozen times, each occasion presenting a revised draft, and each time they would send me home with a single petty correction and no more. This dragged on and on for well over a month. It did not need to be this way for what is effectively a shed, but I got there in the end so f**k those guys.

I had a much better experience with the inspector when he would come out to look at each phase; he always had advice and pointers for doing something better every time. A proper construction guy. Props to the inspector.
 
Last edited:

ruwtz

Well-Known Member
_stick frame.jpg

Here's some parallel projections of the end, the side the front section of the stick frame. The walls are traditional 2x4 stud framing and the roof is 2x6 with a 12degree pitch, all 16" on-center. The building is bolted to a concrete foundation with continuous 24" footings. The building is solid and provides 210sq ft of floor space with 10ft high ceilings.
 
Last edited:

ruwtz

Well-Known Member
IMG_0082.jpg

It all started with cutting through the existing concrete deck, trenching out for the new footings, and forming for the 8" concrete stem wall that the walls would sit on. These were easily some of the worst jobs of the whole project: cutting and jack-hammering concrete is back breaking and messy, and I hit a water pipe when trenching and flooded the yard until I could stem the flow (it took days). Setting forms for the concrete took me weeks as the grade wasn't level and it all had to be sufficiently staked to avoid blow-outs when pouring. Plus i'm just a DIY-er, not a construction pro, so figuring things out and learning, adjusting and fixing takes time.

I called in a truck to pump 6 yards of concrete into this new foundation, before screeding off and pushing in the bolts that would hold the walls.

Throwing up 2x4 walls is real quick and pretty basic stuff: I had it framed in a day. I learned almost everything about this from a carpenter dude called Larry Haun - check out his vids on YouTube where he frames a whole house. Mad skills by a super cool guy. Shame he's dead now.
 
Last edited:

ruwtz

Well-Known Member
Oh and the far wall was just 6" from the property line fence, which meant no space in which to work. That wall had to be framed, sheathed, sided and stained all before it could be lifted into place and bolted down. I've never seen that wall since, but I hear my neighbors really enjoy their view of it 8)
 
Last edited:

ruwtz

Well-Known Member
Studs cored for electrical runs and work boxes mounted.

IMG_1327.jpg

Quantity and location of all outlets was carefully planned based on chosen grow room specs. Each of the two rooms ran a dedicated 120v 20amp circuit for a series of regular outlets, and also a dedicated 240v circuit for lighting, with outlets mounted on the ceilings where I wanted them.

IMG_1360.jpg

12gauge Romex runs between the boxes and I left myself markings on the wall so I would remember in which order the circuit was to run. With this many outlets it can start to get confusing for a newb.

IMG_1356.jpg
 
Last edited:

ttystikk

Well-Known Member
Custom built door, stained and lacquered. At this stage the building doubled as a great workshop, and I was so dialed in with all these new construction skills I kept finding, I mostly forgot why I was building it all for.

View attachment 3734995
It's a great hobby, isn't it? And you haven't even dipped a seed yet? You know it's gonna be a minute for those little ones to grow, so I'm wondering where the head start room is?
 

ruwtz

Well-Known Member
A double pole 80amp breaker from the main board feeds this sub panel in the structure, neatly recessed between studs by the front door. I worked hard to keep all wiring neat and tidy and circuits labelled correctly.

The breakers feed x2 120v outlet circuits, x2 240v lighting circuits, and a dedicated 240v circuit for AC.

I would NOT recommend anyone randomly start working on electrical wiring in this way, but that being said I did have to learn from scratch myself and I was painstakingly thorough in my research. For me it wasn't enough to know what goes where, I had to understand why in order to fully grasp the concept, and crucially the danger posed by electrical systems. I did not touch a thing or buy a single switch until I understood this to the best of my ability. I repeat: DO NOT FUCK AROUND WITH ELECTRICITY.

IMG_1365.jpg
 
Last edited:
Top