12/12 From Seed Experiment - 21 Strains

Hot Diggity Sog

Well-Known Member
Octagon Update

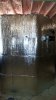
Nearly finished with the Reflectix. Having never used this stuff before I just can't say enough good things about it. I remember fumbling with Mylar back in the day and that shit sucks compared to this. It is so easy to work with. Takes staples like a champ and appears to be completely light proof (but I'll confirm tonight). Setup is going great. After getting a 600 bulb powered up I have to say I'm really pleased with how much light it *appears* to be giving out. I'm considering adding a bunch more rows now. The next steps are to tape all of the overlapped reflectix seams with foil tape. Secure the access panel with velcro. Get going on the electrical. I'm going to wire the octagon so it is completely self-sufficient and can be powered in one of 2 ways: Directly to a circuit via exposed 14-2 wire as well as by plugging an extension code right into the octagon. More pics on this in the coming days.

20150411_102717.jpg 20150411_102115.jpg 20150411_102047.jpg 20150411_101445.jpg
 

Hot Diggity Sog

Well-Known Member
Chapter 2 Update
Day 71
Flowering Day 28


Well...what can I say. Very slow progress. Not really sure what to make of it. Cold temps are finally breaking where I live and we are in store for some warmer weather which should ultimately translate into warmer tent conditions. Been running 66F lights on and 55F lights off. Just today I'm starting to notice some acceleration in flower development so I'm hopeful they will kick it into high gear.

Closeup.jpg DSC_0001.JPG DSC_0002.JPG DSC_0003.JPG
 

Hot Diggity Sog

Well-Known Member
Chapter 2 Update
Day 74
Flowering Day 31


HPS is back in and I'll probably keep it in for the extra lumens and heat that it offers. Everything is way behind schedule but if you ignore that, things are going great. They started flowering about 10 days later than my 1st experiment and being day 31 they look like day 21. If it just ends up taking longer but the results are the same then I'm ok with that.

Continuing to pluck fan leaves that are shading plants underneath. Probably plucked around 500 so far.

Closeup.jpg DSC_0001_00001.jpg DSC_0002_00002.jpg DSC_0003_00003.jpg DSC_0004_00004.jpg
 

Hot Diggity Sog

Well-Known Member
Octagon Update

Building a new octagon. The one I built was just too big. Using my Lux meter I determined that each side was simply too far away. The inner length of the current octagon is 90 inches with each of the 8 sides being 37 inches. With the bulb in the middle of the room we have a 44/45 inch distance to each wall and that was only receiving 8500 Lux at the height of the bulb. This number dropped sharply as we measure above and below the bulb.

Using a 600 watt metal halide, I then took various Lux readings at 20" away from the bulb.
1) Directly across from the bulb: 25,000 Lux
2) 8 inches up: 17,500 Lux
3) 20 inches down: 17,500 Lux.

So I've determined (guessed) that I should reduce my octagon width from 90 inches down to 60 inches. This still might be a tad too big but I'm working with incomplete information such as how much lean the plants will have. I've also concluded that the distance between the lowest plant and the highest plant should not exceed 28 inches as the Lux dramatically drops as we move higher and lower from the before mentioned measurements.

Wanting 24 inches from the floor to the bottom most plant and 36 inches from the ceiling to the top most plant I end up with 88 inches in total height which is great. 88 inch 2 x 4's are on the way today.

The other major change worth mentioning is that I have decided against using the entire octagon for the drain pipe design and will instead, use each side of the octagon to test a different technique. I will leave one side open as my way to get in and out easily. More updates as it gets built.
 

Hot Diggity Sog

Well-Known Member
Another Octagon Update

I ran these same light tests with an HPS bulb and while I knew the numbers would be better, I did not realize just how much better.

@45" distance directly across the center of the bulb:
MH - 8500 Lux
HPS - 16,000 Lux

@20" distance directly across the center of the bulb:
MH: 25,000 Lux
HPS: 45,000 Lux

@20" distance and 8 inches up:
MH: 17,500 Lux
HPS: 35,000 Lux

@20" distance and 20 inches down:
MH: 17,500 Lux
HPS: 35,000 Lux

These figures shocked me. Even though the current octagon is too big it's not as much as I originally thought. So now I have a decision to make. Go through the hassle of building another one or just roll with the one that is already constructed.
 

Hot Diggity Sog

Well-Known Member
Quick Octagon Update

I have decided to use this octagon and not build another one. I finished the 1st side and it's working great! For being level and not having a slope, even small amounts of water flow all the way through. No leaks. I'm liking this one enough I might do one more and have this idea represented on two sides. Pay no attention to the support straps covering sites. This easily slides to the left and to the right so I'll make it work. Water will come in via the top left and exit the bottom left. The other exposed pipe will be capped but not glued. The lower pipe where the water will return to the reservoir will get extended outside of the octagon.

20150415_192439.jpg
 

Sativied

Well-Known Member
That looks great, that elbow and T piece combination seems to work out quite nicely with the distance between the rows.

I was wondering though, to make it less wide, wouldn't it be easiest to merely extend the frame inwards? The reflective wall will still be at the original outer diameter but the tubes don't have to be. Either way, you can probably still learn a few other things from this one which you can then apply to improvements in the next build. Possibly bend a cheap reflector hood open to grow on only half or even more of the octagon, like a half pipe on its side.
 

Hot Diggity Sog

Well-Known Member
That looks great, that elbow and T piece combination seems to work out quite nicely with the distance between the rows.

I was wondering though, to make it less wide, wouldn't it be easiest to merely extend the frame inwards? The reflective wall will still be at the original outer diameter but the tubes don't have to be. Either way, you can probably still learn a few other things from this one which you can then apply to improvements in the next build. Possibly bend a cheap reflector hood open to grow on only half or even more of the octagon, like a half pipe on its side.
Thanks! The distance between pipes turned out good. Using 2 90 degree elbows caused them to be further apart. I have the holes spaced 5 inches apart instead of 4.

Youre totally right about extending the framing to bring everything closer. And i may very well only use 4 sides which would certainly call for a reflector like you mentioned. For this run im mainly looking for more data and wont be too concerned with yield. Ultimately what i need is a reproducable strategy that is relatively easy and does not require lots of maintanence and man hours.
 

Hot Diggity Sog

Well-Known Member
Chapter 2 Update
Day 76
Flowering Day 33


Happy to see the girls growth rate accelerating. Some of them are starting to create good trich's. Over the last couple of weeks I've removed a few plants here and there if they were hopelessly too far beneath the canopy. I'm going to guess I've removed 12 and then we had 12 die from the carbon filter fiasco so a ball park figure is 144 girls in here.

I'm very happy with the top cola development and I expect them to end up about what I'm hoping.
Way too early to talk numbers but:

@10 Grams each
1440 Grams
3.17 Pounds
2.4 Grams per watt.

@7 Grams each
1008 Grams
2.22 Pounds
1.68 Grams per watt.

DSC_0001_00001.jpg DSC_0002_00002.jpg DSC_0003_00003.jpg DSC_0004_00004.jpg DSC_0005_00005.jpg
 

Sativied

Well-Known Member
The PVC maintains a negligible amount of water...maybe a 1/2 gallon if even that.
Hey, that's why Heath and I used an end cap with an offset drain hole, to function as a dam, which results in a deeper layer of water, hence the term flooded tubes. I'm sure NFT will work too but since you also don't have sprayers I'm not sure how well initially. Will you have a separate setup for seedlings?

Why do Americans use the measurement grams per watt and not an imperial measurement like you do for everything else?
Supposedly, according to one source, that (gpw) is because of Jorge Cervantes traveling the world and visiting growers making comparisons.
 

Hot Diggity Sog

Well-Known Member
Hey, that's why Heath and I used an end cap with an offset drain hole, to function as a dam, which results in a deeper layer of water, hence the term flooded tubes. I'm sure NFT will work too but since you also don't have sprayers I'm not sure how well initially. Will you have a separate setup for seedlings?

Supposedly, according to one source, that (gpw) is because of Jorge Cervantes traveling the world and visiting growers making comparisons.
You worked with Heath personally? If so, very cool man.

I looked at the dam approach and it was a lot of work especially for a 1st time for me so I opted against it. I'm considering increasing the size of my pump and see what happens. For seedlings, what I was thinking was start them in 1.5 inch rockwool inside the 2 inch baskets. Rig up a little temporary DWC tray to get some tap root into water.

We'll see...I'm working on my 2nd design right now. Waiting on parts online and then I'll showcase.
 

Sativied

Well-Known Member
You worked with Heath personally? If so, very cool man.
No, we just used the same pvc piece to create that dam. My tube setup was more inspired by @Earl 's spaceshuttle, but I decided to flood instead. Someone asked later at riu what I used to create that dam and turn out to be an item Heath used in the same way.

Rig up a little temporary DWC tray to get some tap root into water
Yeah that's what I was thinking too. However, it's also why I decided to consider flooding initially. The plants don't have to adapt going from DWC to flooded tubes while they didn't like the shallow layer pre-flooding. NFT can work create but in a cylinder/tube (opposed to something flat) the layer is not only shallow but also narrow. Increasing the flow will raise it but only to an extend, it will also flow through faster. Perhaps worst case scenario is that you may have to top water for a few days.
 
Last edited:
Top