DiY LED - Cree CXA3070

SupraSPL

Well-Known Member
Wow very nice looking heatsinks! I would be somewhat cautious though, although copper does move heat faster/easier than aluminum, it does not shed it to the air any better. Even thought those sinks have a lot of surface area, without air movement it does little good to cool the COB. In order for passive cooling to work well, the surface area of the sink need to be exposed, wide areas between fins. So in practice, I expect this $10 unit will do a much better job keeping your Tj as low as possible and I would warn you guys away from the copper fanless sinks which will also save you a bunch of $. If you already invested in the copper sinks, I highly recommend to add a small fan.

http://www.newegg.com/Product/Product.aspx?Item=N82E16835186070&nm_mc=KNC-GoogleAdwords-PC&cm_mmc=KNC-GoogleAdwords-PC-_-pla-_-CPU Fans & Heatsinks-_-N82E16835186070&gclid=CLLU_6Pr0cECFfLm7AodwCoAUA
 
Like Kuifje said already I run one 3000k 3070 @1050mA per square foot and think that 1.4a might be overkill, also you can probably get away with 700mA for veg. So IMO six LPC-60-1050 and two LPC-35-700 would be perfect for that space. You can see pics of my setup in my thread here.
I like that idea to step down to the 1050mA, thank you. I would really like dimable but just can't justify the additional driver expense, maybe upgrade when I only need to purchase a few at a time rather than 8. 1 last question before I pull the trigger on the driver purchase, the datasheet for the LPC-60-1050 shows a 9-48 V range, I thought with the 3070 I had to choose a driver with a max 42 V?
 

stardustsailor

Well-Known Member
Nice work Cap looks like it will be a damn fine yield!

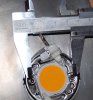
EF, sorry to hear that I steered you in the wrong direction for your build (I use the method of, sanding heatsink to 1000 grit US, using high performance thermal grease, pressing hard for 30 sec to create vacuum and thin even layer, add kapton tape to stop lateral movement.) I have installed and retired many hundreds of 20mm stars and COBs. If I had drilled them all to mount them, I'd still be working on it or I would have never got the projects done. Also, my heatsink surface would be drilled with thousands of holes but they currently have none which I appreciate. I have changed my 20mm setup 2 or 3 times and have already changed my COB setup 2 or 3 times and added 20mm to them. So in my case drilling and mounting them all would have been a nightmare. Flattening the heatsink surfaces however, was a job that only had to be done one time and continues to serve its purpose, so I believe it is a more worthwhile investment of time although not completely necessary to grow good bud.

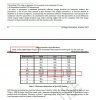
The SOLERIQ test has nothing to do with comparing vacuum method vs COB holders, it has to do with screwing the COB directly VS screwing the COB holder. (That said, I am very skeptical that COB holders provide superior cooling over the vacuum method.) I am not defending the "screw down the COB directly" method and the article itself states: "screwing with too high torque can cause the CoB to bend which can have an adverse effect on the thermal interface." However there are problems with this demonstration I would like to point out.

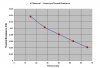
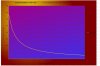
The thermography scan cited did not contain enough information to determine anything conclusive. They failed to show the thermal scale and we have no idea how much power they are pumping through the COB. The more heat you run through it, the more the thermal interface comes into play. We have no idea how long they let the test run, did they allow enough time for thermal stabilization? Did the thermograph automatically adjust its thermal scale in each experiment or were they done side by side or with a fixed scale? Also, I would never advocate the use of a thermal pad regardless of mounting method and the test showed poor performance no matter which way it was screwed down with a thermal pad so I ignore A and C. And finally, we have no idea how they prepared the heatsink surface or what the surface is made of (could be plastic). It seems they used a relatively poor performing thermal grease (~6K/W, only half of the PK3 we use).

In summary, I would put my recommended mounting method up against any of these with full confidence that it would be the best thermal performer and would hold up with time. The only downside, it is not pretty, but it was not meant to be. Also, my method should not be used with stars smaller than 16mm because the vacuum pressure is not high enough to be reliable. I have sold lamps using the vacuum method to folks that trusted me and I want to reassure them. Again, this test has nothing to do with my argument, but I call BS that D would outperform B to any significant extent in practice. I accuse the experiment of being poorly designed or intentionally skewed but I am open to being proven wrong :leaf:
View attachment 3282851

Allow me brother ,to be Devil's advocate ...
(He 's a really ' good' client,afterall... )


1)

In case that the heatsink is going to be used only with COBs/arrays of the category " LES 23 "
(The "heavy-class" ,at the moment .
Then the holes drilled will fit all holders available .
3mm M3 screw,35 mm distance from hole center to hole center .
(Class D holders or OCA D )

From Zhaga Book #3
zgbk33.JPG


zgbk31.JPG

ggbk32.JPG


PA291761.JPG


2) I wish I could question german technology ,system,certification and skills.
But I can't.
contact preesure heatconductance.JPG


http://www.google.gr/url?sa=t&rct=j&q=&esrc=s&source=web&cd=2&ved=0CDIQFjAB&url=http://www.researchgate.net/publication/230555631_Effect_of_pressure_on_heat_transfer_coefficient_at_the_metalmold_interface_of_A356_aluminum_alloy_/links/0912f501639bea08b6000000&ei=ujRRVL2eHMXnygPY_YKAAg&usg=AFQjCNGmbOGsC1RR490-piAa0sx0XScVjA&bvm=bv.78597519,d.bGQ

------------------------------------------------------------

Contact pressure

The contact pressure is the factor of most influence on contact conductance. As contact pressure grows, contact conductance grows (And consequentially, contact resistance becomes smaller). This is attributed to the fact that the contact surface between the bodies grows as the contact pressure grows.

Since the contact pressure is the most important factor, most studies, correlations and mathematical models for measurement of contact conductance are done as a function of this factor.

The thermal contact resistance of certain sandwich kinds of materials that are manufactured by rolling under high temperatures may sometimes be ignored because the decrease in thermal conductivity between them is negligible.

http://en.wikipedia.org/wiki/Thermal_contact_conductance
________________________________________________________________________________

You do not create a vacuum ,by pressing for 30".
It's the viscosity of the TIM that holds the array in place.
As it cures ( ~200 hours for AS5 ) ,it acts as "gummy-glue" .
But no "contact pressure" is applied ,by TIM whatsoever ...


Cheers.
:peace:


epicfail

Well-Known Member
The 48v is the only option in the lpc-60-1050 and the CXA will run around 36-37v at that current, which is about 88% max load. The further away from the 48v max, the less efficient the driver becomes. Since there is no efficiency chart in the LPC spec sheet I couldn't tell you how far below the already low 87% it will drop to. On the other side dropping the current from 1.4A to 1.05A will increase the CXA's performance by about 3%, so I imagine that will pretty much even things out.

If you wanted you could add a few stars to the CXA stings to bring you closer to the 42 volts but it will not be needed IMO.
 
Thank you, I think I'm starting to understand the drivers a bit better, maybe I was making it more complicated than it really is. Basically the cob will draw x amount of voltage at a chosen current and I just need to make sure the driver handles that voltage at the current I choose to run and the closer I get the cob or array voltage to the driver voltage the higher the efficiency. What is PFC protection, it isn't available in the cheaper Meanwell drivers, is it needed?
 

epicfail

Well-Known Member
I don't know how to explain it that well, this is a excerpt from http://forums.anandtech.com/showthread.php?t=157631

What is "power factor"?

Power factor, or ?PF? for short, is the ratio of the real power to the apparent power.

Real power is the capacity of the circuit for performing work in a particular time and is measured in Watts.

Apparent power is the product of the voltage and current (V x A) of the circuit and is measured in volt-amperage (or ?VA?.)

I know that it almost sounds as if Watts and VA are the same thing, and in DC they are (240W DC is equal to 240VA DC, for example) but because energy stored in the load of a device using alternating current (AC) is returned to the source, or due to a non-linear load that distorts the wave shape of the current drawn from the source, the apparent power can actually be greater than the real power. This would give you a power factor of less than 1. Power factor below .70 is generally considered poor power factor.
Its not a big deal for just a few drivers but the more you have the worse it becomes costing you more in electricity. Really though for the individual its not a big deal, its more for commercial buildings.
 

nogod_

Well-Known Member
Don't stress too much about getting close to the driver's max voltage especially with meanwells as most hit max efficiency around 70% load some as low as 50%. Check the ds for the family of drivers youre considering.

You are going to choose current first. Supra has probably posted a spreadsheet somewhere on riu that shows the efficiency of your chosen cob at different currents and the corresponding voltage when you run it at that current. Its a rabbithole my friend. I have half a notebook filled with different cob/driver/heatsink/fan combos and the total BOM for each build.

If you want to go meanwell and dimmable your best bet is to run the cxa3070s on a more powerful driver in series. It ends up not being that much more expensive as you are only purchasing a couple of drivers instead of one for every cob.

For instance:
if you decided on 1050ma you can run 4x cxa3070s on each of 2x meanwell hlg-185h-c drivers and still be around 93% efficient even though youre only at 77% load. Those drivers are something like $75-80 shipped so ~$20/cob for something pfc and dimmable.

Thank you, I think I'm starting to understand the drivers a bit better, maybe I was making it more complicated than it really is. Basically the cob will draw x amount of voltage at a chosen current and I just need to make sure the driver handles that voltage at the current I choose to run and the closer I get the cob or array voltage to the driver voltage the higher the efficiency. What is PFC protection, it isn't available in the cheaper Meanwell drivers, is it needed?
 

bushrider

Member
Don't stress too much about getting close to the driver's max voltage especially with meanwells as most hit max efficiency around 70% load some as low as 50%. Check the ds for the family of drivers youre considering.

You are going to choose current first. Supra has probably posted a spreadsheet somewhere on riu that shows the efficiency of your chosen cob at different currents and the corresponding voltage when you run it at that current. Its a rabbithole my friend. I have half a notebook filled with different cob/driver/heatsink/fan combos and the total BOM for each build.

If you want to go meanwell and dimmable your best bet is to run the cxa3070s on a more powerful driver in series. It ends up not being that much more expensive as you are only purchasing a couple of drivers instead of one for every cob.

For instance:
if you decided on 1050ma you can run 4x cxa3070s on each of 2x meanwell hlg-185h-c drivers and still be around 93% efficient even though youre only at 77% load. Those drivers are something like $75-80 shipped so ~$20/cob for something pfc and dimmable.
I agree completely except I think the hlg-120h-c 1050 is a better match for 4x COBs.
Its true that the efficiency stays above ~92% until you drop below about 70% load. However if you plan to run the light dimmed down then you will be running well below 70% load with the hlg-185h-c. I'm running the 4x 3070 with the hlg-120h-c 1050, my series voltage is 143V (drivers max is 148V).
 

SupraSPL

Well-Known Member
SDS, the point of pressing hard for 30 seconds is to squeeze out air bubbles and get a thin even layer of thermal paste. The COB cannot release because of vacuum pressure, just like a suction cup and it is incredibly strong. The only way to get the COB off the heatsink is to twist or slide it sideways and break the vacuum.

Contact pressure for thermale transfer is much more important if you are dealing with a poorly prepared surface. When the surface is a smooth as a CXA and the heatsink has been flattened to 1000 grit US, large contact pressure is not going to make as much as a difference as a rough surface would. Also, I am advocating a high performance thermal paste 11-12 K/W which will also reduce the effectiveness of increasing contact pressure.

SDS I do appreciate you thoughts on this and I do have a CXA3070 COB holder on hand that I can do some further testing with. I will try to determine how much difference (if any) it really makes to the Tj.
 
Last edited:

SupraSPL

Well-Known Member
Regarding the efficiency of the HLG drivers, the most important factor is the voltage of the string. So even if you reduce the load very significantly by dimming, it maintains a high efficiency because the voltage is still relatively high. Here are some of my test results from the HLG-185H-C1050A:

5 CXA3070s + 3 XML2
At full output 1155mA, 190.1Vf, 93.6% efficient
Same string, dimmed to 525mA, 177Vf, 93%

4 CXA3070s
At full output 1155mA 144Vf, 92.8%
dimmed to 706mA, 137Vf, 92.3%
dimmed to 479mA, 133Vf, 91.3%

3 CXA3070s
1155mA, 108.5Vf, 90.9%
480mA, 100.5Vf, 88.5%
 

Positivity

Well-Known Member
Regarding the efficiency of the HLG drivers, the most important factor is the voltage of the string. So even if you reduce the load very significantly by dimming, it maintains a high efficiency because the voltage is still relatively high. Here are some of my test results from the HLG-185H-C1050A:

5 CXA3070s + 3 XML2
At full output 1155mA, 190.1Vf, 93.6% efficient
Same string, dimmed to 525mA, 177Vf, 93%

4 CXA3070s
At full output 1155mA 144Vf, 92.8%
dimmed to 706mA, 137Vf, 92.3%
dimmed to 479mA, 133Vf, 91.3%

3 CXA3070s
1155mA, 108.5Vf, 90.9%
480mA, 100.5Vf, 88.5%

Supra...if you don't mind me asking. I've always wondered about this.

Drivers usually have a max voltage rating and a max wattage rating.

I've been staying close to the max wattage of 200w even though my driver has enough voltage to run another 3070. It does run warmer at 200w then say 180w. I worry that running 210w + would shorten the driver lifespan.

So I wonder if going over the wattage rating is a good idea. I almost plugged in another Cxa recently but decided to wait until next time

image.jpg


Edit....I wonder if as long as it doesn't go into limp mode, and your in the voltage range, it's okay. It would be nice to get two more cxas on these drivers I got
 
Last edited:

SupraSPL

Well-Known Member
Hey POS, I see what you are getting at and it would be nice to get another pair of CXAs running (more bud!). I would say go for it and if you feel you want to reduce the load, just dim it a bit until you get down to 200W (I assume yours is dimmable like the HLG?)

On the other hand I do not think there would be any problem running them full out. I have been abusing cheapo chinese drivers for many years with very few problems. I have seen a few drivers pop but I believe they were just duds because they were not being run above spec. I do believe the Mean Well and Inventronics use superior components than most cheapos, but despite that I still avoid the LPC-60-1400 because of its relatively low efficiency (85%) vs the cheapos that can get up to 91%. Anyway, I expect that they can take the full 220W with no worries :)
 
Last edited:

midsummer

Well-Known Member
Supra I want to thank you for having such an excellent discussion and such thoughtful responses to this thread. Your (and others) simplification of the process has made it so that I am on the verge of building a COB fixture. I still have heatsink, driver and other considerations; but I do have some CXA's in the house :) Thanks many time over!! This has been fun!!
I believe I could finish one at this time with what I have been shown; but I like the potential of dimming. If you will pardon me, I would like to ask if anyone has seen a simple DIY explanation of how to hook up dimming (I assume with potentiometer) with a driver like the HLG series?
Many thanks
 

guod

Well-Known Member
I would like to ask if anyone has seen a simple DIY explanation of how to hook up dimming (I assume with potentiometer) with a driver like the HLG series?
Many thanks
https://www.rollitup.org/t/what-drivers-i-need-for-2-vero-29.829566/page-2


SDS, the point of pressing hard for 30 seconds is to squeeze out air bubbles and get a thin even layer of thermal paste. The COB cannot release because of vacuum pressure, just like a suction cup and it is incredibly strong. The only way to get the COB off the heatsink is to twist or slide it sideways and break the vacuum.
heat transfer in vakuum...from wiki

"Heat transfer through a volume(thermal paste) occurs by three modes: convection, conduction and radiation. Creating a vacuum practically eliminates convection, since this relies on the presence of gas molecules able to transfer heat energy by bulk movement through the insulator. It also greatly reduces conduction, as there are far fewer collisions between adjacent gas molecules (or between gas molecules and atoms of the core material)."

Adhesion is what happend here.

and believe me or not, you need a constant pressure, just fixing is not enough for a long run.


SupraSPL

Well-Known Member
:) I am not suggesting that there is an air vacuum under the COB. That has nothing to do with what we are talking about. I am talking about vacuum pressure. The COB cannot lift from the surface because of vacuum pressure, just like a suction cup.

So that leaves the question, how much better will the heat leave the COB if we apply a slight pressure. I suspect, not much at all if any. Obviously we do not need to because I have been doing this for years and we got 1.4gr/W even with sloppy canopy management and no selection for yield. BUT I am always open to the possibility for improvement and I will investigate what happens when I apply more contact pressure. If there is a .1 degree improvement in a 50 Watt COB, there is not much to discuss. But if there is at least 1 degree improvement I will admit that COB holders may cool better than my method.

I can see a very quick, easy way to test this. Run a COB until it thermally stabilizes and monitor the Vf. Then press on the COB with a non thermally conductive tool to increase contact pressure and see if the Vf changes. When I press on the COB, if it gets cooler the Vf should increase.
 
Last edited:

SupraSPL

Well-Known Member
I tried the experiment 4 or 5 times and have been unable to get a response, even when I press very hard and holding pressure for about 30 seconds. Every .1 change in Vf should represent about 1 degree Celsius in the Junction temp, so if there is any significant advantage to contact pressure it seems to be less than 1 degree on a 50 Watt COB (CXA3070 3000K Z2 on Arctic 64 CPU cooler at 1.45A).

DSC07637a.jpg

I am not against COB holders, just want to make sure we know exactly what advantages they can offer us and that SOLERIQ thermograph is intentionally misrepresenting the situation.
 
Last edited:

guod

Well-Known Member

Heatsink Mounting Pressure vs Performance
pastepressure.jpg


"Good mounting method.
For good thermal transfer, the pressure between heatsink and heatsource must be high.
Heatsink clips must be designed to provide a strong pressure, while
still being reasonably easy to install.
Heatsink mountings with screws/springs are often better than regular clips. Thermoconductive glue or sticky tape should only be used in
situations where mounting with clips or screws isn't possible. "


http://ocw.nthu.edu.tw/ocw/upload/77/news/The%20Heat%20Sink%20Guide%E2%80%94Information%20about%20Heatsinks.pdf


"11 - Minimising Thermal Resistance
The key to mounting is pressure
- it must be just right. Too much, and you distort the device case and possibly damage the thread or cause protrusions in the soft aluminium heatsink. Too little, and the thermal resistance will be too high. High reliability applications (Mil-Spec) will demand that a torque driver is used, to ensure that every device is tightened to exactly the right pressure. I don't suggest for an instant that this is needed in your project (torque drivers tend to be rather expensive), but it is essential that you develop a feel for tightening the screws to get consistent and reliable results."

http://sound.westhost.com/heatsinks.htm#s11

from 1995
"Required Heat-Sink Thermal Resistance
The interface resistance Rcs depends on the surface finish, flatness, applied mounting pressure, contact area and, of course, the type interface material and its thickness. Precise value of this resistance,even for a give type of material and thickness, is difficult to obtain, since it may vary widely with the mounting pressure and other case dependent parameters."


http://www.electronics-cooling.com/1995/06/how-to-select-a-heat-sink/
 

stardustsailor

Well-Known Member
Heatsink Mounting Pressure vs Performance
View attachment 3283843


"Good mounting method.
For good thermal transfer, the pressure between heatsink and heatsource must be high.
Heatsink clips must be designed to provide a strong pressure, while
still being reasonably easy to install.
Heatsink mountings with screws/springs are often better than regular clips. Thermoconductive glue or sticky tape should only be used in
situations where mounting with clips or screws isn't possible. "

http://ocw.nthu.edu.tw/ocw/upload/77/news/The%20Heat%20Sink%20Guide%E2%80%94Information%20about%20Heatsinks.pdf

"11 - Minimising Thermal Resistance
The key to mounting is pressure - it must be just right. Too much, and you distort the device case and possibly damage the thread or cause protrusions in the soft aluminium heatsink. Too little, and the thermal resistance will be too high. High reliability applications (Mil-Spec) will demand that a torque driver is used, to ensure that every device is tightened to exactly the right pressure. I don't suggest for an instant that this is needed in your project (torque drivers tend to be rather expensive), but it is essential that you develop a feel for tightening the screws to get consistent and reliable results."

http://sound.westhost.com/heatsinks.htm#s11

from 1995
"Required Heat-Sink Thermal Resistance
The interface resistance Rcs depends on the surface finish, flatness, applied mounting pressure, contact area and, of course, the type interface material and its thickness. Precise value of this resistance,even for a give type of material and thickness, is difficult to obtain, since it may vary widely with the mounting pressure and other case dependent parameters."


http://www.electronics-cooling.com/1995/06/how-to-select-a-heat-sink/
Variable: contact pressure

From ~15 psi to ~ 75 psi ,the thermal resistance decreases from 0.014 to alomost 0.004 ...
( / 3.5 decrease )

Variable: Thermal Interface Material Thermal conductivity
tim.JPG

From 5 W/m.K tp 12 W/m.K ,thermal resistance decreases from ~ 0.014 to 0.006
( / 2.333 decrease )


The large price-cost difference amongst different TIM brands and thermal conductivity each TIM scores ,
has less importance than contact pressure .

A COB with a cheap TIM of 5 W/m.K and holder ,will be conducting heat(cooled)far better ,
than the same exact COB having an expensive TIM of 12 W/m.K but no holder .


Cheers.
:peace:
 

epicfail

Well-Known Member
....... I still avoid the LPC-60-1400 because of its relatively low efficiency (85%) vs the cheapos that can get up to 91%.......
Link to cheapo driver please? if you're talking about the perfectdeal_us (JLX-LED) ones, they have been sold out for a while now and only available if you buy it with the a crappy COB which makes the drivers not so cheap anymore plus there is a 15$ import free to canada. Is there a different one I missed the link to somewhere?

http://www.ebay.com/itm/50W-White-High-Power-LED-Light-Lamp-Panel-w-50W-High-Power-LED-Driver-AC90-265V-/310948864822?pt=LH_DefaultDomain_0&hash=item4865ff2336


Ultimately thats why I chose HLG and HLN series over the LPC drivers, they are dimmable, PF corrected and more efficient. The problem is they are expensive and I am looking for some cheapos for my pepper cabinet and to play around with.

I see these are common on ebay with a few sellers having them available. They ship direct from china so shipping is free and there is no import taxes.

link link link link

Has anyone tested these?

Funny how I can get stuff from imported and shipped from china with no fees but if it comes from my neighbours to the south I feel like I have been violated by the time everything is paid for, I won't get into that though.
 
Top