Yet another DIY panel!

patrikantonius

Active Member
Hi guys. You may have noticed that I did a lot of research on LEDs in the past few weeks. Thanks to you guys, they have been very rewarding and I think I can finally build my own light.
I wanted something for a small space (0.25-0.4 m²), short, ideally for a SCROG. Obviously with the best performance per watt while keeping a reasonable price.

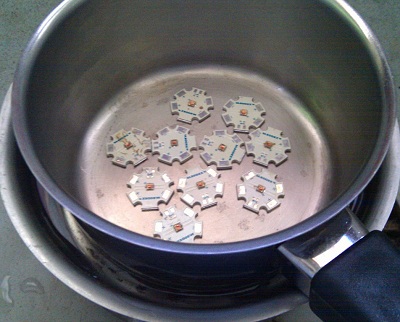
Here are the "ingredients"

46LEDs
24Osram Oslon SSL deep red (660nm), 80°
10Osram Oslon SSL red (625nm), 80°
8Osram Oslon SSL deep blue (450nm), 80°
4Osram Oslon Square neutral white (4000k), 120°
2Drivers
36-75v/0.68A (50W max)
2Heatsinks
140*300*20(mm), 0.32m² surface each

The LEDs come from radiospares, heatsinks and drivers from China on ebay, PCBs from a local reseller. Total around €170 inc tax & shipping.

Total power (theoretical): 84.8W
34*2.45*0.680 = 56.6W (reds)
12*3.45*0.680 = 28.2W (whites/blues)

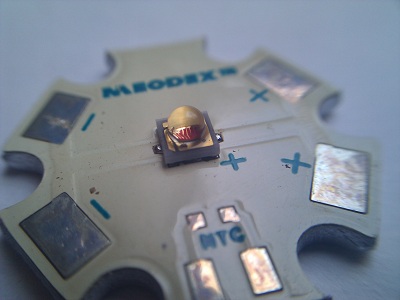
Why all Osrams? Its a purely personal choice. I had the opportunity to take all those LEDs from the same supplier so it was more convenient. I'd have got XP-E reds (in 625nm) and XP-G2 whites, along with the Osrams 660s if I was really seeking the best of the best.

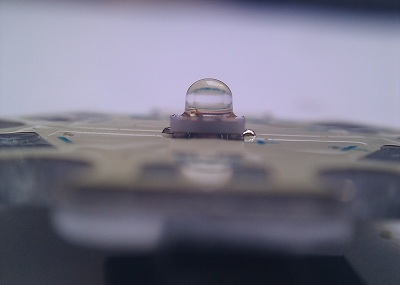
LEDs will be mounted on star MCPCBs and glued to the heatsinks with thermal compound & epoxy. I will certainly use 120mm fans at max power but I'm not decided yet. In the beginning, I will wire both panels in parallel to one driver; passive cooling will be okay I guess.

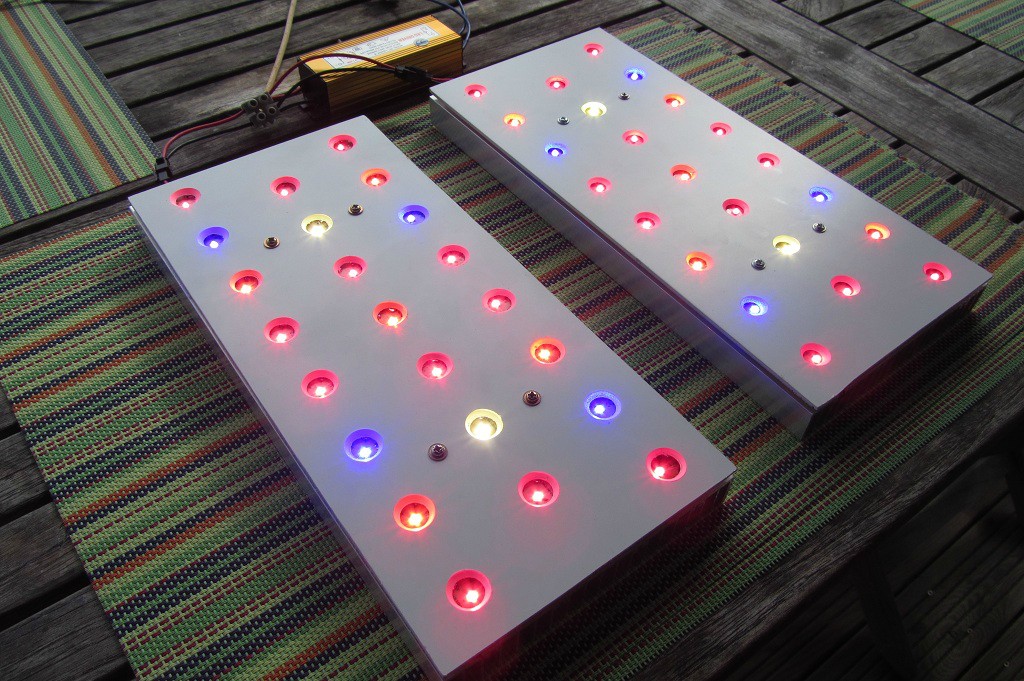
One panel (of the two)
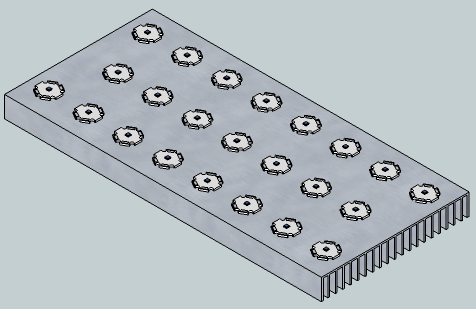

LEDs location


I have already received most parts, I'm still waiting for the PCBs to arrive but it should only take a couple of days. I will keep you updated.

See ya!
 

Chronikool

Well-Known Member
Hey Bruv! Awesome as! Just a query on the choice of the white LED's being a 4000 kelvin temperature rather then a 5000-6000 kelvin temperature? :)
 

puffenuff

Well-Known Member
Looks like a nice panel you're going to make. Will you be doing this tutorial style or just documenting here and there? Can I ask how much the total cost for parts was? Good luck, I'll be subbed for this for sure.
 

staf82

Member
Looking good, do these osram ssl diodes go onto normal pcb's ? I was thinking of using them or the golden dragon plus. Keep up the good work
 

patrikantonius

Active Member
Thanks guys!
Hey Bruv! Awesome as! Just a query on the choice of the white LED's being a 4000 kelvin temperature rather then a 5000-6000 kelvin temperature? :)
I already have a lot of blue (almost 1:4 with reds) so with cold white it would be too much blue. At first I wanted 3000k white but those 4000k are newer generation and seem much more efficient. I think there will be a bit too much blue as it is, so I will probably shut down a couple of blues per panel during flowering. I don't think they will be necessary and that could make me save a few precious watts (almost 10w if I shut down half the blues)
Looks like a nice panel you're going to make. Will you be doing this tutorial style or just documenting here and there? Can I ask how much the total cost for parts was? Good luck, I'll be subbed for this for sure.
I'm not very good at describing stuff in English so I will probably just put a few pictures but I expect it to be really straightforward. Total cost is around €170-180, I could have saved a lot though if I had bought PCBs in China. I paid €0.9/pc whereas it is €0.2-/pc in China.
Looking good, do these osram ssl diodes go onto normal pcb's ? I was thinking of using them or the golden dragon plus. Keep up the good work
I'll have to reflow solder them onto the star PCBs, from what I saw it is possible to do it with a standard stove; I hope it will work.
I think GD+'s are much easier to work with. Oslons are so freaking small, it's unbelievable! With GD+ I guess you can stick them to a piece of copper and it'll work without any expensive MCPCB, because the thermal pad is larger and the electrodes are on the side (on the Oslon everything is on the back). I really like the GD+ but I couldn't find them as easily as the Oslons; and the Oslons have 80° spread angle which is really nice too.
 

staf82

Member
Oh I see, how does that reflow solder work then? If you end up doing it could you add some pics if possible please. Thanx for lthe info
 

guod

Well-Known Member
I'll have to reflow solder them onto the star PCBs, from what I saw it is possible to do it with a standard stove; I hope it will work.
the reflow prozess will not be the problem, but placing and the right amount of solder will you drive nuts.

from
"Details of the Assembly and Solder Pad Design of the
OSLON, OSLON SSL and OSLON Square Family"

To form a good solder joint, the aperture of
the solder paste stencil has to be designed
such that there is just enough solder paste
on the pad. The stencil thickness used in the
industrial SMT assembly process varies in
the range from 100 μm to 150 μm, with
typically 120 μm for the OSLON LED.
In this context however the solder paste
volume has to be controlled very precisely to
avoid LED tiling and to get good positioning
accuracy after soldering

good luck
 

patrikantonius

Active Member
Oh I see, how does that reflow solder work then? If you end up doing it could you add some pics if possible please. Thanx for lthe info
Basically, you put solder on the pads, place the LED on top of the solder and heat that shit up from underneath on the stove. To make everything stick well I'll have to monitor the temperature so that the pad is at 240°C for a few seconds.
the reflow prozess will not be the problem, but placing and the right amount of solder will you drive nuts.

good luck
Thank you! Definitely looks like a bit more complicated than what I imagined but I hope I'll manage to make this work :)
 

patrikantonius

Active Member
You inspired me guod... :)


I took into account efficiency loss at 680mA and 60°C die temperature but it still might be a little off. My method to convert lumens from datasheet into watts is certainly not optimal/100% exact.
Anyway it's nice to see these curves :)
 

cannabuilding

Active Member
Nice build man, great to see more and more RIU members going with DIY LED and LED panels.

I agree with the post about having to much blues for flowering, was thinking the ratio mentioned was to high, but if you can shut the blue during flowering the whites should be sufficient enough to provide enough blue. Best of luck with the build, please post up some pics when you can man.

Stay safe, happy growing and peace to all.
 

PetFlora

Well-Known Member
PA: RU up for a side-by-side?

I would love to see the reds flipped + more neutral whites. We could all learn a lot from that

Anyway got my pop corn
bongsmilie Still no pop corn icon?
 

patrikantonius

Active Member
numerical spectrum data for your LEDs can be found here

http://catalog.osram-os.com/applications/applications.do?folderId=0&act=showBookmark&favOid=0000000200034c80025d0023

you will see a lot of zip-files, download the xxxx_ASCII.zip

the spectrum.txt in the zip makes the converting a little bit easier.
Oh! Thank you very much that's much better than how I used to do it!
My results weren't too far away but it's a lot better with the actual figures. Thank you again!
Here's the updated version:


The curves are much smoother now, awesome!

PA: RU up for a side-by-side?

I would love to see the reds flipped + more neutral whites. We could all learn a lot from that

Anyway got my pop corn
bongsmilie Still no pop corn icon?
Indeed a side-by-side with 2 different spectrum would be awesome. Unfortunately I don't think I'll be able to do it right now. Ordering LEDs at a reasonable price in small quantities is quite a hassle and I'm relieved I finally have all my components. I really don't want to change plans now, I'm sorry :(

About flipping 2.4:1 of deep reds to reds, it is an interesting idea but for the LEDs I'm using (Osrams) the deep red is much more efficient than the red. If you look at the relative output vs die temperature (in the datasheet), you'll see that the red's output falls very quickly as temperature rises, and temperature are always higher than 25°C in real life conditions. Output drops to 75% (of output at 25°C) at 60°C and 60% at 80°C, where the deep red keeps 95% and 90% respectively. And that's common flaw of amber/red LEDs; Cree XP-Es suffer from the same problem (a bit less but still) and I think Lumileds hold their output a bit better but they are expensive as hell.

The solution would be to switch to Crees or Lumileds reds but they are much more expensive, and I can't really afford it. I tried to keep the cost low! Anyway, I'm sorry and thank you for the input.


By the way, I "reflow stove soldered" a bunch of LEDs to star PCBs today. Guod, I witnessed the difficulties you mentioned but once I developed some sort of technique, it went surprisingly smooth. I did almost half the LEDs in a couple of hours and it will be even quicker to finish.


Today's batch


Cooling down


Up close


Excess of tin goes sideways into the small tabs. Btw it seems reasonably sized but keep in mind that the center pad is 1mm wide and the two side tabs are only half a millimeter wide!!

Even if I would not recommend anyone to use my technique (because parts are ridiculously small and it can really drive you nuts), here is the procedure I followed:

1.1. Take a powerful soldering iron (50W+), place a empty star PCB on the flat tip (assuming it is large enough) so that the star is kept horizontal
1.2. Once smoke start to rise, try meticulously but quickly to apply a really tiny bit of solder on each one of the 3 pads (cathode, neutral thermal interface, anode) and once it's done gently put the hot star on a metal/wood board
1.3. While it is cooling down, repeat until all stars have some solder
1.4. Inspect the stars once they are cold. Every star should have 3 distinct very little domes which are level one to the others. If they don't have 3 domes, repeat step 1 and unsolder. Wait for it to cool to try again. If the domes are not exactly even, try to scratch excessive solder with a small knife

2.1 Place the stars in a pan. Place the LEDs on the stars observing polarity. This part is the most tricky. You have to place the LEDs so that they are as perfectly aligned with the star's pads as possible.
2.2 Place the pan on the stove delicately so that the LEDs don't move. Start monitoring temperature and turn on the stove to medium-high
2.3 Once the temperature reaches 240°C, turn off the stove, wait a handful of seconds and take delicately the pan to place the bottom of it in a cold water-filled container
2.4 Once the bottom of the pan is warm/cold the mission is accomplished

PS: I don't take responsibility for any of this. Use your brain and be extremely careful.

This technique is certainly not optimal but I've had really spectacular results with basically no specific tools at all.
 

guod

Well-Known Member
thanks PetFlora

upload the pic again
attachment is still invalid and i can´t see it in the edit-mode.
 

patrikantonius

Active Member
Hey, sorry for the delay, I had a lot of things on my mind but I finished the panels; here are a few pictures


Even in parallel (20.5w each panel) it is insanely bright, I cannot look at them without thick shades.

I was thinking about putting my skills into something useful for everyone; by producing a few of them for you. With components bought in large quantities it would be among the best on the market (even better than this prototype for sure) at a reasonable price. What do you think? Build quality would be much better of course, with everything built here in Europe.
 

Chronikool

Well-Known Member
That is a great idea! I for one dont quite have the confidence to solder (well anyway). Could you custom build them to customer specs? i like the idea of a all white panel, but thats just me. :D
 

patrikantonius

Active Member
Yes of course, custom specs would be very much possible, at little or no supplemental price, since they all would be produced right under my direct supervision (not 30 000 miles away).
 

staf82

Member
Loving the light, so how thick is the front plate and how big did you drill the holes for the leds? Also is the plate resting against the leds or is it spaced? This makes me want to build my own so much more
 
Top