SmokeyExcursion
Well-Known Member
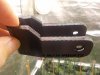
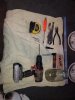
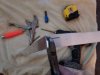
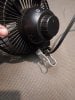
Heres something I made to use the $9 Walmart fans and keep things clean and simple in my tents. You can make them various lengths, are simple to make and cheap, less than $10 to make up to 7 brackets. All you need are the following items.
1 rill with two bits, pilot and 1/4"
2:Vice Grips (1 pair, 2 is better)
3: A socket, or similar round metal object that is a slightly smaller diameter than your tent poles are. (Smaller diameter because metal springs back some from bends)
4:Tape measure (optional, I do a lot of "cut and paste" fabrication)
5:Screws (1 per bracket, not needed if care is taken when bending shorter brackets)
6: 1/8"x1" (3mm x 25mm) aluminum stock. One 3ft stick can make between 3-7 brackets depending how far you want the fan to stick out.
7: screwdrivers, wood chisel, etc any flat tool to wedge/pry with
Here's a rundown of how to make these.
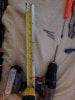
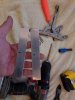
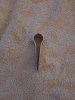
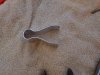
First cut a strip of metal to length. (Distance desired, multiplied by 2, add 1.5x pole diameter) round up or down to your desire, it doesn't have to be precise. To cut the metal, I gripped it in wire cutters where I wanted the cut,, and folded it sharply at the cutter egde. being aluminum it snaps off relatively easy
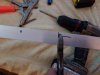
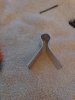
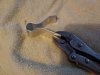
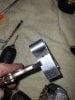
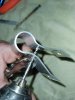
Second, measure and mark the center of your length of metal, use vice grips to clamp it to the socket (or similar object).
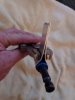
Third, wrap both ends of the aluminum around the socket till both ends meet evenly. Now, if you have a second pair of vice grips, clamp them just in front of the socket, and let the aluminum more completely wrap the socket. I usually squeeze to at least a 5/16" (8mm) gap. If you only have one pair, hold the socket in the curve and clamp accordingly. It may take a few tries.
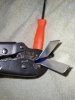
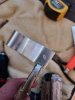
Fourth, take your pry tool, wedge it between the ends and pry apart till they "V" outward. How much of a V depends on the bracket length, pole wrap, when you make the return bends (next step) etc. You're eyes will tell you what's close enough.
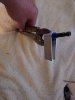
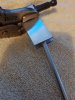
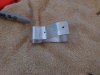
Fifth, make the "Ears". Around 1" from the tip, or more, bend the tops of the "V" inward to just before parallel. You want to start the bends just after where the "V" width matches the attachment width on the fan. This way, in theory when you tighten the fan, it also tightens itself on the pole. But if your guesses (or measurements are wrong), have no fear, that's where screws come in. And what the second set of holes are for.
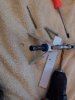
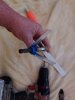
Sixth step is to start drilling. But before we begin. DO NOT, I repeat, DO NOT UNDER ANY CIRCUMSTANCES HOLD THE METAL IN YOUR HAND AND DRILL IT, EVEN WEARING GLOVES!!! Aside from the obvious risk of drilling your hand, if the drill bit catches, it will rip the metal free from your grip, and act like a meat slicer. I've made the mistake many times. Now, grab an ear with vicegrips by the edge. Get a firm grip, mark center about 1/2" to 3/4" in from the edge. Carefully drill a hole using a small pilot bit. Once it goes through, grip the other ear with the vice grips and center with your eyeballs, using the first hole as a guide to drill straight through. Before changing bits, move your 'grips up near the pole area, go approximately 1-1/2"-1-3/4" in from the base of the bend, and drill like before. Swap to the bigger drill bit, and drill all but òne of the holes near the pole. Lube a screw up with Vaseline or an antibiotic ointment and you should easily thread the hole with the screw and driver if you selected the right size pilot bit.
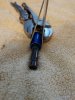
Seventh and final step is to put them up and enjoy you're budget fan brackets. Toss that string, and open that floor space.
I made this write up after thinking of making and selling them on eBay. But after consideration, building motors and transmissions pays better..
Happy Growing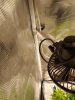
1
2:Vice Grips (1 pair, 2 is better)
3: A socket, or similar round metal object that is a slightly smaller diameter than your tent poles are. (Smaller diameter because metal springs back some from bends)
4:Tape measure (optional, I do a lot of "cut and paste" fabrication)
5:Screws (1 per bracket, not needed if care is taken when bending shorter brackets)
6: 1/8"x1" (3mm x 25mm) aluminum stock. One 3ft stick can make between 3-7 brackets depending how far you want the fan to stick out.
7: screwdrivers, wood chisel, etc any flat tool to wedge/pry with
Here's a rundown of how to make these.
First cut a strip of metal to length. (Distance desired, multiplied by 2, add 1.5x pole diameter) round up or down to your desire, it doesn't have to be precise. To cut the metal, I gripped it in wire cutters where I wanted the cut,, and folded it sharply at the cutter egde. being aluminum it snaps off relatively easy
Second, measure and mark the center of your length of metal, use vice grips to clamp it to the socket (or similar object).
Third, wrap both ends of the aluminum around the socket till both ends meet evenly. Now, if you have a second pair of vice grips, clamp them just in front of the socket, and let the aluminum more completely wrap the socket. I usually squeeze to at least a 5/16" (8mm) gap. If you only have one pair, hold the socket in the curve and clamp accordingly. It may take a few tries.
Fourth, take your pry tool, wedge it between the ends and pry apart till they "V" outward. How much of a V depends on the bracket length, pole wrap, when you make the return bends (next step) etc. You're eyes will tell you what's close enough.
Fifth, make the "Ears". Around 1" from the tip, or more, bend the tops of the "V" inward to just before parallel. You want to start the bends just after where the "V" width matches the attachment width on the fan. This way, in theory when you tighten the fan, it also tightens itself on the pole. But if your guesses (or measurements are wrong), have no fear, that's where screws come in. And what the second set of holes are for.
Sixth step is to start drilling. But before we begin. DO NOT, I repeat, DO NOT UNDER ANY CIRCUMSTANCES HOLD THE METAL IN YOUR HAND AND DRILL IT, EVEN WEARING GLOVES!!! Aside from the obvious risk of drilling your hand, if the drill bit catches, it will rip the metal free from your grip, and act like a meat slicer. I've made the mistake many times. Now, grab an ear with vicegrips by the edge. Get a firm grip, mark center about 1/2" to 3/4" in from the edge. Carefully drill a hole using a small pilot bit. Once it goes through, grip the other ear with the vice grips and center with your eyeballs, using the first hole as a guide to drill straight through. Before changing bits, move your 'grips up near the pole area, go approximately 1-1/2"-1-3/4" in from the base of the bend, and drill like before. Swap to the bigger drill bit, and drill all but òne of the holes near the pole. Lube a screw up with Vaseline or an antibiotic ointment and you should easily thread the hole with the screw and driver if you selected the right size pilot bit.
Seventh and final step is to put them up and enjoy you're budget fan brackets. Toss that string, and open that floor space.
I made this write up after thinking of making and selling them on eBay. But after consideration, building motors and transmissions pays better..
Happy Growing