The Dawg House Grow Featuring Area-51 Leds

The Dawg

Well-Known Member
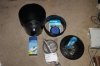
You Are Going To Need Some Basic Tools.
Screw Gun
Screw Driver
Plyiars
Set Of Regular Drill Bits
Step-Drill Bit
HackSaw
Tape Measure
Marking Pencil

Materials Needed
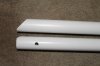
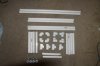
24ft Of White Pvc Pipe.I Use 3/4
4) 90 Elbows
4) 90 Elbow with Side Outlet
4) T Connectors
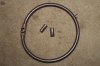
1)Pkg Of#10-24x1-1/2 Machine Screws
1)Pkg Of 3/8 OD #8 Scr Bonded Neoprene Washers
1) 3/16 Fender Washer
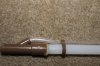
2Ft Piece of 1 Inch Pvc For Down Tube

Now To Cut Your Screen Pieces You Will Need
2)22-1/2 Inchs
2)8-1/2 Inches
4)9-3/4 Inches
4)10 Inches
2)30 Inches
2)22 Inches

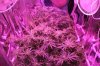
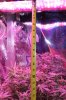
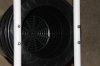
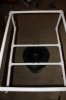
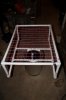
Now Put A T-Connetors On The Ends Of The 8-1/2 Inch Peice Now Stick the 9-3/4 Into The T-Connector And Add A 90 Degree Elbow On The End.Now For The Top Screen Take Your 90 Degree Elbow With Side outlet And Connect The 22 Inch Peices And The 30 Inch Peices To Make Your Top Screen.Now Use The 10 Inch Peices To Connect The Top To The Bottom.Now You Can Set Your Screen On The 8 Inch Netpot And Center Then Drill Your Holes For Attaching Your Screen Using A 11/64 Drill Bit.Once Your Screen Is Attached You Can Take the Top Off And Starting On Center Make Marks at 2 Inch Incriments For Your Holes.
DIY WaterFarm With attached Screen 001 (800x533).jpgDIY WaterFarm With attached Screen 003 (533x800).jpgDIY WaterFarm With attached Screen 004 (800x533).jpgDIY WaterFarm With attached Screen 005 (533x800).jpgDIY WaterFarm With attached Screen 014 (533x800) (2).jpg

Now For The WaterFarm Unit
Materials Needed
2)5Gl Buckets
1) WaterFarm Kit
1)8 Inch Net pot
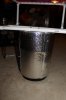
1 Roll Of Reflectix Material To Wrap Your Bucket
1 Roll Of Tin Foil Tape For The Top Of Your Netpot

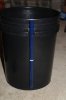
Now Take 1 Of Your Buckets And Mesure 2 Inches From The Bottom Lip And Cut.Now Doing This Will Give You A 3-1/2 Gl Res In Veg And A 3 Gl Res In Flower.If You Choose To Use 1 5 Gl Bucket With The 8 Inch Netpot It Will Give You A 2-1/2 Gl Res In Veg And A 2 Gl Res In Flower.Now On The Other Bucket Make A Mark 1-1/4 Inchs From the Bottom Of The Bucket.Using Your Step Drill Bit Drill A 7/8 Hole Making sure It Is Centered With The Hole The Bucket Handel Came Out Of On The Top Lip A Clip will Be Inserted Their To Hold Your Drain Tube.Now Assemble.

DIY WaterFarm With attached Screen 008 (800x533).jpgDIY WaterFarm With attached Screen 009 (533x800).jpg
 

The Dawg

Well-Known Member
First You Have To Cut An Inch Off Both Side Of The Drip Ring This Will Allow It To Fit Into The Netpot.Next Using A 3/32 Drill Bit and Hand Ream Out The Holes in The Drip Ring.This Will Give You Bursting Bubbles.Now Its Time To Glue The Brown Peice To The End Of The Air Tube.Trust Me Its Not Fun Fishing Those Small Parts Out Of The Res In The 5th Week Of Flower.That Brings Us To the 1 Inch Pvc Tube.Cut Said Tube To 16 Inches And 45 The Lower End.Now Messure Up 2 Inches From The Bottom and Drill A 1/4 Inch Hole.This Will Be Used For The Air Hose Connecting Your 5 Inch AirStone.Now cut Your Netpot To Fit Your pvc Pipe And Attach With Zip Ties.Now Wrap Your Bucket With The Reflectix Material And Tape the Top Of Your Netpot.I Do This To Reflect Heat Keeping My Res Alittle Cooler..I Use A 80 Gl Air Pump For The Airstone And A 40 Gl Pump For The Drip Ring.Now You Have A SuperCharged WaterFarm

DIY WaterFarm With attached Screen 002 (800x533).jpgDIY WaterFarm With attached Screen 010 (800x533).jpgDIY WaterFarm With attached Screen 011 (800x533).jpgDIY WaterFarm With attached Screen 012 (800x533).jpgDIY WaterFarm With attached Screen 007 (800x533).jpgDIY WaterFarm With attached Screen 015 (533x800).jpg
 

The Dawg

Well-Known Member
Love the natural light pics Dawg............ever thought of using this brand of aerators http://www.htgsupply.com/Product-Micro-Pore-Air-Diffuser,-Single-5.25-Inch.asp wont breakdown ever and their double XL is a beast but your probably gonna need a serious air pump to run them....cough http://www.htgsupply.com/Product-Sunleaves-DuraPump-Air.asp loud as shit though:P
Right On Brother Psuagro.I Just Ordered 5 Of Them

Looking good dawg, how long will you run both these bitches if they are 7 weeks now?
Brother newworldicon Im Planning On Running Sally For 10 Weeks Or When She Say's She's Ready
 

The Dawg

Well-Known Member
MaryAnn Week4 Day6 Of Flower.Look At This Little Biotch Stretch.Everytime I Move my Light Up She Stretches To It Then Maintains A 6 Inch Height From My Light.So Im Leaving It At 6 Inches From My Canopy.Now Those Missle Sites You Are Seeing Are Side Branches From Side Branches From The Main Trunk.Now You Will See Before And After Pics Of My Defoilation.I Did A Res Change Last Night ppm Out 788 pH 5.43 Res temp 77 Cab Temp 81 Rh 66%Ppm In Was 950 pH In 4.93 :weed:

MaryAnn Week4 Day6 Of flower 003 (800x533).jpgMaryAnn Week4 Day6 Of flower 004 (533x800).jpgMaryAnn Week4 Day6 Of flower 005 (533x800).jpgMaryAnn Week4 Day6 Of flower 006 (533x800).jpgMaryAnn Week4 Day6 Of flower 001 (533x800).jpgMaryAnn Week4 Day6 Of flower 002 (800x533).jpg
 

The Dawg

Well-Known Member
MaryAnn G-13 GigaBud Week5 Day1 Of Flower.Man Her Sativa Pheno Kicked In This Past Week And She Entered A Second Stretch Phase.This Nasty Azz Midget Only Grew 14 Inches In The First 10 Weeks And The Last Week And A Half She Has Doubled That.So Tonight I Took Matters Into My Thumb And Fore Finger And Super Croped Her Azz.Now My Canopy Is Basicly Even Again And My Light Is 12 Inches From My Canopy :clap:
MaryAnn Week5 Day1 Of Flower 001 (800x533).jpgMaryAnn Week5 Day1 Of Flower 002 (800x533).jpgMaryAnn Week5 Day1 Of Flower 008 (533x800).jpgMaryAnn Week5 Day1 Of Flower 003 (800x533).jpgMaryAnn Week5 Day1 Of Flower 004 (800x533).jpg
 

guod

Well-Known Member
MaryAnn & Sally will look more natural if you use your Flash (Keywords: forced flash on or fill in Flash). most cams have this settings.

without flash
noflash.jpg
same with flash
withFlash.jpg
 

The Dawg

Well-Known Member
Sally Week7 Day6 of Flower.Well Everytime I Open My Tent Sally Has Suprises For Me To Look At.Like Last Night I Open My Tent And Saw A Bunch Of White Trich's And Thought Wow She's Going To Be A Fast Finisher.So I Got Out My Scope And Imagin My Suprise Those White Trich's Were Not White Theirs So Many Of Them They Give The Apperance Of Being White.Sally Is One Sticky Lady Woo Hoo Boo Boo.I Did A Res Change This Am Ppm Out 1074 pH Out 5.97 Res Temp 77 tent Temp 81 Rh 61%.Ppm In 1095 pH 5.93 :hump:

Sally Week7 Day6 Of Flower 004 (533x800).jpgSally Week7 Day6 Of Flower 003 (800x533).jpgSally Week7 Day6 Of Flower 002 (533x800).jpgSally Week7 Day6 Of Flower 001 (533x800).jpgSally Week7 Day6 Of Flower 008 (800x533).jpgSally Week7 Day6 Of Flower 007 (533x800).jpgSally Week7 Day6 Of Flower 006 (533x800).jpgSally Week7 Day6 Of Flower 005 (533x800).jpg
 

HeisenBud

Active Member
Looking mighty fine. Btw, i love the the waterfarm setup. The attached scrog screen was stroke of horticultural genius. Looks great. All the waterfarm ideas inspired me to design my own setup. I've been brainstorming the approach and came up with a cheap "multiponics" set up.
 

The Dawg

Well-Known Member
Woof, nice and frosty, just the way we like them...:weed:
Thank You Brother Txchilies. In All My Years Of Growing I Have Never Seen Buds This Frosty.Leds Kick Major Azz :hump:

Looking mighty fine. Btw, i love the the waterfarm setup. The attached scrog screen was stroke of horticultural genius. Looks great. All the waterfarm ideas inspired me to design my own setup. I've been brainstorming the approach and came up with a cheap "multiponics" set up.
Right On Brother HeisenBud.I Know Your Going To Post Pics Of Your Setup When Its finished.:clap:
 

The Dawg

Well-Known Member
I woke up and went into my garden and started taking samples of ppm's and pH's and found that MaryAnns pH was 2.34 from 5.49 the night before.So I started her on a 24 hour flush.That seem to help sally the most.I ran across this post on another site and I did cut and paste it for discussion on this site with my Led's Bud's.So yall please give your input

LED's and Nute's, Why you need less
Let me start off by saying I'm a data collector, I like to find patterns to help answer questions that have so many conflicting and random explanations and I have specifically found a pattern that occurs when using LED's. Just about ever LED grower uses less nutes then a hid or cfl equivalent and I assume that it's related to the total amount of PAR.

I use the Flora 3 part series nutes and noticed the last time using their nute calculator that they had disclaimers stating that PPM amount should be decreased in high amount of light situations and it is indeed true. As I started putting together a spread sheet to find patterns I also quickly found that when LED panels where being used that the amount of nutes can very based on the distance from the panel to canopy.

I always assumed that the strain played a bigger role when using LED's but not nearly as big of a roll as distance from light source. I noticed that in many cases the PPM amount that was being used without a problem became a problem later on as the LED panels became closer to the canopy from reaching max height for that space or what ever reason. My current grow for example illustrates this perfectly as at one point I was up to 375 PPM for a few weeks without a problem but once the panels where much closer I had to drop the PPM to 250. Keep in mind that even at 250 PPM (not including 180 PPM of tap water) I have no reduction in growth or yield, I even estimate that yield will be some where around 1.25 gram per watt. =)

So if you ever wondered why so many people out there have such drastically different feeding amounts and schedules it mostly boils down to light or more exactly PAR. Light source alone is certainly not the single reason as humidity and temp also play there roles, I would have to say strain factor comes in last on the list as crazy as that sounds but it is a known fact that the higher the temp and lower the humidity, the more a plant drinks which in turn effects how much nutes are indeed needed.

I hope this info helps anyone that is like myself and wondered why?​
 
Top