All right boys and girls,
as i am getting asked a lot about the setup i am running + planning,
i figured that some insight for you would be pretty sweet.
I believe in a staged grow-room expansion, if that makes sense.
So i got a small investment up front, small monthly additions, and a
big bump every time i harvest.
So here are some Facts about what my current situation is:
-> i live in a apartment i own.
-> i got a spare room
-> i want to harvest every month, having a lot of possible strains.
-> security is a concern for me
-> also i go away for 3 days at a time or sometimes for a week, so i have to be careful
-> i don't have big budgets at hand up front, but over time i got the cash-flow to do it.
->i want good statistics, full control,…
-> i haunt grown in a couple of years so i will need to buy everything. including a ph, and ppm meter.
-> this grow is just for me and a couple of friends.
->keep diy to a minimum. for me it just makes a terrible mess.
Some stuff up front:
a)Why do i choose tents over a open setup? => I want to have 2 flower rooms, one veg room and one clone room.
This allows me to get it without much hassle. Also i can run one box at day and one at night. Furthermore i am also
able to control bad bugs better. Lets say i get some mites. When flower room 1 is infected, i can deploy good bugs at
room 2 while i fight off the attack in the first.
b) smell => this is a real concern to me, as you will see deploy more active coal filters than needed. but i just wanna
have it under control in any case.
c) Fresh air is a bit of a problem in my setup => i will have a few tricks to help out with that. The few problems left to solve,
maybe someone here can give me a few hints.
d) but your setup is commercial => no it isn't, i live in amsterdam. therefore i could go out and just buy my stuff at the coffee shop.
the main reason for building this is to sample some not so common bud. This is just for me and my friends to enjoy.
Therefore my pricing will be slightly below watt stuff costs at coffee shops. After the cost is back in, i will drop the prices to
a bit above my cost to run the system.
e) but two year plans didn't work in russia, why should it work with you? => i am a single person and therefore its easier to
keep in check.
== PLANNING STAGE ==
-> Rotation:
in order to have two flowering rooms, i will need one cloneroom and one veg room (that also holds my mother plants).
The first grow will go from coco and feature bought cuttings. Afterwards i will turn to make my own clones and expand
the room harvest by harvest + a small bump monthly.
->Plant cycle:
Clone Time: 10 days
Veg Time: 60 days.
Delay: The first room starts, the second starts 30 days later. This way i have one harvest per month.
=> This means that my veg room is running non-stop.
=> the clone room will be used when need be.
->Room Expansion
Ok, i think i explained it. It will finance itself.
->Room Design:


->Result:
This is my calculation for the finished room, that is running. I take running cost (light, energy, nuts)
into account. This will help us see what the min price is and how much i end up with.
you see that i lean towards the lower end of the spectrum when it comes to how much i will harvest.
just to make sure it always fits. Each Tent has a own Reservoir!
-> Final room Setup:
1x Homebox XXL Flower Room 1
….2x 600w HPS
….RDWC
1x Homebox XL Flower room 2
….1x 600w HPS
…..RDWC
1x Homebox Clonebox Veg Room
….1x 250w MH
…..RDWC
1x Homemade Cutting Room
….Thinking CFL maybe
…..Rainforest 72 (aero cloner)
1x Homebox XS
….Plus a dry net
Ventilation:
1x active Air intake
1x active air exhaust (used to heat my apartment) + active carbon filter
1x Fan moving the air in the room towards the exaust
each homebox:
Has its own exaust fan + active carbon filter.
is cooltube'd (except the dryrack of corse)
…the veg room and the flower room 2 share one fan pushing the air thru
2x oscillating fan
Co2 for both flower rooms
..my planning says i am going to use tanks. Its easier for me than a burner.
Homemade Control unit:
…i am building a control unit for all the fans, light and power, stay tuned for how it turns out.
Monitoring Solution:
…If i have time i will go and see if i can build a cheap grow room monitoring kit + write some software for it.
Harvest+Gadgets:
1x Trimbox (the small portable one)
1x pollinator (the round spinning thing in the box)
Room Light:
1x Green light for the room that the boxes stand in.
Security Cams
i'll get a few webcams, one good for the room and one for each grow tent.
this way i can see some progress when i am not home, and also snap a few pics from
fixed positions.
Calculations:


== IMPLEMENTATION ==
LEAP 1:
-> What we Need:
I got a Empty Room. All good. Now lets get some Eqipment.
->Shop list:
1x Homebox XXL Set (local growshop) - 600 eur
….includes: 600w HPS, ballast, 1x Exaust fan, 1x Active Coal Filter
1x PH and PPM Meter - 200 eur
1x Fertilisers+Nutrients+… - 100 eur
22x pot - 20 eur
12 Coconut Bricks - 30 eur
…they get soaked in water and fall apart, that will be my soil.
1x Small oscillating fan - 20 eur off bay
Wiring+Smaller parts+electric meter - 100
1x underlay for a flood and drain table - 50
…………………………..1100 Total Price
->Spare Parts i had around:
2x Tables (same model)
1x small side table
1x big oscillating fan
1x aluminum foil
2x duct tape
2x Old PC cases (same Model)
1x old clock
1x digital thermometer + rh
1x analog thermomether
…………………………….ok i would have spent 300 on this or so, but its not that bad.
->Clones
i have a nice store round the corner, clones cost me only a few euro's each.
10x chronic
12x Sweet tooth no. 4
=> 200 eur
->Total:
Eqip: 1100
Spares: 300
Clones: 200
……………………….1600 eur in Total
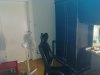
->Time To set up!
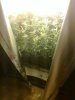
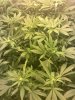
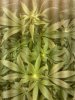
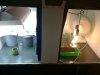
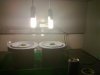
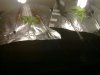
This is how it looks when its done.
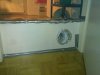
->inside the tent:


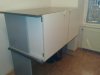
->my personal fire harzard:

->wiring:

->all done:

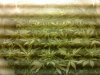
DAY 24:
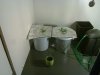
While this is on its Way, i got bored. So i figured i could go test out some DWC Stuffs.
I went to a few local stores, and got myself two buckets, a air pump, a mini green house
(usually used for clones to root), and some tubes. Plus two cfl lights with 18 watts each.
…………spent 100 eur
DAY 30
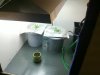
Its Time for me to switch from Veg to flower. I took a clone off each strain. From the best looking plants.
Put them into the DWC buckets i built. Now its Time to Wait.
Also i got myself some more budget to play with. Its a fresh month and as i said earlier i have some budget
each month. This one is a lot higher than the other ones to come. Due to the fact that i got some money from
my grand parents who i haunt seen in years. Well instant investment.
->Shop list:
1x small fan with a clip to better fix it up in the tent - 20
1x Rainforest 72 (for my future clones) - 250
1x more wiring stuffs - 30
1x a pack of yellow stickers 5
1x electric meter - 15
2x security power outlets - 60
-------------------------------------------- all in all about 400 eur
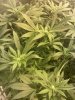
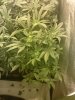
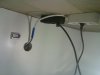
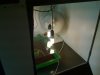
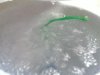
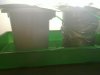
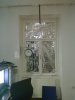
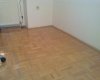
->Pictures:
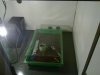
mini bubbler for my mothers:
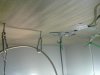
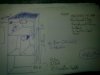
my window + clock
and of corse i marked the next box on the floor so i have a clue how much space it
will eat.
i didn't snap a pic off the rainforest. you can find it online. Sorry.
Thats the state of things Right Now. I will keep you posted on the Future expansion of the room.
See you soon. And stay safe.
as i am getting asked a lot about the setup i am running + planning,
i figured that some insight for you would be pretty sweet.
I believe in a staged grow-room expansion, if that makes sense.
So i got a small investment up front, small monthly additions, and a
big bump every time i harvest.
So here are some Facts about what my current situation is:
-> i live in a apartment i own.
-> i got a spare room
-> i want to harvest every month, having a lot of possible strains.
-> security is a concern for me
-> also i go away for 3 days at a time or sometimes for a week, so i have to be careful
-> i don't have big budgets at hand up front, but over time i got the cash-flow to do it.
->i want good statistics, full control,…
-> i haunt grown in a couple of years so i will need to buy everything. including a ph, and ppm meter.
-> this grow is just for me and a couple of friends.
->keep diy to a minimum. for me it just makes a terrible mess.
Some stuff up front:
a)Why do i choose tents over a open setup? => I want to have 2 flower rooms, one veg room and one clone room.
This allows me to get it without much hassle. Also i can run one box at day and one at night. Furthermore i am also
able to control bad bugs better. Lets say i get some mites. When flower room 1 is infected, i can deploy good bugs at
room 2 while i fight off the attack in the first.
b) smell => this is a real concern to me, as you will see deploy more active coal filters than needed. but i just wanna
have it under control in any case.
c) Fresh air is a bit of a problem in my setup => i will have a few tricks to help out with that. The few problems left to solve,
maybe someone here can give me a few hints.
d) but your setup is commercial => no it isn't, i live in amsterdam. therefore i could go out and just buy my stuff at the coffee shop.
the main reason for building this is to sample some not so common bud. This is just for me and my friends to enjoy.
Therefore my pricing will be slightly below watt stuff costs at coffee shops. After the cost is back in, i will drop the prices to
a bit above my cost to run the system.
e) but two year plans didn't work in russia, why should it work with you? => i am a single person and therefore its easier to
keep in check.
== PLANNING STAGE ==
-> Rotation:
in order to have two flowering rooms, i will need one cloneroom and one veg room (that also holds my mother plants).
The first grow will go from coco and feature bought cuttings. Afterwards i will turn to make my own clones and expand
the room harvest by harvest + a small bump monthly.
->Plant cycle:
Clone Time: 10 days
Veg Time: 60 days.
Delay: The first room starts, the second starts 30 days later. This way i have one harvest per month.
=> This means that my veg room is running non-stop.
=> the clone room will be used when need be.
->Room Expansion
Ok, i think i explained it. It will finance itself.
->Room Design:
->Result:
This is my calculation for the finished room, that is running. I take running cost (light, energy, nuts)
into account. This will help us see what the min price is and how much i end up with.
you see that i lean towards the lower end of the spectrum when it comes to how much i will harvest.
just to make sure it always fits. Each Tent has a own Reservoir!
-> Final room Setup:
1x Homebox XXL Flower Room 1
….2x 600w HPS
….RDWC
1x Homebox XL Flower room 2
….1x 600w HPS
…..RDWC
1x Homebox Clonebox Veg Room
….1x 250w MH
…..RDWC
1x Homemade Cutting Room
….Thinking CFL maybe
…..Rainforest 72 (aero cloner)
1x Homebox XS
….Plus a dry net
Ventilation:
1x active Air intake
1x active air exhaust (used to heat my apartment) + active carbon filter
1x Fan moving the air in the room towards the exaust
each homebox:
Has its own exaust fan + active carbon filter.
is cooltube'd (except the dryrack of corse)
…the veg room and the flower room 2 share one fan pushing the air thru
2x oscillating fan
Co2 for both flower rooms
..my planning says i am going to use tanks. Its easier for me than a burner.
Homemade Control unit:
…i am building a control unit for all the fans, light and power, stay tuned for how it turns out.
Monitoring Solution:
…If i have time i will go and see if i can build a cheap grow room monitoring kit + write some software for it.
Harvest+Gadgets:
1x Trimbox (the small portable one)
1x pollinator (the round spinning thing in the box)
Room Light:
1x Green light for the room that the boxes stand in.
Security Cams
i'll get a few webcams, one good for the room and one for each grow tent.
this way i can see some progress when i am not home, and also snap a few pics from
fixed positions.
Calculations:
== IMPLEMENTATION ==
LEAP 1:
-> What we Need:
I got a Empty Room. All good. Now lets get some Eqipment.
->Shop list:
1x Homebox XXL Set (local growshop) - 600 eur
….includes: 600w HPS, ballast, 1x Exaust fan, 1x Active Coal Filter
1x PH and PPM Meter - 200 eur
1x Fertilisers+Nutrients+… - 100 eur
22x pot - 20 eur
12 Coconut Bricks - 30 eur
…they get soaked in water and fall apart, that will be my soil.
1x Small oscillating fan - 20 eur off bay
Wiring+Smaller parts+electric meter - 100
1x underlay for a flood and drain table - 50
…………………………..1100 Total Price
->Spare Parts i had around:
2x Tables (same model)
1x small side table
1x big oscillating fan
1x aluminum foil
2x duct tape
2x Old PC cases (same Model)
1x old clock
1x digital thermometer + rh
1x analog thermomether
…………………………….ok i would have spent 300 on this or so, but its not that bad.
->Clones
i have a nice store round the corner, clones cost me only a few euro's each.
10x chronic
12x Sweet tooth no. 4
=> 200 eur
->Total:
Eqip: 1100
Spares: 300
Clones: 200
……………………….1600 eur in Total
->Time To set up!
This is how it looks when its done.
->inside the tent:
->my personal fire harzard:
->wiring:
->all done:
DAY 24:
While this is on its Way, i got bored. So i figured i could go test out some DWC Stuffs.
I went to a few local stores, and got myself two buckets, a air pump, a mini green house
(usually used for clones to root), and some tubes. Plus two cfl lights with 18 watts each.
…………spent 100 eur
DAY 30
Its Time for me to switch from Veg to flower. I took a clone off each strain. From the best looking plants.
Put them into the DWC buckets i built. Now its Time to Wait.
Also i got myself some more budget to play with. Its a fresh month and as i said earlier i have some budget
each month. This one is a lot higher than the other ones to come. Due to the fact that i got some money from
my grand parents who i haunt seen in years. Well instant investment.
->Shop list:
1x small fan with a clip to better fix it up in the tent - 20
1x Rainforest 72 (for my future clones) - 250
1x more wiring stuffs - 30
1x a pack of yellow stickers 5
1x electric meter - 15
2x security power outlets - 60
-------------------------------------------- all in all about 400 eur
->Pictures:
mini bubbler for my mothers:
my window + clock
and of corse i marked the next box on the floor so i have a clue how much space it
will eat.
i didn't snap a pic off the rainforest. you can find it online. Sorry.
Thats the state of things Right Now. I will keep you posted on the Future expansion of the room.
See you soon. And stay safe.