Spanky's CFL Micro Grow

Spanky's Monkey

Active Member
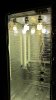
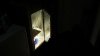
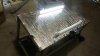
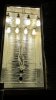
2'x2'x4' Grow Cab with (8-16) 23w CFL horizontal lights & (4)17w T-8 vertical lights for flower.

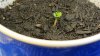
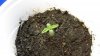
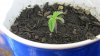
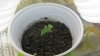
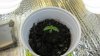
This is my first cab ever built by hand. No wood working skills at all. First grow ever. Looking to get a green thumb. Right now I'm learning how to maintain the temps in the cab with different light variations. Posted the light setup because everyone always seems to ask with the CFLs anyway so I'll be straight up front about it.


9S7EK.jpg

75siO.jpg

q3EDM.jpg

pfRog.jpg


0nGR9.jpg
 

Spicy8305

Active Member
I like your box dude really pro looking for a first time. the cfl fixture you put together is really cool for veg but Those t8's aren't going to do much for the flower phase. I like to use lower wattage for my veg period and then blast them with a higher output during flower. Currently you have 8-16 cfl's for veg which would equate to roughly 184w- 368watts ( awesome for veg) but once you're ready to flower it's going to decrease to 68 watts between the 4x 17watt t8's.
what color spectrum are the lamps btw?
 

Spanky's Monkey

Active Member
5k and 2.7k mixed in and the T-8s are 4.1k. This box will be for both vegging and flowering to learn. Later once I build a larger box this will be converted solely to veg as a "mothership" so to speak. The T-8s are simply to add side lighting for a healthier plant later down the line, I'm not expecting a lot out of them for flowering, but in this current I'm not using them to veg.
 

Spanky's Monkey

Active Member
modified 50 cfm bathroom fan using the negative pressure method........lol. working out right now but the box is modular and if need be I can swap out for either a 200 cfm dryer booster like in the Hydro Kits or a larger bathroom fan will not be worth the money. $117 for the 200 cfm centrifugal booster sounds good should this not prove adequate later.
 

Spanky's Monkey

Active Member
ZLpGT.jpg

The four bagseeds I started in dirt never hatched so the cups got cleaned and reused. Grabbed a couple more healthy seeds and used the baggie method and in two days the first one broke open. Here "she" is popping outta the dirt and I'm hoping one of these two will be a female.
 

Spanky's Monkey

Active Member
yes sir, top layer is about 3/4" soil and the rest is a mix of 70% soil and 30% perlite with a little perlite at the bottom for drainage.
 

evhybrid

New Member
Nice box, same exact size as mine (I also made mine by hand). I will follow along to see how your grow goes.
 

Spanky's Monkey

Active Member
v0Bo2.jpg

No vertical growth today and I think I know why. Im under the impression I've overwatered. hopefully i caught the problem early enough. I did notice the first set of true leaves branching out.
 

Abiqua

Well-Known Member
Nah, that isn't bleek.

In fact the topsoil at least looks dry. Give it a day or two more if the soil is still wet.

Sometimes I like to poke chopsticks into clogged soil, just to get air allowed in, but be very careful with young seedlings. I usually prod the edges with young cats and even then, its more last resort, to get some O to the roots.

One to half an 0z of water every 1-2 days or so [solo cup], unless you have a fan or your humidity is low. Usually that is a good average for the 1st week or two of life.

Plain water till it hits 3 nodes or so, then you can start to add nutes at half strength for a week or two.
 
Top