Soil to Hydro Afghani/Kush Rescue Operation

ocho

Active Member
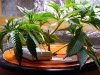
I just inherited some dirt girlies.

I have read mixed reports about converting to hydro.
I use DWC Bubbleponic, 5-gallon buckets w/baskets, etc, etc.

These girls were heading south fast and they came with a touch of mites to boot. However, I think this will give me a little something to experiment with and I'm positive I can nurse these ladies back to health.

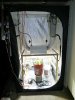
Added to the mix are 3 LED fixtures that are *supposed* to put out as many lumens as a 600w. I have NEVER used an LED so this should be fun. I'm already sold on the lower power draw. Let's see if these girls live and then I will have something to compare with on the back end.

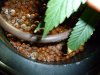
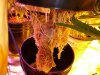
I took the pots of dirt and removed the plants from the pots. The dirt ball went straight into a container with cold water in it. I figured this would shock them but I was OK with this since leafy greens are placed in Iced water to preserve the cells. I'm no expert on this but I figure this would shock them less then a full night of cold. Once again, the only direction these girls can go is up. These soaked with the very gentle assistance of my nimble fingers. The roots looked very healthy. The dirt was washed off of the roots...mostly. There is a touch of grit here and there but I figured if the roots are clinging to it, then it won't go anywhere soon.

After the dirt was removed we held the little ladies upside down by their stalks and sprayed them with neem oil to take care of the mites. This sat for a few minutes and then we q-tipped the undersides to remove any possible eggs. Meticulous work here but better than watching my clone roots grow......

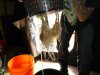
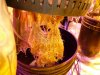
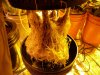
We then very gently threaded some of the larger (read, more girth) root strands down into the net basket's holes. These hanged down to below the level where the water would be. Most roots were mostly intact.

At this point, I clipped (with my cloning razor) anything the plants had growing that was below the top of the net baskets. The best and hearty of these were made into clones and placed in the aeroponic clone box.

Insert expanded clay pellets...

I mixed a solution of GH flora micro and flora grow to about 400 ppms combined strength. A dash of mychorrizial additive, a pinch of superthrive (we all have our little mixes) and a pinch of rooting hormone.

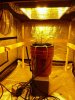
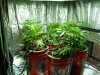
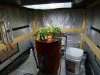
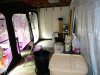
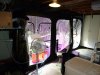
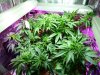
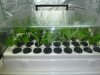
Girlies tubed up and and air is blowing. Placed under 3 of the LED fixtures.

Fan adjusted lights left on all night. Left the ladies looking soggy, pathetic and like I had just hurt their feelings. No noticeable bugs though and I'll see how this all comes together. Lots of good energy and love is all these girls from a very neglectful situation needed.

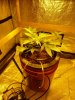
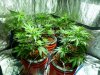
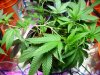
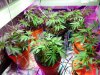
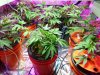
So far this A.M. they look fucking beautiful. They look vigerous, spritely and spunky. They aren't taking this beating lightly nor lying down! Good leave texture, firm and pliable. Still no sign of bugs or eggs on any of the leaves. Hit them with penetrator foliar spray.

Getting some pictures taken and will post to show how they all look and perform.
 

ocho

Active Member
Getting all my recent data collected....I haven't posted on this for a couple weeks now. Here is my nute mix/regiment:

Sep 13: ~400 ppm mix of GH FloraGrow, FloraMicro and FloraNova. A dash of superthrive, ~30ml hygrozyme/10 gal
Sep 19: ~600 ppm new mix of above after adding to previous week's solution
Sep 27: ~900 ppm total nutrient swap (cleaned buckets) of above nutrient combo

I think I'll keep them at ~900 until flowering.....
 

ocho

Active Member
Post from 5 days after I converted...

All 8 girls looking great. Re-freshed the water last night and took a peek at the lady's roots. New growth on the main root chords. Lots of little rooties poking through the bottom of the net baskets. Looks like I may be out of the woods for these gals.

Problems for the first 2 weeks seems to be that my buckets seem to keep going up in pH. I check every day and have to make adjustments. It's mellowing out though and they can go 2 days currently without adjustment.
 

ocho

Active Member
Made a screen and frame for one of the ladies. She lost her top 8" in a lighting accident. She now has 3 main branches and I am going to experiment a little bit. I'm doing my first scrog. It will be one plant and I will make the plant fill a 3'x3' square. I have one dedicated 600w lamp on this and I decided to see if getting more oxygen (bubbles) to the roots would help with the rapid and massive growth I am hoping to get. I am running a 4 outlet GH air pump all 4 of the air tubes into this one bucket. I wonder about the weight potential from a scrog...

All the ladies look fantastic. They are all reaching up for the light in a big way. I have switched them the a 600w MH and will add LED supplements here in another couple of days.

Making adjustments to my tent and room.
 

ocho

Active Member
And here are some pictures.

P1000003.jpg
This is the one girl with 3 arms that I'm doing a scrog on for shits and giggles.
 

ocho

Active Member
P1000004.jpg
Same girlie but from a different angle. Is a pound from one plant possible with this method?
 

ocho

Active Member
And here are the girls I rescued.

P1000007.jpgP1000009.jpgP1000005.jpg

The gal on the left is going to be my mother. I have bent her at about 8" down. The lower growth has gotten big and sturdier. I think I will be taking some pre-lim clones from her and a couple others.

I'm never sure when the right time is to take clones is. I was thinking the day I flip them into flower....

So, the grow forges onward and upward...and outward for the scrog!
 

ocho

Active Member
Finished getting the last 600W HPS set up and connected.

Bent the stalks on all plants. They are already reaching for the light from the upper portions I bent.

Added 2 buckets (one each tent) of yeast, sugar, water mix for CO2 production.
 

ocho

Active Member
P1000015.jpgP1000020.jpgP1000014.jpgP1000016.jpg
Here are some photos of the ladies after I bent the stalks. Beautiful.
The roots are going CRAZY too.


P1000018.jpgP1000022.jpgP1000021.jpgP1000017.jpgP1000019.jpg
 

ocho

Active Member
ladies look great after stalks bent. Still recuperating a bit. i went ahead and bent the biggest girl for the second time. I bent her a couple weeks ago and she's busy as hell. Mixed up fresh nutes. Mixed at 800ppms of previous blend as the ppms of my buckets keeps going up along with the pH. hmmm. gotta watch em..

Checked buckets the next day. ppms at ~1000 and pH is steady at 5.91

All the girls look healthy and robust. All are bushing out...Lots of large full leaves...
 

ocho

Active Member
Water level was higher than the blue line on my show tubes for my buckets...
The drip rings are spurting a constant flow of H2O. Lots of churning in the buckets...
Placed some covers over the buckets (clay pellets) to prevent further spots of algae from developing...
After a couple of days...I had this on my pellets but most of the gunky-ness was on the pellets with the cover placed over the top...

What in the world is this?
P1000035.jpg

Ditched the SCROG experiment in favor of moving that plant in with her sisters and using single tent for cloning and vegging. I think ventilation will improve a bit with this move as I intend on adjusting my ducting between the 2 tents this afternoon.

Just about ready to flower. Gonna switch the nutes today...mixed a new batch of bloom nutes this A.M.

Cleaned gear for cloning too. Cloning worries me as I lost the last batch of clones I had entirely. Lots of mistakes in my last round so I am hesitant but will have babies tonight.

Most ladies recovered from their bending quite well and are bushing out as a result. VERY strong looking stalks. These ladies will be able handle the massive weight they are about to put on.

Here is a display of the gals.

P1000038.jpg

Here is a lookey at a root mass....so nice and healthy looking! It's hard to believe these girls were in such distress about 3-4 weeks ago.
P1000032.jpg

I'll keep the pics coming!
 
  • Like
Reactions: gom

gom

Active Member
You my friend have a very green thumb. those lady's look fantastic.

You know. I started reading this, and I was thing man this grower is going through a lot of work just to save a plant. Then you tell me you did all this to 8 of them. Good god man that must have taken for ever. But it is very clear to me that Your hard work has payed off in a big way. Just look at those things man you would never know that they had any problems. well done. Very well done.

+rep and subing this one got to see how this comes out.
 

gom

Active Member
One more thing don't you just love them net pot bucket lids with the water farm kits added. I got 2 myself, and I think there the bomb. I have the 8" ones. I went to homedepot today and got some black lids for $.98 I'm going to cut them up to make lids for the 8" net pots so no light can get in.

Any way. Good luck, and good grow. Peace
 

ocho

Active Member
Let's see if I can remember all I have done since my last post on the matter.....

Ducting between tents has been adjusted so the move and set up is complete...still thinking a bit more ducting work will be in order in another month or so but it's working for me now. It can always get a little bit better.

Clones taken. Already a fuckup as an hour into them being cut and placed in the box...my timers switched and everything shut off. 45 minutes before it dawned on me that this is what had happened. So, 45 mins with no water spraying on the cuts...I hate cloning. I will take ANYONES advice on cloning. I have a clone box with 45 spots. I use clonex and h202. All my babies die. Crossing my fingers for this litter.

Switched nutes to a bloom formula. GH FloraBloom and GH FloraMicro. Running ppms at around 1100-ish. within 100 each pot. Still don't understand how to read and gauge EC but would love someone to point me in the right direction.

pH is dead on at 5.5...One and a half gallons in each pot.

So, After talking with the hydro store guy, I decided to attack this slimey shit aggressively. Ditched the hygrozyme and superthrive as I have never used those two in the past and never had this issue of slime before. I added H202 to each bucket as instructed.....Waiting for another solution from the hydro store. Forget the name of it though. Something with a 90 in it's name and my notes are downstairs.

Doubled up my air pump lines on each bucket after removing the drip rings.
Two lines per bucket. Will add an air stone into each once I pick up more air tubing. For now, both lines are running through one stone via a t-joint in my tubes.

Switched my timers for flowering.

2 days later:
Got the solution from the hydro store. The 90 stuff and mixed up a new batch of nutes with this solution and some H20H. Per directions. Same blend as before with an 1100 PPM.

pH is around 6.0 and steady.

Pulled all buckets out and lifted baskets. Found slime areas on each root mass and trimmed those spots off very carefully removing most slimey stuff. Not much of it at all really just something I don't want to fuck around with as I only get to smoke what I am able to grow...Filled FREASHLY CLEANED buckets with 1.5 gallons of new nute mix. Aside from those small areas of ick...the roots look so freaking good. Here's some pix of 3 random samples.

P1000095.jpgP1000094.jpgP1000093.jpg

Rearranged the girls. 3 of the girls (each had a little weaker and less healthy root mass than their bigger sisters) were moved and placed under one 600w HPS lamp closer to the bucket of yeast and fans. The light was lowered a bit to accommodate their vertical challenges.

Raised the LEDs surrounding the other 600w HPS under which the remaining 5 girls were neatly arranged. I have had some of these leaves touching the LED DIRECTLY for VERY long periods of time and they don't burn the leaves...much. In very localized spots (like RIGHT where the diode is at) if the leaf is touching for a long period of time...just the little circle of where diode is touching the leaf is burned. I like this about these lights as it allows very close penetration of the light. I think they are making great lighting supplements. Anyone hear about these and their effectiveness. I was given these by a friend to use so I have nothing invested in them.

At any rate. I took some more photos because I want a very detailed account of this grow. It's my first solo hydro grow and all, so for posterity's sake I am being exhaustive...

P1000092.jpgP1000091.jpgP1000090.jpg

Now for the eternity it takes to get some weight on these girls...Their stalks are beefy and I am going to bend the tops again in about a week or two to tame their height. I may use bags of pennies or tie them down to stakes attached to the buckets so I can still move them around a bit.

Thanks for reading so far and thanks in advance for any advice or suggestions.
 

gom

Active Member
Wow. If your going to give me negative rep (-rep). I wish you would be kind enough to tell my why.
 

gom

Active Member
It's ok man just glad I didn't piss somebody off. I try to get on with everybody.

Hows the grow going? Good I hope:leaf::leaf:
 

ocho

Active Member
OK.

A lot has taken place since I last posted. A week and a half into flowering and I have made some adjustments.

Lost all my clones. Trying again without the humidity dome. Full surgical style scrub-down of all clone gear. clean clean clean.

6 Days into flowering:::
Adjusted the bloom nutes to 1200 ppm. Mixed in some Bushmaster to stop vertical growth. Ran the SM90 and H2O2 one last time.
May have mixed in the Bushamster too late but we'll see.
Trimmed up the undersides and sucker stalks and placed in water to take cuts from...then took cuts. crossing fingers for these ones.

9 Days into flowering:::
Drained my buckets (using the nutrient solution on my regular flower-beds in my yard and they are loving it!) and rinsed the roots with some plain RO water.
Mixed up fresh batch of nutes.

This time:::
General Hydro FloraBloom and FloraMicro as per bottle putting PPMs at 1100 (with nutrient additive).
Added Hygrozyme as directed.
Added Nutrient additive (forget the damn name but will post tomorrow or so) as per bottle instructions.
Poured about a gallon and a half of mix into each bucket.
Added 2 cups of a beneficial bacteria mix to each bucket.
Mixed up new batch of yeast for CO2 production.

the girls look great and are thriving after their haircuts. They do look a bit sparse due to the trim though. Lots of good looking bud sites too. The new growth is forming more buds as opposed to leaves. Pictures are below:

P1000182.jpgP1000184.jpgP1000181.jpgP1000183.jpg
 
Top