SIP thread -- (Sub-Irrigated Planter)

ttystikk

Well-Known Member
my Earthbox Sip outdoors with 2 tomato plants is still thriving,, the plants went into the ground on May 1st which is early around here, and now they have been in the same soil for almost 5 months with no nutes added, ( some cal mag to the res early on while the domolite lime broke down in the soil),, now they are doing better than ever, lots of fruit growing still getting new flowers, and still harvesting ripe red tomatos,, she is drinking near 1.5 gallons per day
Nice! If it was a pot plant it would be worth some money! Lol

I'm such a brat, I know,lol
 

Tim Fox

Well-Known Member
Nice! If it was a pot plant it would be worth some money! Lol

I'm such a brat, I know,lol
this is a test drive for the earthbox sip,, when i chop down the tomato i will get a look at the water roots too, plus I have been working on spacers and an over flow catch for the earthbox in the mean time, the grow cab has new switches on the cob panel , and doing some fan testing this week, I am gearing up for a fall/ winter grow,,
this sip box fits perfectly in the bottom of my wardrobe grow cab
 

ttystikk

Well-Known Member
this is a test drive for the earthbox sip,, when i chop down the tomato i will get a look at the water roots too, plus I have been working on spacers and an over flow catch for the earthbox in the mean time, the grow cab has new switches on the cob panel , and doing some fan testing this week, I am gearing up for a fall/ winter grow,,
this sip box fits perfectly in the bottom of my wardrobe grow cab
Smart, like a fox. I'll be watching carefully.
 

Cornishi

Well-Known Member
They deffo produce a better plant using these SIP's. Just feeding is a little tricker as I am having to top feed to balance them out.
Am using 50/50 Soil/perlite.

Not measuring PH as it seems redundant when the res can fluctuate so much.
 

Tim Fox

Well-Known Member
ok,, took down the tomato plant yesterday,
several surprises, first off they went 5 months in this soil and the plant was still making boat loads of tomatos,,
second, the layer of domolite lime was just now barely beginning to break down,, no wonder the plant was starving for cal mag, in fact if you look closely in the photos you can see white layer of lime streaking across the dirt about mid way , like a gold vein, only white, and if you grab a piece of the lime layer its gummy,, hyroot was right,
third there were water roots all the way across and even, due to no air stone they wre not congregating in one certain section,, check out the picture where i pull on the screen and stretch the roots, a fine layer of hair all the way, it would have been cool to see the roots right side up in the res,, i am happy with this
the earth box screen with air gap ,, the plastic was warping under the load of the soil and the air gap was only about 5/8 of an inch,, so i will correct that on the next grow,
Also for all you organic fans,, there are 2 pictures of the worms that came out of this thing when we tipped it over,, oh yea
over all i am happy with the end result of the test,,
 

Attachments

Evil-Mobo

Well-Known Member
Bro your life is about to change as a grower with what you have planned you will all good vibes. Let me know if you need some beans :)
 

coughphee.connoiseur

Well-Known Member
Hello to everyone communicating and contributing in this thread. I thought that this may be best place to direct my questions etc.

To anyone rocking SIP's, earthbox's I was wondering if you someone could help out with a layout, just some rough estimates.

In a 11x11x8 total space room, and the canopy most likely being 9x9 and or 9.5x9.5.

Lighting Double Ended 825/1000.

How many earthbox juniors or standard earthboxes would one use to create a full canopy of hybrid strains?

Earthbox Junior dimensions: 23" 1/2 long, 9" 1/2 wide
Earthbox Standard: 29" long, 14" wide.

If i'm leaving out in information that maybe needed to help conclude please excuse me and let me know and i will glady provide what is absent.

I hope i get some responses and intelligent ideas and conversations started.
 

Cornishi

Well-Known Member
First time running SIP's for my autos topped them and boy am I glad I did. They're over 3.5ft from soil and built like trees. Got my light as high as poss now as the canopy is super dense. Had to switch them to 14/10 to induce flowering on one that wanted to go longer.

Crazy times!
 

Tim Fox

Well-Known Member
Hello to everyone communicating and contributing in this thread. I thought that this may be best place to direct my questions etc.

To anyone rocking SIP's, earthbox's I was wondering if you someone could help out with a layout, just some rough estimates.

In a 11x11x8 total space room, and the canopy most likely being 9x9 and or 9.5x9.5.

Lighting Double Ended 825/1000.

How many earthbox juniors or standard earthboxes would one use to create a full canopy of hybrid strains?

Earthbox Junior dimensions: 23" 1/2 long, 9" 1/2 wide
Earthbox Standard: 29" long, 14" wide.

If i'm leaving out in information that maybe needed to help conclude please excuse me and let me know and i will glady provide what is absent.

I hope i get some responses and intelligent ideas and conversations started.
hey bro, I use the earthbox, and it works well,,,
but for a room your size, i would build your sips out of storage containrs, you can get ALLOT more water into the res below,, some of the guys were getting 5 to 10 gallons in the res,,,, where as the earthbox only olds 2.5 gallons,,, with the bigger res, someguy was only watering once a week,,,,
plans for building the storage container type is at the start of this thead,,,
let me know if i can be of further help
many of the great sip guys have left riu,, sadly
 

ttystikk

Well-Known Member
hey bro, I use the earthbox, and it works well,,,
but for a room your size, i would build your sips out of storage containrs, you can get ALLOT more water into the res below,, some of the guys were getting 5 to 10 gallons in the res,,,, where as the earthbox only olds 2.5 gallons,,, with the bigger res, someguy was only watering once a week,,,,
plans for building the storage container type is at the start of this thead,,,
let me know if i can be of further help
many of the great sip guys have left riu,, sadly
Is AIS, or air injected soil, a related tech?
 

coughphee.connoiseur

Well-Known Member
hey bro, I use the earthbox, and it works well,,,
but for a room your size, i would build your sips out of storage containrs, you can get ALLOT more water into the res below,, some of the guys were getting 5 to 10 gallons in the res,,,, where as the earthbox only olds 2.5 gallons,,, with the bigger res, someguy was only watering once a week,,,,
plans for building the storage container type is at the start of this thead,,,
let me know if i can be of further help
many of the great sip guys have left riu,, sadly
Thanks for the reply, For the time being im content with the 2.5 gallon res. Due to time restrictions, working methods, and partnership situation. I definitely will build some bigger sip containers in the future.
 

Evil-Mobo

Well-Known Member
Any ideas or recommendations @ttystikk

Lets say earthbox juniors were your "only" option due to certain circumstances. How would you fill up a 11x11 size room with them. @Tim Fox

Anyone in the SIP world?!?!?!
If it was me I'd just do as many 5 gallon bucket SIP's as possible you can easily grow a plant like this on one, I ran (2) this size in a 3x3............I like leaving my girls space to grow......and good air flow keeps the bad shit at bay...........
Barney's Blue Cheese.jpg
 

Humanrob

Well-Known Member
Any ideas or recommendations @ttystikk

Lets say earthbox juniors were your "only" option due to certain circumstances. How would you fill up a 11x11 size room with them. @Tim Fox

Anyone in the SIP world?!?!?!
That really depends on your growing style, and how you would lay out the room in general. Are you looking for fewer bigger plants or more smaller ones? IMHO SIPs are not going change how you grow by that much. You need access to water, to trim and care for the plants, optimally access from all sides in case you need to spray (or if spraying is part of your normal procedure). SIPs will encourage growth and keep your plants healthy, but I don't think they don't have any unique space requirements.

The best laid out room I've seen is SomeGuy's (as Tim mentioned, he left RIU). Here's a somewhat random link to his thread with pics of his set up. He packed them in around the perimeter of the room and scrogged them. It seemed to work very well for him. If you fish around on the pages preceding and after that on his thread, you'll see lots of other pics of his SIP room set up.
 

coughphee.connoiseur

Well-Known Member
Thanks for all the replies guys, @ttystikk ahhhhh sorry to hear that but its a good thing you can have humor about it.

@Evil-Mobo.... I originally was thinking to do the same thing months ago, im out voted though so we are going with earth boxes & city pickers ...

@Humanrob thanks for the link ill be sure to check it out.

As for my growing style. I love too foliar 2-3 times a week if vegging high intense light, or just once a week. Even foliar in flowering if needed... Only Aloe & Coconut.

Id say in between on plants size ranging from 3.5' to 5.0' tall after scroggin so tru height i guess around 4.5' to 6'?!??Haven't experienced scrogging yet only have tied down with stakes.....

Veg will be 2-4 weeks just depending on strain and growth.
 

Tim Fox

Well-Known Member
Any ideas or recommendations @ttystikk

Lets say earthbox juniors were your "only" option due to certain circumstances. How would you fill up a 11x11 size room with them. @Tim Fox

Anyone in the SIP world?!?!?!
well , i would use the standard earthbox if possible, but the Jr and the City boxes are cheaper,, but ,, if you go with the Jr earthbox you will have a smaller res,, my last grow during hot days, I was having to fill the 2.5 gallon res daily ,, so if your ok watering daily if need be,, then go for it,, if i had room i would build the SIPs,, and get the large res, @SomeGuy and his fabric over 10 gallon res was just a cool build,, plus the fill tube was outside of the soil and you can make a trap door,, so you can peek down into the res if needed,, those are things you cannot do with the earth box,, I would give my left ear to be able to see the res in my earthbox,
in an 11 by 11 room, i would place them apart by about 3 feet,, plants get big in these things,, especially if you veg for 4 weeks,, and you will need the space, so 2 rows of 3 earthboxes,, or if you pushed 2 rows against the walls, maybe 3 rows of of 3,, leaving you room to slide between them to work on the plants if needed,,
there is peace of mind having them pre built,, and the wick size already correct,,
 

coughphee.connoiseur

Well-Known Member
Will most likely go with the standard earthbox's and city boxes, think ill be doing half/half of each to maybe compare i guess... the city boxes hold just a little less water. Yes definitely as peace of mind for the pre built. I plan on creating my own in the near future.

This particular project isn't just my own so the vote went to pre-built. Oh shit give your left ear!! say it aint so....

I also have a nice sized blumat system that i may use in conjuction with the SIPs not sure yet.. but i know it would help out for empty res if i missed a day or two yeah?

I like your canopy layout... think ill try the 3 rows of 3 after i see it. Thank you for your brain work Mr. Fox and to all who shared with me.
 

Nu-Be

Well-Known Member
I figured it's a good idea to post this here. Thanks to @Humanrob and @SomeGuy and @hyroot for the help and inspiration.

People ask about SIP rez size frequently. I've been working with these 18gal rezzes using a homemade ROLS mix for a whole cycle, and they did great, even with no airstones!

Here's what I got in 'em:

4" perforated drain pipe
4" drain pipe end plug that fits on the end of the drain pipe pieces
3.5" hole saw
18gal rubbermaid roughneck container and lid (6 of these fit comfortably in a 4x4 apollo tent as two rows of 3, and you can get 7 in if you stuff them in a 2-3-2 |=| config)
2' lengths of 2" dia sch40 PVC pipe
2-1/2" hole saw
7gal root pouch cloth pot with handles (did 5gal last time, and it was fine but 7gal is better)

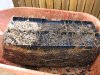
Drill your two holes through the lid. The pot hole is dead center, but try to be strategic about the fill pipe location - you want these to be easy to get to for watering because it's hard to move 150lbs of SIP in the middle of flower. This is especially important in a tent. When drilling the holes, go slow and steady or you'll make a mess.
SIP1a.jpg

Expand your 4" perforated drain pipe, and cut its length about 2 nodes above the edge of the container with the lid on. You're going to want this to be long enough to stick up into your cloth pot on one end, while resting comfortably on the bottom of the rez at the other end.
SIP2.jpg

Use scissors to make a cuts down those first 2 nodes around one interior end of your drain pipe, and use your thumbs to dimple the other end for your wick bottom cap. When you affix the cap, don't leave big gaps between it and the dimpled pipe. The other crinkle-cut end will fit up through the bottom of the lid.
SIP3a.jpg

Make sure to clean everything, even if it's brand new. Spray your gear with tapwater and scrub with a clean cloth. You can even use a mild detergent like Bronner's or something, just make sure to rinse a bunch.
SIP4a.jpg

Let 'em dry out fully. Here in the desert, it doesn't take long.
SIP5a.jpg

Take your 7gal pots, poke a hole in the middle, and use scissors to cut a small 3" +. This is where you'll fit the crinkle-cut end of the drain pipe. Don't make the + too big.
SIP6a.jpg

Put that end of the drain pipe through the bottom of the bag. It should be a snug fit, pushing the ribbed flaps up through the cloth pot's + opening. You want your pipe fitting tightly into both the lid and the bottom of the pot so that, if you use supplemental teas from the top, it doesn't drain much down into your rez and sour it.
SIP7a.jpg

Fit the lid and pot assembly down on top of the rez. Be easy, as the ribbed pipe can bend if forced, so make sure it's not too long before you clamp the lid down. You want the pipe hanging straight down, so the end is resting comfortably against the bottom of the rez. Fill this pipe with coco to a mound at the top. Don't knock the bottom cap off or spill your coco into the rez - fill gently and take your time. It's worth doing right the first time.
SIP8a.jpg

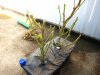
Here are a few that took 30min to clean, cut and assemble one morning:
SIP9a.jpg

The last thing is to transplant your ladies, add water to within about 1-2" of the bottom of the lid (about 15-16 gal of water) and then add a plastic cover on the top around the stem to make the pot wick. It's critical to transplant, add water to nearly (but not quite) the top of the rez, then add a little water to wet the soil in the cloth pots - but not enough to drain out the bottom/sides of the cloth pot. Add slowly and surely from the top of the soil. Water down the white fill pipes can be added as quickly as you want, just make sure to look down them to prevent overfilling. I used filtered tap water, but RO would be best.

You'll also want to cut plastic evaporation barriers for the sides of the pots. I use 3mil clear plastic, and cut it into 48" x 10-11" strips for the sides, and a rough 12" x 12" circle for the tops. It's important to provide these evap barriers for proper wicking here in the desert, especially the top, but see what works for you and your garden. Lots of people use bucket lids and such.

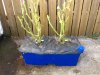
This is what my SIPs looked like in use at day 49F:
SIP11a.jpg
 
Top