Hello Community,
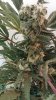
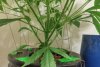
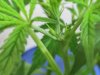
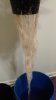
This will be my first journal for RIU. I plan on following this grow through to harvest, but things happen. Currently I have two "ladies" both Critical Kush by Royal Queen Seeds. They are in the vegetative phase under a P300 light. For simplicity I have named them plant A and B. Initially A was my prize as she showed much promise and had no issues early on. However plant B, even after suffering some tap root damage during the first week of life, has come back with vengeance. For the time being I only have a picture of B during a res change.
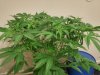
They are roughly 3 weeks into veg, I personally don't consider them to be in veg until the first 3 bladed leaf, so they may be a little older. They are currently transitioning to flowering nutrients in small amounts, and maintain a 14/10 light schedule. I am vertically limited and can support roughly a two and a half to three foot plant, so I try to limit their vertical growth and create a canopy somewhere around fifteen inches in height.
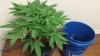
I am running House & Garden Aqua Flakes, with the additional help of some silica blast, cal-mag+, zone, rhizo blast and lastly a touch of open sesame. I try to keep my res levels at 2.2 gallons, which is slightly enveloping the bottom of the net pot to encourage growth. Generally they sit at around 250 to 300 ppm's or about .5 - .6 EC. It is extremely low, however they seem to be doing fine and less is more. During this res change I have increased the ppm's to 420 because why not, and I would like to see generally where she starts to show nutrient deficiencies.
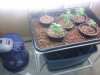
As far as their life so far and training, they started life in rockwool cubes, under a dome with a heating pad. Once roots were formed I took a zip lock storage container, cut two square holes in the lid, and suspended them there with tooth picks. Something like this.
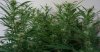
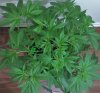
From here nothing special happened and they grew like plants do to about here.

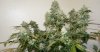
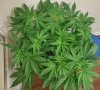
From this point I implemented some basic training like fimming, tucking, super cropping and low stress training to promote inter node growth.


Currently I now have clones from both "ladies". I am now simply trying to create an even canopy for B while her roots expand, and hoping that A gets her self together and starts to pump out some growth. Also I am waiting for pre flowers, they both have staggered growth, meaning the nodes are now offset and no longer parallel. I do see what appears to be female organs, but they have yet to show calyx's of any kind. If you choose to stick around and see what happens feel free, if you don't maybe I will spark your interest next time.
On a side note Ive had decent results with the P300 LED. I may throw in my 2 "solar flare 220's" into the mix since the P300 is a focused lens, designed for penetration.
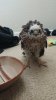
And now a random hawk picture that I rescued. Sad story I was driving home and this not so little guy was in the middle of the street. As I tried to pull over and park I watched not one but two cars drive over him, luckily he decided to duck at just the right moment. Thus allowing me to snag him up.
This will be my first journal for RIU. I plan on following this grow through to harvest, but things happen. Currently I have two "ladies" both Critical Kush by Royal Queen Seeds. They are in the vegetative phase under a P300 light. For simplicity I have named them plant A and B. Initially A was my prize as she showed much promise and had no issues early on. However plant B, even after suffering some tap root damage during the first week of life, has come back with vengeance. For the time being I only have a picture of B during a res change.
They are roughly 3 weeks into veg, I personally don't consider them to be in veg until the first 3 bladed leaf, so they may be a little older. They are currently transitioning to flowering nutrients in small amounts, and maintain a 14/10 light schedule. I am vertically limited and can support roughly a two and a half to three foot plant, so I try to limit their vertical growth and create a canopy somewhere around fifteen inches in height.
I am running House & Garden Aqua Flakes, with the additional help of some silica blast, cal-mag+, zone, rhizo blast and lastly a touch of open sesame. I try to keep my res levels at 2.2 gallons, which is slightly enveloping the bottom of the net pot to encourage growth. Generally they sit at around 250 to 300 ppm's or about .5 - .6 EC. It is extremely low, however they seem to be doing fine and less is more. During this res change I have increased the ppm's to 420 because why not, and I would like to see generally where she starts to show nutrient deficiencies.
As far as their life so far and training, they started life in rockwool cubes, under a dome with a heating pad. Once roots were formed I took a zip lock storage container, cut two square holes in the lid, and suspended them there with tooth picks. Something like this.
From here nothing special happened and they grew like plants do to about here.
From this point I implemented some basic training like fimming, tucking, super cropping and low stress training to promote inter node growth.
Currently I now have clones from both "ladies". I am now simply trying to create an even canopy for B while her roots expand, and hoping that A gets her self together and starts to pump out some growth. Also I am waiting for pre flowers, they both have staggered growth, meaning the nodes are now offset and no longer parallel. I do see what appears to be female organs, but they have yet to show calyx's of any kind. If you choose to stick around and see what happens feel free, if you don't maybe I will spark your interest next time.
On a side note Ive had decent results with the P300 LED. I may throw in my 2 "solar flare 220's" into the mix since the P300 is a focused lens, designed for penetration.
And now a random hawk picture that I rescued. Sad story I was driving home and this not so little guy was in the middle of the street. As I tried to pull over and park I watched not one but two cars drive over him, luckily he decided to duck at just the right moment. Thus allowing me to snag him up.
Last edited: