Quasi Ghetto Grow

good2bkind

Well-Known Member
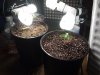
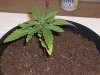
I took the larger black containers you see here and added pretty much the rest of my seeding soil. Added saved water, the soil went down by at least a third, added more water.

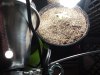
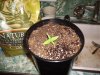
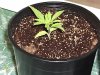
When I put in Lady Luck, she appeared to have some sort of mild root system, the dirt held together (roots may not have developed well from being in a clear, shallow container).

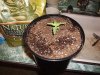
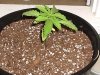
But when I did Stretchy2, most of the dirt fell away and that boy was still sittin in his peat pellet. He seems the healthiest of all though.

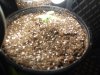
Packed up more dirt to cover up the stem (still hasn't shown new growth, so might as well fix the stretch) and misted this top inch of soil or so pretty aggressively to make the wetness match the rest of the soil.

For all of them I used water that I'd let stand but for Stretchy2 I was out, and had to use tap water.

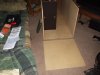
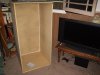
The biggest problem by far now is the light situation, obviously.

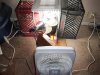
That 5th light at the top might as well be for looks since it's so far away and the other lights block it...

But that's a project for this weekend ;)


Pics:

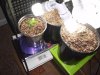
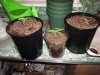
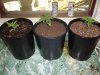
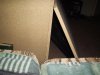
1) Rear to front: Original Mr. Stretchy, Lady Luck, Stretchy2
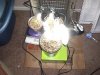
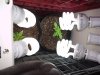
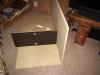
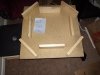
2) We keeps it ghetto
 

Attachments

good2bkind

Well-Known Member
These pics show that since last night some growth has occured for the two stretchys but not for Lady Luck, though she seems to be slightly more stabilized. But she doesn't seem to be growing.

Maybe she's a runt?

Anyways the one who has shown the most growth is actually Mr. Stretchy, but I haven't transplanted him yet so maybe the other two are dealing with a lil transplant trauma (sounds like a bad hospital TV show-- "Transplant Trauma")

pics

1) left is Mr. Stretchy, rotated (he had moved towards the light), middle is "stealth" Stretchy2 and right is Lady Luck (I just now put that third light on her, because it fit... not sure if she needs that right now-- she seems a lil traumatized-- any ideas are welcome, she's lighter green than the others)

2) Stretchy2. Notice that the stocks are not thickening though growth seems slow... but maybe I'm impatient.

Slow growth is fine for me at this stage as I still have to build the closet they will flower in... waiting for money for that.

I also wonder how keeping a slow-growing plant in veg for so long will affect anything-- final buds, flavor, and so on.

3) sorry... I should have turned off the lights and stood back.

4) The whole setup, for now. Notice that it is slightly less ghetto than when I first started.
 

Attachments

good2bkind

Well-Known Member
Mr. Stretchy has been in the longer but clear container and he's ready to transplant.

I felt this urgently when I looked at the container and the drainage is not good enough. There was some risk of mold or root rot so over the past couple days I've been cutting slits in the plastic but it's not aerating fast enough.

So this morning I woke at 3:30, took the pot and set it on a chair near the heater, turned the heater on and went to Wal-Mart to get more lights and stuff.

Came back an hour later, this may have helped the drying some.

I have to dry out the soil before I transplant, so I don't pull away roots (soil on top is dry and moist on bottom).

So now as you see in this pic I have it sitting on top of the stove while I heat up some enchiladas...
 

Attachments

good2bkind

Well-Known Member
Yesterday I gave the plants a rest from all the light. I'd been running 24 hours a day from about day 3 or 4 and they seemed fatigued, needed some rest.

So I turned off the lights yesterday night and they seemed healthier.

pics

1) Stretchy2
2) Lady Luck (any comments on why she's lighter green are welcome)
 

Attachments

good2bkind

Well-Known Member
I have been waiting to do the final transplant of the third plant, Mr. Stretchy, and today the soil was dry enough. Noticed the roots had gotten fairly extensive on the bottom-- long white tendrils.

I thought I was about three weeks into this but I only planted these on the 25th, it looks like-- so we're just 16 days, barely over two weeks. Seems like it's been much longer.

So I bought this Miracle Gro organic potting soil. It's pretty rich looking stuff. Luckily I had just enough leftover starter mix to make about a 40/60 split for Mr. Stretchy-- that is, about 40% starter and 60% organic. I have to remember that this plant will have more nutes than the others because the others are just in starter mix though I now realize the containers are quite large for these plants so they may not need any nutes for a while. I'm thinking maybe 1-2 weeks from now, maybe even longer. I'll feel how they grow and judge it from there.

I re-did my ghetto light setup. I am waiting for some more money so that I can buy the wood and tools I need to build the grow closet, but I have no tools whatsoever-- I even had to buy a hammer and nails the other day. I remember when there were always tools laying around.

As you can see I am using two strips with some lights in 'em. I went out and bought more powerful cool floro's which are on the back plant (2 75 watts each equivelent) and my original 4 smaller lights with a 100-watt equiv in the shroud.

Height to the lights is adjusted by moving the plants down-- they're sitting on books so to lower them you just remove a book.

I bought Neem oil today-- I don't need it for these plants (thankfully) but my houseplants are having serious infestation of gnats but also something I think is eating the roots. So I'm trying it on that plant, to get a feel for it though I may be too late-- that thing got sick really quick-- probably because I set it outside when I found the gnats and I think some stuff from the field next door got in ma plant.

pics

1) Mr. Stretchy in his new container (that stalk is looking pretty weak though I've had the fan on all of them regularly-- however it is not an oscillating fan and this may make some difference or I may need to up the fan speed)
2) The grow space
 

Attachments

brendon420

Well-Known Member
looks like youve got everything going okay but im a fellow noob too so you're learning for me too! the only thing i would recommend at this point is something to keep all the light so its not dissappearing. i heard printer paper is good, and mylar if you have the funds, but stay away from tin foil.. any way good luck, ill be watching
 

mastakoosh

Well-Known Member
looks like they are growing right on track. i have the book method of raising and lowering my plants too lol.
 

good2bkind

Well-Known Member
looks like they are growing right on track. i have the book method of raising and lowering my plants too lol.
Thanks, Koosh! I appreciate you checkin in. Funny how exciting it is to see someone checkin out yer grow.

Okay, so someone else does the book thing, I ain't crazy!

I'm biding time until I build the closet but I'm very tempted to start flowering one of these pretty soon.

What I would do, is put it with some lights in one of the milk-crates here and put a thick blanket to block out light.

Even as I type this I'm realizing-- no ventilation. That wouldn't be so bad now, it's been raining (unusual) and temps in the room are 60-78... but we're supposed to get a heat wave come Thursday and this room will be baking.

But I need something to do this weekend.

Well, my friend DID give me an old PC case... :mrgreen:
 

good2bkind

Well-Known Member
looks like youve got everything going okay but im a fellow noob too so you're learning for me too! the only thing i would recommend at this point is something to keep all the light so its not dissappearing. i heard printer paper is good, and mylar if you have the funds, but stay away from tin foil.. any way good luck, ill be watching

Thanks for checkin it out Brendon, you're right. I have been lamenting this and surprised at how fair they've grown without it. I recently saw a guy using inside-out chip bags. Apparently, this is mylar.

Only I don't eat that many chips, I have one empty bag (I saved it, too).
 

good2bkind

Well-Known Member
It's amazing to me the relationship and connections one builds to the living beings one is growing.

I found this book, a few weeks ago, called "The Secret Life of Plants" by Peter Tompkins and Christopher Bird.

They talk about this guy in the 60's who just happened to start testing the galvanic response of a plant, by accident.

Galvanic response is what's measured on a lie detector test-- excretions from the skin based on emotional response, and so forth.

He was considered one of the better people at understanding how this new technology worked.

For some reason (I forget) he hooked it to his plant and left the equipment rolling.

He'd noticed, when he hooked it to the plant-- first of all, there was a response-- just like when the equipment was connected to a human.

He thought of an idea.

"What would happen if I burned a leaf of the plant?"

What happened next was strange, and led to years of study with plants.

Because what happened is, as soon as he THOUGHT of burning the plant, the galvanic response went haywire.

He had simply thought of striking a match and burning one of the leaves.

And the plant reacted as soon as he thought of it.

The book details the various tests he went through-- in one example a person came into the room and the experimenter (forget his name) noticed that the indicators showed the plant going into a sort of "play dead" state-- he'd seen this before, around danger indicators.

He asked the man: does your work have anything to do with killing plants?

And the man said, actually yes, I work at such-and-such and when we're done with a certain process, I burn the plants because we don't need them anymore.

And so on.

Point is, I'm excited and a bit incredulous that I've gotten this far.

But I have to remember, if I get lazy in the future, that I've been listening.

A number of times, they woke me at freakin 2 or 3 in the morning.

"We need more light!"
"We need a fan!"
"We need different pots!"

And so on.

I listened, and I have to remember, that in the future, maybe when I've been growing a while, if I forget, and think I'm all Mr. Scientist green thumb, that in the beginning... I just read grow journals and listened to my babies.
 

Attachments

good2bkind

Well-Known Member
A side note.

When you go out to buy lights around here, you always see this NVision stuff that is packaged cheaply and you think they're cheap lights, and they are.

When I went to Wal-Mart that's all I could see but I knew there had to be something else so I hunted and found General Electric and it clearly said, 6500K, which I've seen around here.

The cheaper brands say "sunlight" but no "K".

So I put them in and could tell immediately they are a cooler color than what I was using, the cheaper ones that are supposedly sunlight.

I looked at the cheap ones I'd been using, and sure enough, in fine print: "5500K".

I noticed this because there's a guy on here doing a first grow and he's using a "soft" light (I already tried that-- even worse than 5500K) so I thought I should warn people.

For veg, from my understanding, you want 6500K-- sunlight, cool.

Apparently for buds you want a warmer spectrum-- this corresponds more realistically to where the sun is at naturally, at that time of year.

But I'm not sure how much it applies to flouros-- will have to research.
 

brendon420

Well-Known Member
THAT BOOK IS SICK i just posted a thread on it...makes you think about how you grow, and your intentions!
 

good2bkind

Well-Known Member
The 2nd pic is the babies in their natural home. Obviously I do not have any reflective material (just saved 3 chip bags, may add them tonight, for "mylar").

Not enough, obviously... I don't eat enough chips. I had to quarantine them at work (where I eat chips), in a non-descript white bag-- "WHY YOU WALKIN AROUND WITH EMPTY CHIP BAGS?"

Don't need those kinda questions.

The 1st pic is the thermometer I bought. Next I'll get a water PH tester.

You can see the temperature, right now, at 7PM, is about 90 degrees.

And this is middle of May. Things gonna get hot, come summer.

This is west coast, and we were warned that this Thursday (today) would reach 99 degrees.

Well, I just checked on Yahoo and we had a high today of 97 degrees.

I can probably assume that when we have days of around 105-110, my babies are gonna be about 100 degrees.

And that's not in a closet (makes mental note to grow autoflowers in the summer).

I'm pretty sure any closet I had right now (and will have soon) could hit potential degrees above 100 F... with fans...

So I need to figure all that out... that's way too hot.

And the nights here, in the summer... we have 70-80 degree nights, it's pretty intense.

With autoflower and a fan, none of this is an issue.

Without...

I still want to build the closet though, out of respect for my first babies, and then I can always use the closet in the winter here where our temps inside this room without a heater and the window open can get down to around 50 degrees (the closet would probably be around 65 lowest, 90 highest during the day)

THINK ABOUT THE FUTURE!

Always loved that line from Batman.

But notice the humidity.

The air is really dry, we're in a semi-arid place.

At least mold will probably not be a problem.

I live in a city with lots of trees and the temps are less variant than cities I've lived in just 10 miles away.

I'm going to flower these babies as soon as I can build a light-tight closet, hopefully this weekend, but if not, the weekend after.

My main concern right now is temperatures. And light.

Because once I go into flower, they're going to grow much bigger, and I have to have enough light to spread upon them.

I don't have the book Buds for Less, I looked for it but can't find it and can't order online.

So this is pretty much feeling my way here, reading different grow journals, etc. Same as we're all doing.
 

Attachments

good2bkind

Well-Known Member
I finally started adding nutes, it's been about 3 weeks and my babies are growing really slow. They had a slow and humble start if you remember the beginning of this post.

So I had the feeling that Lady Luck, for whatever reason, wanted nutes.

I added 4 drops of Schultz' 10-15-10 plant food Plus (they swear) to a little over a quart of water (but not 1/2 gallon-- no markers on this container, you gotta feel it).

10-15-10 is "NPK"-- 10% Nitrogen, 15% Phosphate, 10% Potash (Potassium like in Special K cereal: K=Potassium)

I poured about 3/4 of this weak mixture into Lady Luck. I put 4 drops of this into a little over a quart (the recommendation is 7 drops per quart and I always see on cannabis grows that you should use half the nutes suggested).

She has for some time tended to show a mild yellowing, and slow growth.

Because she had the most developed root system (I intuited), I thought maybe she needed nutes as I started all these babies in "starter soil," or whatever it's called-- something that was really airy, with hardly any nutes.

She is still showing a very slight yellowing at the ends, but it doesn't look like burn or need so much... I have no idea what it is, maybe she needs more light.

So last night, after nutes, I put her under the brightest 6500k's and we shall see.

As for Mr. Stretchy, he is the biggest of the bunch, followed by Stretchy2.

So far, I cannot see that the nutes I added yesterday to Lady Luck have hurt her in any way.

In fact, all of them for some reason (maybe it's love?) have sorta gotten bigger quickly, I had to move Mr. Stretchy from the "optimum lights," the two 6500k's in the back, because at lunch today he was literally touching them, whereas yesterday he was quite below them.

So I put Lady Luck under those lights, Mr. Stretchy in the weakest position (middle) and Stretchy2 under the weak 5500k's + a stronger 5500k (shitty ghetto bulbs called "NVision" which I will never buy again because they claim to be sunlight but are only 6500k. Still... may be more useful than 6500k during flower...).

Only Lady Luck has been watered well, though I believe I did spray some "set water" (water allowed to sit, dispersing chemicals over a couple days) onto Stretchy2. That is, I sprayed it around the stem, in case the roots hadn't gone far enough down to hit the moist soil that I knew was still there at the bottom, because of the weight of the container)

I never watered Mr. Stretchy because if you remember when I transplanted him or whatever took place (not too sure now, OH NO TOO MUCH BER), I mixed in 40% Starter Mix with 60% Miracle Grow Organic Choice Potting Mix, which was very moist, and I assume fairly strong as far as ferts go, and since the soil was very moist, I didn't add water then.

So I just felt that out and Mr. Stretchy is growing more than any of them, but then... it's Mr. Stretchy.

Always the over-achiever.

I'm assuming at this point that Lady Luck is probably a female... she's low to the ground and bushier, and that the two "stretchies" are males.

The question now is...

When I put them into flower... do I make seeds... or do I terminate the stretchies so that I can get bud from Lady Luck?

Also I ran across another possible scenario, not a good one.

I felt one night, that I should rest my babies, turn off the fans and the lights.

Sure enough, next day, I see that some people do this to give them some rest, and it seems good, they seem to like it.

I have done this about 3 times, and it seems to help them, they seem invigorated, less stressed.

But I also read that this can produce hermies. Because the light source is unpredictable.

Arrrgggghhhh!

Well.

I think so far, the process of reading A LOT of grow journals and listening to your plants, this is the best thing, I've gotten this far...

So for now I will keep moving forward by a careful combination of intuition and reason...

pics

1) Lady Luck, Mr. Stretchy, Stretchy2
from this pic, looks like Stretchy2 could be female, as well as Lady Luck :mrgreen:

2) Lady Luck

3) Mr. Stretchy

4) Stretchy 2
 

Attachments

Last edited:

good2bkind

Well-Known Member
Okay, Saturday I'm going to Lowe's or Home Depot or both to buy all the stuff for my grow closet.

It will probably be 2x2x4= 2' deep, 2' wide, and 4' high.

I'm only using flouros, so don't need a lot of fan power, but can't buy online.

I know I need at least two fans, one for intake at the bottom, one for exhaust at the top (mental note: carbon scrubber, too), and I would prefer they run on a/c, not have to mess with conversion to DC.

Any suggestions?

I'm thinking a 6" each will be plenty for a closet with floros. I live west coast and the room here in the summer could get as hot as 90's F... I assume the closet without fans could get 120... bad!

Of course I'll have a fan on the babies, inside, for their stalks.

Any advice is appreciated! I need to be able to go and buy it cash. Also if you know it doesn't come with plug, let me know if you have any info on that-- wiring, plug rec's, etc.

Meanwhile, I'm researching myself for these answers...

Also know that I need to maintain light-titeness so any rec's on this would be welcome.

Looks like I'm supposed to buy some of that stretchy tube stuff used for dryer output...
 

good2bkind

Well-Known Member
I figured I would build this just like I used to build speakers, when I was 12-- ghetto and everything.

The easiest way to do this is to start with 4x2 pre-cut boards that you can get at Lowe's or Home Depot.

I'm using 1/2" particle board as it tends to be more resistant to warping than plywood, and is usually cheaper.

That black thing is just to hold the sides square while the glue is drying.

You just spread wood glue (I used Elmer's) on both sides that you're gluing, set it down and wiggle a little with your fingers as you feel along the edge to make sure the fit is clean.

The 2nd pic shows the clean edge and how I put too much glue. It's been 25 years since I last did this. I used to just use Elmer's white glue, and this glue is stronger-- see the drips touching the carpet? It was hell trying to get it off the carpet, and now there's hardened glue nugs on the carpet-- but I'll replace the carpet at some point, anyway.

3rd pic-- using the same strategy as before, to keep the sides square, you can see I have a book opposing the black shelf thing. Make sure this doesn't get bumped while drying!

I use glue because I find it to be stronger and easier than screws or especially nails.

Right now, the whole thing is very weak-- you dare not move it like this, though after 2 days you probably could gently move it.

The next trick is to put on the fourth side.

In all these examples, I just let the glue dry a couple hours. As long as you're very careful, you can glue this up pretty quick.

Pic 4, I add the bottom panel. This is the part where you start to relax because now, you have the two large side panels anchored not only to the panel on the floor, but on three sides of the bottom panel-- so it's starting to get rigid, and is in much less danger of collapsing (once the glue has dried for a couple hours, anyway).
 

Attachments

good2bkind

Well-Known Member
I should point out that I had to use certain basic power tools-- not for the largest 4x2 panels, but obviously for the base and top, and for other parts of this project.

I had to go out and buy new tools. When I was a kid I started out with my grandfather's very old fashioned tools-- no power. My God, trying to build speakers using a handsaw, a hand-cranked drill, brace, and trying to cut circles with that skinny saw... eventually I saved up and bought the most basic tools I'd seen my neighbor's dad using-- a powered drill and a powered jigsaw. I later got a circular saw to make due for my lack of table saw.

You won't need that for this.

You need a jigsaw, for cutting round holes or straight lines, and a drill to start the hole for the chainsaw when you cut round holes (also handy obviously for driving screws and... drilling holes).

I was gonna get cordless, but they were about $45 apiece, then the charger was another $45. This is over $150 with tax. Or you could buy a kit, but they never included a jigsaw, only a circular saw. You can't cut round holes (your 4" intake and outtake holes) with a damn circular saw.

Then I saw the corded versions were cheaper so I got one of each, about $40 a piece with tax, and found a 16 gauge power cord for $8.

I bought some blades for the jigsaw (you'll need at least two blades for this project-- particle board is quite dense) and a basic set of drill bits.

The drill came with a screw driver, which I did not expect. Sweet!

Remember, if you're on a severe budget, you can do all this with non-power tools. You will save at least half the cost, and expend easily more than twice the physical energy.

Still, if you're young and low on cash, there's nothing wrong with working hard for something you are going to love!

And you only have to do this once. Consider it an investment, a learning experience, a college course. :mrgreen:

For manual non-power tools, you would need a standard saw, and this weird skinny saw that seems to barely exist anymore. The only pic I could find is here:

http://www.istockphoto.com/file_thumbview_approve/1989666/2/istockphoto_1989666_hand_saws.jpg

You need the top one for cutting long pieces, and the bottom skinny one for cutting holes.

But to cut the hole, you first have to make a large enough hole to start cutting, inside the circle, with something called a Brace.

This is like a drill, only can use much bigger bits. You can make a 1" hole with your brace, so you can stick the skinny saw in there and make the circle cut.

A brace looks like this:

http://www.antiqueadvertiser.com/Collectables/Tools/HandDrill.jpg

For this project, as far as hand tools go, you do not technically need a hand drill-- you can use an awl (looks like an ice pick) to start your screw holes (for things like the handle to your door), and then use a lot of muscle and a basic screwdriver to drive your screws.

But here is a pic of a hand-powered drill:

http://www.toolstation.com/images/library/stock/webbig/20242.jpg

That shit is real, Jack! This is how our ancestors did it.

If you go with the manual method, be sure to eat lots of protein and drink lots of water, get vitamins from veggies and fruit. Because you WILL be workin out, and you will be sweatin.

You also need saw horses. Of course, you can always just use a very sturdy table, but remember-- Safety first!

I paid $20 (ripoff) for two plastic sawhorses and they work fine.

However, again, you can do it the old way, and make sawhorses out of a kit.

It's just two metal pieces at angles and you shove some 4x4x1 (not sure of those dimensions, basically 4 inches wide, 1 inch deep, 4 feet tall) lumber into them, you'll need three pieces of lumber for each sawhorse, plus the kit, which is simply the metal parts.

Here's a pic:

Ma bad. I literally could not find a pic of this. It's what we all used in the 80's.

I did find a pic of the metal brackets, to hold the wood, but when I clicked on the link for the image, it said file not found.

Buy the plastic if you need a sawhorse. Sheesh.

I guess with the kit you'd probably only save $5 anyway. My how times have changed.
 

good2bkind

Well-Known Member
Okay, this first pic is misleading!

This is not viewed from the bottom, as it looks, but from the side. The bottom is the piece of which you can only see the skinny part. It's the piece that has the board propped up against it.

If you remember the pic showing this board lying flat on the carpet, you just glue your stuff and raise this board to the three panels that you have, and hold it in place.

The large part of board you see is actually about a 1/3 of the 4x2 side.

I hate that I took this shitty, misleading pic.

Anyways.

pic2 shows the caulk. You have to do this to make it light-tight. In the speaker-building days, light-tightness was not crucial, but air-tightness was, and the same principles apply. Just caulk the shit out of it.

Okay, pic3, here's what's happened.

The bottom-most panel is the one that I glued to the three sides, that I lamented photographing so shittily.

When it was fairly dry, I raised the whole structure, rotating it 90 degrees.

In this pic the top is already on, whether glued or not I don't know, but once you get the bottom and three sides, and they've dried well enough (6 hours? have no clue-- feel it) you just lube the top part with glue, set it on there, and set something heavy on it if you can (this is preferable-- anything)-- I set a 2.5 gallon thing of water, this was more than heavy enough to seal things.

Pic 4 is the light baffle, a design I borrowed from Bud Buddha:

Growing Cabinets From Scratch 101 - PlanetGanja.com

In fact, read his blog with mine and you'll get a really good idea of what to do (probably more from his blog).

This thing 'baffled' me for some time. I just eyeballed his, cut blocks of wood to a size I thought appropriate, then measured carefully to get everything centered. It's different than his (notice I cheaped out and don't have the 45 degree corners) but I think it's the same principle and am confident it will work).

This thing was strange, because his design is so simple it's sublime.

You basically put a round hole in the bottom of your grow closet.

You raise the closet 3-4 inches.

You insert this inside the closet, over the whole. (the pic here shows it upside down)

Air can come in through the hole, but light cannot.

You leave 1-2 inches around the sides, for the air to come up.

This is brilliant, because being on the bottom, it's sucking up cooler air (hot air rises) and with a fan at the top of the closet, you create a negative air pressure situation where cool air is draw in and hot air is pumped out, and you never show an ounce of light to your babies!

Over the hole, you put some screen, to keep out big bugs.

This cabinet is maybe a third done, at this point, if that.

We still have to paint the inside white, paint the light baffle black (white on top, of course), install the shelf rails and holders (in this design, rather than moving the lights UP, you move the plants DOWN as they grow-- I chose this so that I can configure my flouros in various ways rather than have a strict arrangement).

We have to add the framework for the door, being careful to make it light-tight, we have to trim the door.

I was standing here looking at the box, imagining (and not liking) this heavy 1/2" particle-board door.

Then I was like, wait, I could buy plywood that's only 1/4" thick, lighter, and still rigid.

Well, it turned out, the only plywood I could find that thick and still rigid was oak plywood. And the 4x2 piece was $16.

But I love oak, and man is that gonna be a pretty door.

So in the interest of aesthetics and nature for just the door I chose to go with a really beautiful, expensive plywood.

I'm making this once.

It's worth it.
 

Attachments

good2bkind

Well-Known Member
Also hinges for the doors, a handle, a lock if you want, screws for the shelving, white matte or flat paint for the interior, black flat paint for the light baffle, some fans, and that flexible silver tubing, taking care that it is adjusted to avoid letting light into "le chambre" (the chamber).

If you want to get metaphysical or new age-y you may also want to say a prayer of blessing over your cabinet.

I sure did.
 
Top