Plastic Box Growing Plans

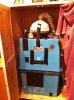
I'm planning on growing discreetly, and the second thing that came to my mind was one of those old plastic boxes. I went ahead and took pictures of the box I was thinking of using:


Would that work if I were to flip it so it goes upwards? Obviously I'd be cutting a few holes here 'n there for the lighting/wiring and whatnot. If you don't think that would work sufficiently, could you please recommend something that would? It can't be too big (and obviously not too small.), and needs to be stealthy. So with that said, thanks in advance.

EDIT: Silly me, just realized it's only just under 2 foot tall. Looks like I won't be using that! Can anybody give any measurement recommendations for one plant though?
 

lokie

Well-Known Member
stack 2. 1 on top of the other. cut the bottom of them out to make 1 big tub look like 2.

there is a DIY aroung here someplace.
 
Get another of the top boxes, put the 2 together and you have a growbox. It's what i use, see my sig.
Good Luck
Could you get a larger picture, please? That way I can get a better idea as to what I should do.

EDIT; Just saw you posted an attachment, thanks!
 

subl!me

Member
Gimme an hour or so and i'll dig out the photos i took while i was building it and post em up with a description.
 

subl!me

Member
Picture 433.jpgPicture 432.jpg
Apologies, i can't find the photos i took when building it but the bsics are as follows.
I lined the boxes (with foil, but would recommend a white sheeting or mylar as it's more reflective)
Cut a 4" hole in the top and fitted a ruck fan and ducting into a carbon filter. Cut 2 lengths of wood and mounted 3 light fittings either side and screwed thru the box to hold them in place.
Fitted a time clock to the lights, mounted on the side. Cut a 4" hole on bottom right hand side, and fitted a pc type fan motor to draw fresh air in (although i don't use it as the ruck extract is ideal for creating negative pressure in the box)
I bought a Primair fan speed controller to control the extract fan and fitted a digital thermostat to monitor the temps.
Then i just use 6x 25w 6400k cfl's for veg and swap for 6x 30w 2700k cfl's for flowering.

I'm only on my second grow but the box was ideal for what i needed. After this harvest, i'm gonna strip it all down and use the bits to build a growdrobe with a section for vegging and space for a couple more plants as the box is only really big enough for the one.
Also, with my currant grow i'm trying out LST which seems to be going ok.

This site has been a goldmine of infomation for me since i started, so would encourage you to spend a lot of time just searching around. This build was my first attempt but there are many many more people on here with better designs and more knowledge but i hope this helps.

Good luck and let us know how it all goes.

J
 

subl!me

Member
Picture 040.jpg
This is an early one, i fitted the timeclock into the white box, replaced the top fan with the ruck extract, fitted ducting to the intake fan which sat near a window and lined the join between the 2 boxes with armaflex tape and magnetic strips to keep them closed tight.
 
I'm probably going to sound like a complete fool when I ask this, buttttttt...

How the hell do you cut through the damn box to place old PC fans, etc, etc, and whatnot? I'm sitting here with a pair of tin-snips like a complete idiot having a hell of a time trying to do so!
 

doctor.j

Well-Known Member
either a cutout bit for a drill, maybe an xacto knife, I'll be having this problem if my fans ever get here, I wouldn't use tin snips though, they're not very accurate when trying to cut a circle.
 
either a cutout bit for a drill, maybe an xacto knife, I'll be having this problem if my fans ever get here, I wouldn't use tin snips though, they're not very accurate when trying to cut a circle.
Yea, I actually just remembered I had an old razer blade. That worked out pretty well, despite having to cut and work through all the jagged and gappy edges from the horrible work caused by the tin-snips. >_<

Anywho, managed to get my first fan affixed into it's final spot.
 

doctor.j

Well-Known Member
I'm a big fan of using the "melt method" for plastic, for that size I guess you could get a used tin can, wash it and take the paper off, get a torch or something above a regular lighter, maybe a candle even, wear a glove and heat the can hot enough to melt a hole.
 
I suppose I'll go ahead and show the fan placement photos out of boredom. The first fan is in there to the point where it's a bit wiggly, but won't come out unless you absolutely force it too. It runs fine, I got it hooked up to a 6watt opposed to the original 3watt supply I did have it hooked up to. It works much better and undoubtedly more efficient since the change, lol. I'll probably end up taking it out when the mylar, and other items I ordered online arrive, that way I can lay the entire inner side of the box with mylar. Then I'll just need to secure the fan itself from wiggling around too much, if at all.

Once I get the other two fans, I can set up the other inner fan that will be placed inside the box for all around circulation, and another such as the one shown in the pictures as the exhaust/outtake fan. I should also mention I'm surprised at how unbelievably easy it was to convert a regular old computer fan taken from an unused PC, into an outlet fan. It only took me about 2-3 minutes tops without any help. So if anybody would like any help as far as that goes, just ask.


Still sucks that I messed up a little on the cutting and made it uneven to the fan. Mainly due to the fact I was a total fool and used scissors and tin-snips before I realized it'd be easier to use a razor blade. But it's nothing a little duct tape can't take care of! :D

EDIT: The fan is on in both pictures by the way. Just thought I'd mention that so it isn't misinterpreted as if the fan only has two blades, as it looks in the picture. >_<
 
Top