the system is finally fixed!!! i've been waiting to post pictures since the 19th, so this is going to be another huge post. I'm posting under this account, Cann, now that I have access to it - hopefully this doesn't confuse anyone. So without further adieu
11/15 Cleaned flower tent, moved all known females from veg into flower tent but light cycle is still set at 18/6. 20 plants in the flower tent not 21 because what I thought was a female agent orange popped a nut so I cut it. Here are the stats: put 50 seeds in towels, 48 germinated, about 43 actually surfaced and continued to grow. After a month there were 38 (107 degree day did some damage from which a few didnt recover) One of them was crazy stunted and growing horribly so I culled it a few weeks back, leaving 37 as the final count. Not the greatest, but its better than nothin

and luckily the strains I am really interested in had a lot of survivors so that is good. The count is as follows:
3 Plushberry, 1 Jillybean, 2 Kaboom, 1 Agent, 2 Qush, 2 Jack the Ripper, 4 The Flav, 3 Ace of Spades, 1 Cheese Quake, 1 Space Bomb, 1 Mystery that is one of the ten, I just lost the label at some point. To me it looks like a Plushberry or Space Bomb, very unsure though. I guess we will find out soon enough
They are all currently under a 600 MH and a 600 HPS, both air-cooled hoods so they are about 2 feet away from the canopy. Today I transplanted over 15 of the ladies into their final 17.5L (4.6 gal) air pots, some are still in 5L (1.3 gal) air pots, and some are in 3-4 gallon Plant Warrior pots that I got for free and want to compare vs. the air pots. Sprinkled Oregonism on the roots of course and watered with RO water as always. I need to pickup a good pH and ppm meter for reading runoff and measuring nutrient levels, just need to get the $$$ first. Thinking all should be roughly in line though as I am using strictly RO water and feeding nutrients once a week or less. Spotted a few thrips and fucking whiteflies, so I went down to the hydro store to pick up some azamax, but when I told the dude I was using azamax on thrips he said it wouldnt kill them, and gave me a product called ENDALL (USDA Organic listed of course). I sprayed ENDALL as per the instructions on both rooms, although I may have applied a tiny bit too much because it was dripping off the leaves and the instructions said not to let that happen... Also the instructions said to apply it before a dry period so it doesnt get washed off, so I left it on the leaves for a few days. Currently no thrips or whiteflies visible, we will see what happens in a few days.
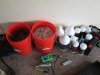
11/16 Decided it was time for a project. Been thinking about buying an EZ Cloner, but they are way too overpriced for my liking, so I decided to make a DIY version. Went to Home Depot, Walmart, and the hydro store and picked up:
10 of ½ PVC
(4) ½ PVC elbows
(3) ½ PVC Ts
(1) PVC threaded male to ½ female adapter (for connecting to the pump)
(20) 360 degree misting sprayers
255 Gallon water pump
Air pump, air line, air stones
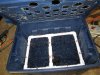
14 Gallon Rubbermaid tote
(35) neoprene EZ Cloner inserts
Floating thermometer
I already had a drill and tin snips
Total cost was around $65 much better than the $200 that hydro stores charge for EZ cloners.
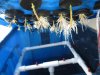
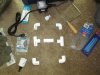
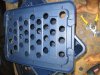
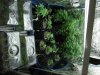
First, cut the PVC into pieces and assemble a rectangle with a bar across the middle using the 4 elbows and 3 Ts. Not sure how many inches etc. because I just eyeballed it. Then, with the center Ts hole facing down, drill 10 holes somewhat equally spaced in the top of the PVC. These holes should be just smaller than the diameter of your sprayers so that you can thread them successfully. Make sure not to go all the way through when you drill, only the top of the tube needs a hole. At this point you should disassemble the system and clean out all of the plastic bits, otherwise your misters will clog almost immediately. Once its clean reassemble everything and thread your misters into place. Add a piece of PVC (clean of plastic bits!) to act as a vertical stand for the rectangle. This piece will connect to the pump on the bottom of the tub and the T joint at the top. Make the piece long enough so that the misters are about 2 under where your cuts will be (for me this was 6). Clean out your tub so that there are no plastic bits left, attach the pump to the bottom with suction cups, and screw the male end of the adapter into the pump. Attach the vertical piece of PVC to the female end of the adapter as well as the T, and voila the lower part of the cloner is born. Hook up your air pump to some air stones and throw them in the water as well for extra aeration, as well as a thermometer to make sure the temps stay low enough. Now comes the actually hard part the lid. I chose to make a 35-site cloner, so I traced out 35 holes in my lid. Since my neoprene sleeves are 2 in diameter I made the holes 1 ¾ so the seal is watertight. Initially I tried using a 1 ¾ drill bit to make the holes but that ended up butchering the entire lid (try it youll see). After buying a new lid I decided that tin snips would do the job just fine, so I drilled some pilot holes within the 1 ¾ stencil so that I could start the cut with my snips. This worked beautifully, and after a bout an hour of meticulous cutting and forearm pain I had a functional, albeit ghetto looking lid. The holes were still quite jagged though, so I took a piece of jade I had lying around and smoothed them out (didnt have sandpaper or anything else really). After I was confident the holes wouldnt tear my neoprene sleeves to shreds, I popped the lid on the tote, strung my air lines and pump cord through one of the holes, and plugged it in. After making sure that it worked (which doesnt take long) I filled it up with cuts and checked for leaks. Might need one piece of duct tape but besides that everything is running great, water temperature is staying around 68, and all of the cuts are getting misted constantly. All in all about 3 hours of work, and $65 bucks now I just have to wait for roots! Hope this helps someone out there who is looking to build one of these for themselves.
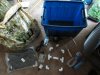
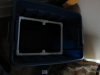
supplies
close up of PVC pieces
assembly in process
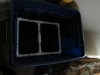
with misters in place

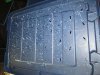
outlining sites
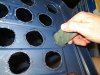
drilling pilot holes for tin snips
smoothing out holes
up and running!
add a drop or two of clonex to the res and you're ready for cuts

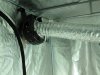
After all was said and done I walked into my flower room to find that my portable A/C unit for some reason had leaked all over the floor in the tent to the point where there was about a half inch of standing water in most places. God damnit. Spent about two hours in there with fans/towels/shopvac to get it all dry. Readjusted the A/C and cleaned the air intake, hoping this fixes the problem.
 11/17
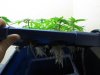
11/17 Last night I switched the lights in the flower room to 12/12. Tired of waiting to see my phenos!!! Decided after a bunch of research that F1 cuttings of these seed ladies wont be any less potent genetically, and since my cuts have mostly rooted I feel safe flipping the lights (could always take a cut into flower but dont need the added stress). There are still a few waiting to show sex in the veg room (one Qush, one JTR), and once they do they will either get chopped or put into the flower tent. I came in to the flower tent this morning to check on the ladies and found that the floor was again flooded by the A/C! This better not continue otherwise I wasted upwards of $300 on this unit
Im hoping that it has to do with the high humidity outside, because there are two hoses (one for intake, one exhaust) so if the machine is drawing in very humid air then it has to get rid of that moisture somehow. We will see if the condition improves. Also, the ENDALL I sprayed is definitely burning the leaves or doing something to them they are turning weird mottled colors in certain places. Washed it off fully today with RO water, hoping it didnt damage them too much. Shoulda stuck with neem
everything else I use always burns my ladies!!!!
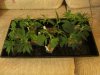
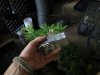
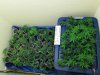
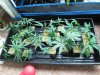
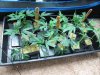
Bought some more party cups and had a planting festival with all of my rooted F1 cuts as well as momma cuts. Sprinkled Oregonism on the roots, then potted straight into Roots 707 Soil and watered with RO water/super plant tonic. About 50 total if you include the males, which will soon be gone. Some of the females look much better than others, so in a few weeks the healthy ones will stay and the rest will become compost, as long as I have one of each pheno to become my new mom.
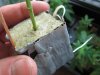
crazy roots!
cuts and A/C shot after lights went out

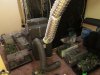
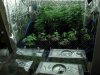
looking into the flower room
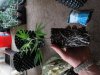
into the smart pot you go!
 11/19
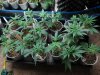
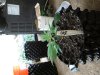
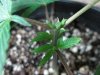
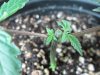
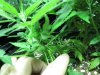
11/19 ENDALL leaves are looking a bit better, they are definitely not getting worse. Transplanted the 3 ladies that are in 5L air pots into their final 17.5L air pots. Dont think I need to describe my transplanting method anymore J its always the same. Roots in air pots look so healthy and awesome! Watered them with RO water, and then gave the rest of the ladies in the tent their first bloom feeding 3 tsp/gal Roots Buddha Grow, 1 1/3 TBSP/gal Roots Buddha Bloom, 3 tsp Roots elemental. About 5 gallons spread through 17 plants, so it wasnt that heavy of a feeding. Gave them all a bit of RO water as well afterwards just to make sure they were satisfied. Plants in the air pots seem to be really thirsty. I swear to god some of these ladies have grown 2 inches in the last 2 days, especially the Jillybean! Definitely a C99 leaning pheno, I might have to top it or LST. What do yall think? I like LST but she has 3 leaf sets that look like they would become 3 beautiful colas if I just topped her traditionally (even though I am a fan of FIM myself).
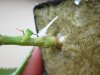
11/21 Cuts in aero cloner starting to show roots
")
Mixed up a compost tea of RO water, super plant tonic, roots Buddha grow, roots Elemental, and Molasses. Currently using a home depot bucket as the vessel, with a $10 air pump and air stone for aeration. Giving the tea a day or two to stabilize and for microorganisms to reach peak beneficial levels. Decided to try my hand at mainlining a few of the F1 cuts, so a Qush and a Plushberry were selected and chopped. One of them I chopped on the 2nd node, the other on the 3rd node. Not sure which one was correct (I think the one on the 3rd node which was the Plushberry) but we will see how they react. Trimmed up the bottoms of my mommas and the ladies in the flower room. Figured it'll improve air flow and reduce the chance of PM, etc.
so fast!


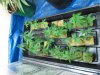
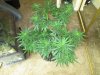
flower room
 11/22
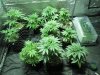
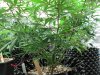
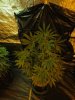
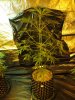
11/22 Happy Thanksgiving!! Giving thanks to my ladies for everything they do. Glad I was sending them good vibes cause I walked into veg room today and it was 93 degrees! Upon further inspection the A/C appears to be dead. The exhaust fan isnt spinning, although the compressor still kicks on for a second but then turns off. Luckily I have a spare sitting around, so I swapped the units out real fast and got the temps back down to 75 in about an hour. No idea how long it had been dead, hopefully no more than 5 hours. Thinking I may have killed it because the exhaust is connected to ducting that runs 10+ feet towards the roof, so the little exhaust fan inside the unit was facing a lot of resistance, and it was running like 22/7 for months. Because of this, I rearranged the setup so that there is a 6 435 cfm inline fan in the ceiling pulling the exhaust out of the unit. I am hoping this will keep my other unit alive for a long time, because I dont have the $$$ to buy more portable A/Cs. Tied down the Jillybean in the flower room, she is stretching like crazy so I need to do something to stop her.
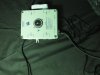
11/23 Black Friday deals at the hydro store today. Spent way too much money, but it will all be worth it in a few months J Came home with a carbon filter (Can-filter 75) two 8 745cfm inline fans, 25 of 8 ducting, C.A.P. AIR-4 Temperature, Humidity, and CO2 controller, 5 more 5L air pots, a pH meter as well as a TDS meter, two 16 oscillating fans, and a whole bunch of roots organic nutes. Just finished setting it all up, hence me posting this at 4 in the morning

Gotta do late night work when the lights are on at night. Jilly has responded very well to being tied down, need to do the same to a few other plants that are stretching. The one agent female I have is definitely extremely sativa dominant cause it is shooting up quicker than almost anyone else. Check the pictures from a few days ago and you will see that she was shorter than the A/C unit, and now she is towering above it. Saw a whitefly or two and a few thrips while I was setting stuff up, going to spray neem tomorrow. Im trying to let the leaves rest after the ENDALL incident, the old leaves are still not looking too hot. What a pain in the ass. Waiting to use my other compost tea before I start another, but here are the nutes I am planning on using for the next few weeks:
Roots Trinity
Roots Ancient Amber
Roots Extreme Serene
Roots Elemental
Roots HPK
Roots HP2
Roots Buddha Bloom
Roots Buddha Grow
Roots Oregonism XL
Humboldts Own Bushmaster
Super Plant Tonic
Hoping to get good results
Shouldn't be hard with these genetics!
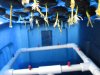
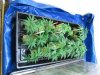
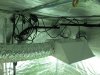
Had to rip my tent to get my carbon filter through the door of the room (my tent is squeezed within a room), but it's a small price to pay for odorless exhaust. Hooked it up to an 8'' inline fan and vented it up into the attic. Hooked up my other 8'' inline fan to a set of 3 air cooled hoods. Now I have all 7 hoods hanging, 6 of which are connected to fans and one which is currently not connected to anything. Only 4 of the lights are running, with plants positioned accordingly. As they fill out and I bring more plants in I will turn on the rest of the lights. Will try to get pictures of the setup next time
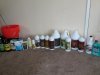
full nute lineup
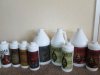
main nutes
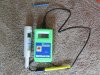
pH and TDS meters

flower room shot w AIR 4 hanging in the corner


carbon filter

jilly a day after being tied down
k thats it for now - need to get to bed. let me know what y'all think. peace


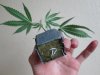

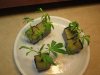
 Wish i had a better camera to show y'all how dank this is. Smell is delicious and sweet - unlike anything I have ever smelt before even other permafrost. May have to do with the fact that it was cured and then put straight into a Herb Preserve jar, which has kept that shit fresh and delicious for months.
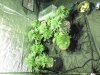


 ) and even though i sprayed the area down with hydrogen peroxide and culled the infected plants I am afraid it will transfer to my new cuts. Might get some PM wash from the hydro store and spray a light dillution on the cuts. anyone have experience with this? just trying to avoid losing these great genetics. Once they go into my real rooms there won't be any concern because the humidity is always below 40% (yay desert) but for now the humidity is kinda high in the bathroom even with fans exchanging air (which also ruins the quarantine cause it blows mildew spores everywhere). anyone with suggestions?