one light one plant one pound....

horribleherk

Well-Known Member
I'm running 2 gallon Tupur buckets in ebb n flow tables at a friend's house, we're growing for his wife who has stage 4 bray cancer.

This is very possibly the lowest effort setup I've ever laid eyes on; the runts don't drown and the big ones never dry out, EC and pH are very stable and I don't need to touch the res more than once a week!
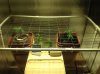
before I moved I was using coco / perlite 60%coco & 40% perlite I liked the botanicare coco both brick & bag in 2 gal. smart pots I would feed at about 5.6 & flood daily on a timer about 4 days later the ph. would creep up to about 6.3-6.6 & I would top off & lower ph. I liked that because I covered a range of ph. instead of just sitting at one ph. level when I tried the roots organic coco that was buffered & had cal mag already in it I didn't like the results e&f has been so far the easiest for me especially with multiple plants
 

horribleherk

Well-Known Member
I'd like to see that when you get around to it.
these are ones I built & grew tomatoes outdoors last summer using waste nutes from my indoor grow I duplicated the drip column &I just used a single discharge line at the base of the plant so easy & cheap to build I won't buy another one I had a thread in the gardening anything but weed called tidy-cat hydro the junky one worked as good as the fancy one IMG_0345.JPG
 

sgrowdum

Well-Known Member
these are ones I built & grew tomatoes outdoors last summer using waste nutes from my indoor grow I duplicated the drip column &I just used a single discharge line at the base of the plant so easy & cheap to build I won't buy another one I had a thread in the gardening anything but weed called tidy-cat hydro the junky one worked as good as the fancy one View attachment 3859152

Love the DIY stuff. It always seems to work out better since your tailoring it. one feature I've never seen on a bucket system that I think should be there is a sump drain on each one. I mean it cant be hard to manufacture a bucket with a little catch sump at the bottom.. Seems like it would solve a lot of issues. I'm curious why you drip ring feed over simply flooding?
 

sgrowdum

Well-Known Member
please feel free to be part of the conversation here wherever it may go sharing the experience is what I think makes the world go around without even knowing it you may have provided someone with some useful advice they can use now or later on

Happy to read this. I completely agree.
 

horribleherk

Well-Known Member
1 present is mine can you guess which one? lol! View attachment 3859167
forgot the stocking stuffer!
Love the DIY stuff. It always seems to work out better since your tailoring it. one feature I've never seen on a bucket system that I think should be there is a sump drain on each one. I mean it cant be hard to manufacture a bucket with a little catch sump at the bottom.. Seems like it would solve a lot of issues. I'm curious why you drip ring feed over simply flooding?
i think you could take one of those hot air guns (the kind like a blow dryer on steroids) &warm up the bottom of your bucket & stretch or concave a low spot in the location you choose then use a through hull boat fitting like they use for live wells & bilge pumps as they are flat on the inside & would pretty much allow a complete drain
 

Attachments

bassman999

Well-Known Member
forgot the stocking stuffer!

i think you could take one of those hot air guns (the kind like a blow dryer on steroids) &warm up the bottom of your bucket & stretch or concave a low spot in the location you choose then use a through hull boat fitting like they use for live wells & bilge pumps as they are flat on the inside & would pretty much allow a complete drain
I had a hot air gun from Harbor Freight tool blow up on the 2nd use.
Installing sound deadening in my trunk when it got louder and louder and started shooting sparks and fire. I havent bought a new one...
 

horribleherk

Well-Known Member
I had a hot air gun from Harbor Freight tool blow up on the 2nd use.
Installing sound deadening in my trunk when it got louder and louder and started shooting sparks and fire. I havent bought a new one...
typical harbor freight quality & the craftsman quality is on a downward spiral hopefully I run into one at a yard sale I had a harbor freight one as well with the same result
 

bassman999

Well-Known Member
typical harbor freight quality & the craftsman quality is on a downward spiral hopefully I run into one at a yard sale I had a harbor freight one as well with the same result
I tripped out as it was shooing sparks and flames at my inner trunk with all my audio equipment.
Decided that day no more electronic crap from HF.
Sucks you can buy quality stuff much anymore
 

ttystikk

Well-Known Member
Im thinking of trying this out on a future grow.

Fuck ya.

I'm building a slightly larger size system; I'm using ten gallon Rubbermaid tubs with a hole in the bottom sized to accept an 8" netpot bucket lid.

The tubs sit on bricks so the netpot hangs beneath and all that sits inside a 27 gallon tub. The larger tubs are connected together RDWC style and I'll circulate nutrient solution through them.

Exactly the same concept, though; SIPS with a soil wick.
 

horribleherk

Well-Known Member
it's been 5 days ppm holding @ 390 ph. @ 6.2 they are above the drip rings so I gave them their first topping my light has 2 rows of cobe at 3 cobs each each row has a switch that controls 3 cobs I alternate each day today I noticed each plant is slightly larger , not taller or new branches just larger all the way around I'm thinking they're about to start waking up & giving me some growth getting ready to order some seeds hso has some good looking offerings that come in 3-packs & I want kandy kush I've had good results running r-p /DNA stuff IMG_0355.JPGIMG_0356.JPG IMG_0357.JPG
 

horribleherk

Well-Known Member
finally finished my trimming difinatly gonna prune off all the smaller popcorn generating stuff this next grow its such a bitch to trim final weight 7-1/4 oz. less than half of what I was shooting for & way smaller nugs even for an og type plant but you know what there is better to be had &I I'm gonna tap into it all in all I had a good time with this grow as I will the next one as well almost doubled my last grow this little light is capable of more than I'm getting IMG_0358.JPG
 

horribleherk

Well-Known Member
trial fitted the new Scrog (modified the old one) to fit the footprint of my light it's 43in.x 30in. the 1/2in. pvc risers are made to fit by cutting to length & coupling to the risers no glue is used there for that reason hopefully these changes put me in the ball-park of where I want to be & I can focus on strain choice also gonna open the squares in the wire to 4in. X 4in. as the smaller openings in the last screen resulted in broken limbs IMG_0363.JPGIMG_0362.JPG IMG_0361.JPG
 

ItalianMike

Member
finally finished my trimming difinatly gonna prune off all the smaller popcorn generating stuff this next grow its such a bitch to trim final weight 7-1/4 oz. less than half of what I was shooting for & way smaller nugs even for an og type plant but you know what there is better to be had &I I'm gonna tap into it all in all I had a good time with this grow as I will the next one as well almost doubled my last grow this little light is capable of more than I'm getting View attachment 3859859
Nice Herc.
How dense are the nugs?

Sure wish you had a high res camera Id love to be able to see your harvest up close.
 

horribleherk

Well-Known Member
Nice Herc.
How dense are the nugs?

Sure wish you had a high res camera Id love to be able to see your harvest up close.
the nugs are fairly dense but what they lacked in density they more than make up for in stickiness this is one of the more sticky strains I've ran across this grow will really tell the story as it will be led start to finish & this time I'll have a Scrog I made for this light &not a 400hps
 
Top